Dell PowerVault TL4000 Dell Model TL2000/TL4000 Tape Library- User's Guide - Page 82
Entering User Access Information using the Web User Interface, Enable Stateless Auto Config - default login
 |
View all Dell PowerVault TL4000 manuals
Add to My Manuals
Save this manual to your list of manuals |
Page 82 highlights
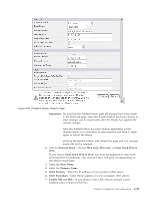
Note: If you get a security certificate alert when logging in to the Web User Interface, you can install the certificate or allow an exception (depending on the internet browser you are using). SSL is enabled when the URL begins with https:// and some browsers will show a lock. 8. Ethernet Settings - Ethernet Settings choices are: Auto (the default), 10 Mbit/Half, 10 Mbit/Full, 100 Mbit/Half, 100 Mbit/Full. Please refer to http://support.dell.com to determine the availability of manual Ethernet settings in your library's firmware. 9. Enter IPv4 settings (if applicable). a. Enable DHCP - Click this item ON to have the IP Address of your library automatically set by the DHCP server. b. Static Address - Enter the assigned IPv4 address. The format of an IPv4 IP address is a 32-bit numeric address written as four numbers separated by periods. c. Network Mask - Enter the assigned IPv4 Network Mask. d. Gateway address - Enter the assigned IPv4 Gateway address. This address allows access outside the local network. 10. Enter IPv6 settings (if applicable). a. Enable DHCP - Click this item ON to have the IP Address of your library automatically set by the DHCP server. b. Enable Stateless Auto Config - Stateless Auto config is ALWAYS on (not defeatable). c. Static Address - Enter the assigned IPv6 address. The format of an IPv6 IP address is a 128-bit numeric address written as 8 groups of four numbers separated by colons. d. Prefix length - The default prefix length is set to 64, but can be set to any length, depending upon the address used. e. Gateway address - Enter the assigned IPv6 Gateway address. This address allows access outside the local network. 11. Click one of the following: v Refresh - to cancel the changes made to the screen. v Submit - to apply the changes made to the screen. Note: Depending on the changes made, you will either be disconnected and need to login again, or reboot the library. If a reboot is required, the following Warning message will appear after the Submit button is clicked. Figure 4-27. Warning Screen The library must be rebooted or the changes will not take place. Entering User Access Information using the Web User Interface The Configure Library → User Access page is only accessible to the Admin and Service login. Access is denied to User and Superuser logins. 4-26 Dell PowerVault TL2000 Tape Library and TL4000 Tape Library User's Guide
-
 1
1 -
2
-
3
-
4
-
5
-
6
-
7
-
8
-
9
-
10
-
11
-
12
-
13
-
14
-
15
-
16
-
17
-
18
-
19
-
20
-
21
-
22
-
23
-
24
-
25
-
26
-
27
-
28
-
29
-
30
-
31
-
32
-
33
-
34
-
35
-
36
-
37
-
38
-
39
-
40
-
41
-
42
-
43
-
44
-
45
-
46
-
47
-
48
-
49
-
50
-
51
-
52
-
53
-
54
-
55
-
56
-
57
-
58
-
59
-
60
-
61
-
62
-
63
-
64
-
65
-
66
-
67
-
68
-
69
-
70
-
71
-
72
-
73
-
74
-
75
-
76
-
 77
77 -
 78
78 -
 79
79 -
 80
80 -
 81
81 -
 82
82 -
 83
83 -
 84
84 -
 85
85 -
 86
86 -
 87
87 -
88
-
89
-
90
-
91
-
92
-
93
-
94
-
95
-
96
-
97
-
98
-
99
-
100
-
101
-
102
-
103
-
104
-
105
-
106
-
107
-
108
-
109
-
110
-
111
-
112
-
113
-
114
-
115
-
116
-
117
-
118
-
119
-
120
-
121
-
122
-
123
-
124
-
125
-
126
-
127
-
128
-
129
-
130
-
131
-
132
-
133
-
134
-
135
-
136
-
137
-
138
-
139
-
140
-
141
-
142
-
143
-
144
-
145
-
146
-
147
-
148
-
149
-
150
-
151
-
152
-
153
-
154
-
155
-
156
-
157
-
158
-
159
-
160
-
161
-
162
-
163
-
164
-
165
-
166
-
167
-
168
-
169
-
170
-
171
-
172
-
173
-
174
-
175
-
176
-
177
-
178
-
179
-
180
-
181
-
182
-
183
-
184
-
185
-
186
-
187
-
188
-
189
-
190
-
191
-
192
-
193
-
194
-
195
-
196
-
197
-
198
-
199
-
200
-
201
-
202
-
203
-
204
-
205
-
206
-
207
-
208
-
209
-
210
-
211
-
212
-
213
-
214
-
215
-
216
-
217
-
218
-
219
-
220
-
221
-
222
-
223
-
224
-
225
-
226
-
227
-
228
-
229
-
230
-
231
-
232
-
233
-
234
-
235
-
236
-
237
-
238
-
239
-
240
-
241
-
242
-
243
-
244
-
245
-
246
-
247
-
248
-
249
-
250
-
251
-
252
-
253
-
254
-
255
-
256
-
257
-
258
-
259
-
260
-
261
-
262
-
263
-
264
-
265
-
266
-
267
-
268
-
269
-
270
-
271
-
272
-
273
-
274
-
275
-
276
-
277
-
278
-
279
-
280
-
281
-
282
-
283
 |
 |