Dell PowerVault TL4000 Dell Model TL2000/TL4000 Tape Library- User's Guide - Page 211
Replacing a Library Controller Card, Read Me before Continuing
 |
View all Dell PowerVault TL4000 manuals
Add to My Manuals
Save this manual to your list of manuals |
Page 211 highlights
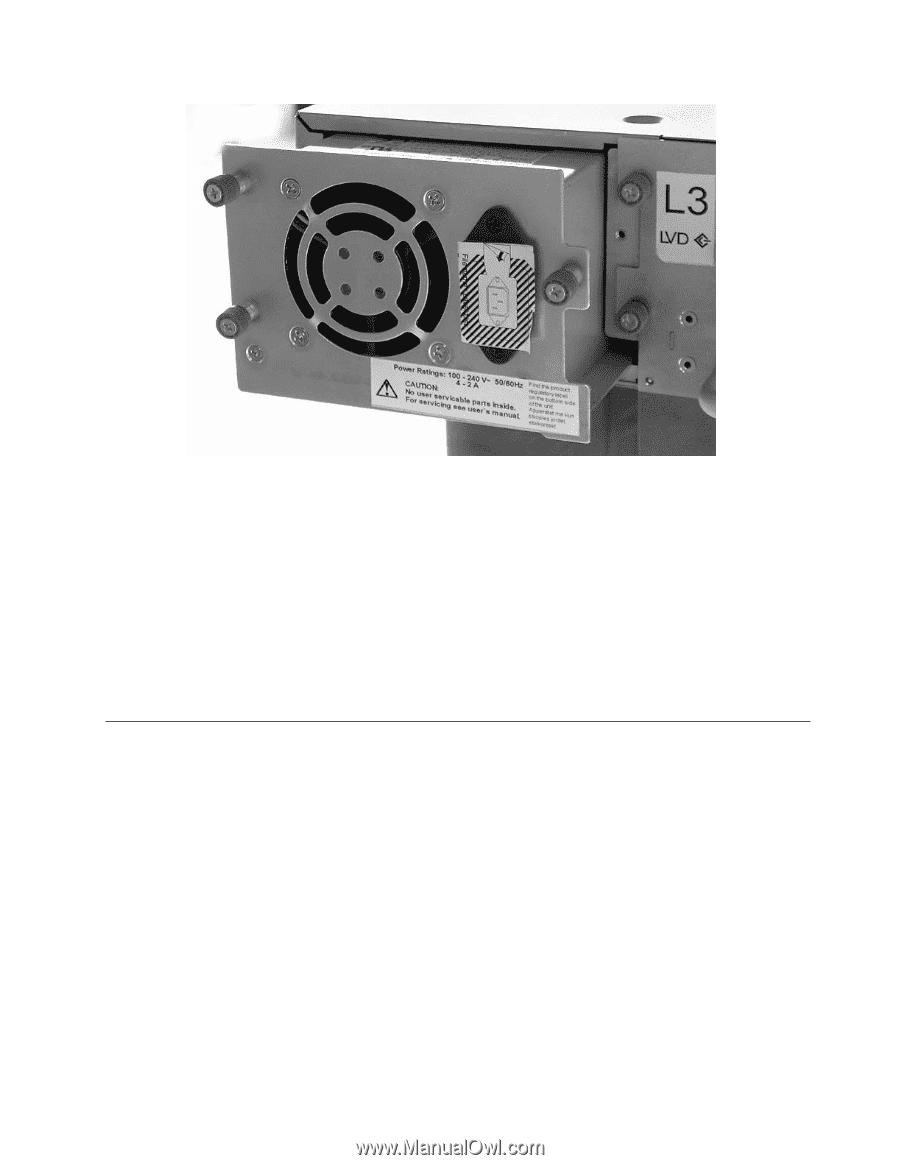
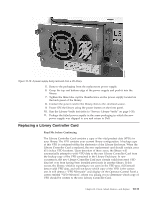
a66mi096 Figure 10-10. A power supply being removed from a 2U library 5. Remove the packaging from the replacement power supply. 6. Grasp the top and bottom edge of the power supply and push it into the library. 7. Tighten the three blue captive thumbscrews on the power supply located on the back panel of the library. 8. Connect the power cord to the library, then to the electrical source. 9. Power ON the library using the power button on the front panel. 10. Run the Library Verify test (refer to "Service: Library Verify" on page 5-30). 11. Package the failed power supply in the same packaging in which the new power supply was shipped to you and return to Dell. Replacing a Library Controller Card Read Me before Continuing The Library Controller Card contains a copy of the vital product data (VPD) for your library. The VPD contains your current library configuration. A backup copy of this VPD is contained within the electronics of the Library Enclosure. When the Library Controller Card is replaced, the new replacement card should contain zeros (0's) in key VPD locations. Upon detection of these zeros, the library will automatically attempt to write VPD data to the new Library Controller Card from the backup copy of the VPD contained in the Library Enclosure. In rare occurrences, the new Library Controller Card may contain valid (non-zero) VPD data left over from having been installed previously in another library. If this occurs, the library, which is expecting to see zeros in the VPD area, will instead detect valid VPD data, and will not know which copy of the VPD is the correct one. It will detect a "VPD Mismatch" and display on the Operator Control Panel a screen entitled "VPD Selection", where it is asking you to determine which copy of VPD should be written to the new Library Controller Card. Chapter 10. Check, Adjust, Remove, and Replace 10-11
-
 1
1 -
2
-
3
-
4
-
5
-
6
-
7
-
8
-
9
-
10
-
11
-
12
-
13
-
14
-
15
-
16
-
17
-
18
-
19
-
20
-
21
-
22
-
23
-
24
-
25
-
26
-
27
-
28
-
29
-
30
-
31
-
32
-
33
-
34
-
35
-
36
-
37
-
38
-
39
-
40
-
41
-
42
-
43
-
44
-
45
-
46
-
47
-
48
-
49
-
50
-
51
-
52
-
53
-
54
-
55
-
56
-
57
-
58
-
59
-
60
-
61
-
62
-
63
-
64
-
65
-
66
-
67
-
68
-
69
-
70
-
71
-
72
-
73
-
74
-
75
-
76
-
77
-
78
-
79
-
80
-
81
-
82
-
83
-
84
-
85
-
86
-
87
-
88
-
89
-
90
-
91
-
92
-
93
-
94
-
95
-
96
-
97
-
98
-
99
-
100
-
101
-
102
-
103
-
104
-
105
-
106
-
107
-
108
-
109
-
110
-
111
-
112
-
113
-
114
-
115
-
116
-
117
-
118
-
119
-
120
-
121
-
122
-
123
-
124
-
125
-
126
-
127
-
128
-
129
-
130
-
131
-
132
-
133
-
134
-
135
-
136
-
137
-
138
-
139
-
140
-
141
-
142
-
143
-
144
-
145
-
146
-
147
-
148
-
149
-
150
-
151
-
152
-
153
-
154
-
155
-
156
-
157
-
158
-
159
-
160
-
161
-
162
-
163
-
164
-
165
-
166
-
167
-
168
-
169
-
170
-
171
-
172
-
173
-
174
-
175
-
176
-
177
-
178
-
179
-
180
-
181
-
182
-
183
-
184
-
185
-
186
-
187
-
188
-
189
-
190
-
191
-
192
-
193
-
194
-
195
-
196
-
197
-
198
-
199
-
200
-
201
-
202
-
203
-
204
-
205
-
 206
206 -
 207
207 -
 208
208 -
 209
209 -
 210
210 -
 211
211 -
 212
212 -
 213
213 -
 214
214 -
 215
215 -
 216
216 -
217
-
218
-
219
-
220
-
221
-
222
-
223
-
224
-
225
-
226
-
227
-
228
-
229
-
230
-
231
-
232
-
233
-
234
-
235
-
236
-
237
-
238
-
239
-
240
-
241
-
242
-
243
-
244
-
245
-
246
-
247
-
248
-
249
-
250
-
251
-
252
-
253
-
254
-
255
-
256
-
257
-
258
-
259
-
260
-
261
-
262
-
263
-
264
-
265
-
266
-
267
-
268
-
269
-
270
-
271
-
272
-
273
-
274
-
275
-
276
-
277
-
278
-
279
-
280
-
281
-
282
-
283
 |
 |