Dell PowerVault TL4000 Dell Model TL2000/TL4000 Tape Library- User's Guide - Page 182
Isolating Host Attachment Interface Problems, Identifying a Suspect Cartridge, Service, Library
 |
View all Dell PowerVault TL4000 manuals
Add to My Manuals
Save this manual to your list of manuals |
Page 182 highlights
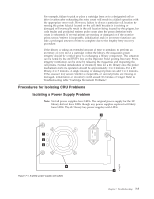
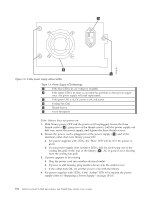
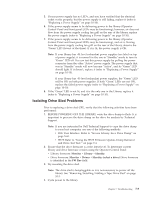
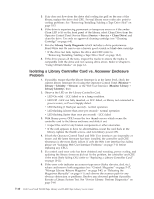
4. If the labels are still not being read properly, please contact Dell technical support. Isolating Host Attachment Interface Problems After successfully exercising "Isolating Drive Sled Problems", and more specifically the "Library Verify" diagnostic on the Operator Control Panel (Service → Library Verify) which includes a drive (or drives) read/write diagnostic, the following procedures are suggested to help isolate the failure to properly establish connectivity to the Host Bus Adapter (HBA). 1. Use the utility, ITDT, to evaluate connectivity from the HBA through the cabling to the drive (or drives). ITDT does not require separate device drivers, thus the Operating System has the ability to scan and find all the LTO devices that are attached. If ITDT cannot successfully locate the LTO drive, suspect cabling or HBA problems, and skip step 2. If ITDT successfully located the LTO drive, proceed to step 2. See "Using the ITDT Firmware Update, Dump Retrieval and Drive Test Tool " on page 9-4 for a brief description of ITDT and instructions on how to download the tool from the web. 2. If ITDT successfully locates the LTO device(s), verify that the correct application device drivers and backup application software is properly installed. 3. Ensure that all the required or latest available Operating System files and/or updates (dll's, PTF's, etc.) have been installed and applied. Identifying a Suspect Cartridge The amber Attention LED will be lit on the front panel of the library when there has been a failure that indicates a piece of media is bad, marginal, or invalid. It will be cleared when all invalid cartridges have been exported from the library. Note: The amber LED may also be lit because a power supply, or a power supply fan is failing. Refer to "Isolating a Power Supply Problem" on page 7-7. 1. Identify the media using the Web User Interface (Monitor Library → Inventory). Expand the cartridge details for each magazine and look for media status in the Attn column of the inventory table. 2. Make note of the cartridge location (Slot #) and VOLSER (Label) in the inventory table. 3. To remove the cartridge from the library: a. Using the web, select Manage Library → Move Media. If the cartridge is not in an I/O Station slot, move the cartridge to an I/O Station slot. b. Using the OCP, select Control → Open I/O Station. 4. Remove cartridge. If cartridge was reported as Bad, properly dispose the cartridge. 5. Close the I/O Station. If the amber LED was lit because of bad media, the Attention LED will turn OFF. If the amber LED is still on, check the power supply or the power supply fans. See "Isolating a Power Supply Problem" on page 7-7. 7-12 Dell PowerVault TL2000 Tape Library and TL4000 Tape Library User's Guide
-
 1
1 -
2
-
3
-
4
-
5
-
6
-
7
-
8
-
9
-
10
-
11
-
12
-
13
-
14
-
15
-
16
-
17
-
18
-
19
-
20
-
21
-
22
-
23
-
24
-
25
-
26
-
27
-
28
-
29
-
30
-
31
-
32
-
33
-
34
-
35
-
36
-
37
-
38
-
39
-
40
-
41
-
42
-
43
-
44
-
45
-
46
-
47
-
48
-
49
-
50
-
51
-
52
-
53
-
54
-
55
-
56
-
57
-
58
-
59
-
60
-
61
-
62
-
63
-
64
-
65
-
66
-
67
-
68
-
69
-
70
-
71
-
72
-
73
-
74
-
75
-
76
-
77
-
78
-
79
-
80
-
81
-
82
-
83
-
84
-
85
-
86
-
87
-
88
-
89
-
90
-
91
-
92
-
93
-
94
-
95
-
96
-
97
-
98
-
99
-
100
-
101
-
102
-
103
-
104
-
105
-
106
-
107
-
108
-
109
-
110
-
111
-
112
-
113
-
114
-
115
-
116
-
117
-
118
-
119
-
120
-
121
-
122
-
123
-
124
-
125
-
126
-
127
-
128
-
129
-
130
-
131
-
132
-
133
-
134
-
135
-
136
-
137
-
138
-
139
-
140
-
141
-
142
-
143
-
144
-
145
-
146
-
147
-
148
-
149
-
150
-
151
-
152
-
153
-
154
-
155
-
156
-
157
-
158
-
159
-
160
-
161
-
162
-
163
-
164
-
165
-
166
-
167
-
168
-
169
-
170
-
171
-
172
-
173
-
174
-
175
-
176
-
 177
177 -
 178
178 -
 179
179 -
 180
180 -
 181
181 -
 182
182 -
 183
183 -
 184
184 -
 185
185 -
 186
186 -
 187
187 -
188
-
189
-
190
-
191
-
192
-
193
-
194
-
195
-
196
-
197
-
198
-
199
-
200
-
201
-
202
-
203
-
204
-
205
-
206
-
207
-
208
-
209
-
210
-
211
-
212
-
213
-
214
-
215
-
216
-
217
-
218
-
219
-
220
-
221
-
222
-
223
-
224
-
225
-
226
-
227
-
228
-
229
-
230
-
231
-
232
-
233
-
234
-
235
-
236
-
237
-
238
-
239
-
240
-
241
-
242
-
243
-
244
-
245
-
246
-
247
-
248
-
249
-
250
-
251
-
252
-
253
-
254
-
255
-
256
-
257
-
258
-
259
-
260
-
261
-
262
-
263
-
264
-
265
-
266
-
267
-
268
-
269
-
270
-
271
-
272
-
273
-
274
-
275
-
276
-
277
-
278
-
279
-
280
-
281
-
282
-
283
 |
 |