Dell PowerVault TL4000 Dell Model TL2000/TL4000 Tape Library- User's Guide - Page 62
Important, Packaged in the small bag with no label - user manual
 |
View all Dell PowerVault TL4000 manuals
Add to My Manuals
Save this manual to your list of manuals |
Page 62 highlights
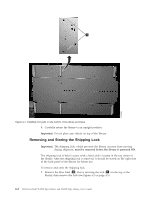
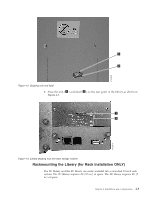
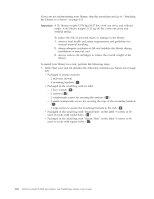
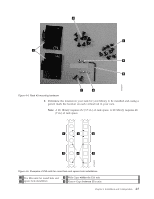
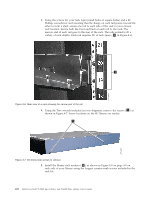
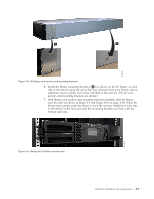
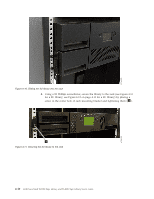
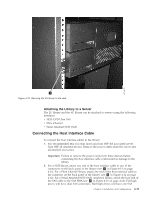
If you are not rackmounting your library, skip this procedure and go to "Attaching the Library to a Server" on page 4-11. Important: A 2U library weighs 15.59 kg (34.37 lbs.) with one drive and without media. A 4U library weighs 21.32 kg (47 lbs.) with one drive and without media. To reduce the risk of personal injury or damage to the library: 1. observe local health and safety requirements and guidelines for manual material handling, 2. obtain adequate assistance to lift and stabilize the library during installation or removal, and 3. always remove all cartridges to reduce the overall weight of the library. To install your library in a rack, perform the following steps. 1. Verify that your rack kit includes the following contents (see Figure 4-4 on page 4-7): v Packaged in plastic material: - 2 rails (not shown) - 2 mounting brackets ( 1 ) v Packaged in the small bag with no label: - 1 Torx wrench ( 5 ) - 2 anchors ( 4 ) - 2 countersunk screws for securing the anchors ( 6 ) - 2 small countersunk screws for securing the tops of the mounting brackets (7) - 2 large screws to secure the mounting brackets to the rack ( 8 ) v Packaged in the small bag with "Round Hole" on the label: 9 screws to be used on racks with round holes. ( 2 ) v Packaged in the small bag with "Square Hole" on the label: 9 screws to be used on racks with square holes. ( 3 ) 4-6 Dell PowerVault TL2000 Tape Library and TL4000 Tape Library User's Guide
-
 1
1 -
2
-
3
-
4
-
5
-
6
-
7
-
8
-
9
-
10
-
11
-
12
-
13
-
14
-
15
-
16
-
17
-
18
-
19
-
20
-
21
-
22
-
23
-
24
-
25
-
26
-
27
-
28
-
29
-
30
-
31
-
32
-
33
-
34
-
35
-
36
-
37
-
38
-
39
-
40
-
41
-
42
-
43
-
44
-
45
-
46
-
47
-
48
-
49
-
50
-
51
-
52
-
53
-
54
-
55
-
56
-
 57
57 -
 58
58 -
 59
59 -
 60
60 -
 61
61 -
 62
62 -
 63
63 -
 64
64 -
 65
65 -
 66
66 -
 67
67 -
68
-
69
-
70
-
71
-
72
-
73
-
74
-
75
-
76
-
77
-
78
-
79
-
80
-
81
-
82
-
83
-
84
-
85
-
86
-
87
-
88
-
89
-
90
-
91
-
92
-
93
-
94
-
95
-
96
-
97
-
98
-
99
-
100
-
101
-
102
-
103
-
104
-
105
-
106
-
107
-
108
-
109
-
110
-
111
-
112
-
113
-
114
-
115
-
116
-
117
-
118
-
119
-
120
-
121
-
122
-
123
-
124
-
125
-
126
-
127
-
128
-
129
-
130
-
131
-
132
-
133
-
134
-
135
-
136
-
137
-
138
-
139
-
140
-
141
-
142
-
143
-
144
-
145
-
146
-
147
-
148
-
149
-
150
-
151
-
152
-
153
-
154
-
155
-
156
-
157
-
158
-
159
-
160
-
161
-
162
-
163
-
164
-
165
-
166
-
167
-
168
-
169
-
170
-
171
-
172
-
173
-
174
-
175
-
176
-
177
-
178
-
179
-
180
-
181
-
182
-
183
-
184
-
185
-
186
-
187
-
188
-
189
-
190
-
191
-
192
-
193
-
194
-
195
-
196
-
197
-
198
-
199
-
200
-
201
-
202
-
203
-
204
-
205
-
206
-
207
-
208
-
209
-
210
-
211
-
212
-
213
-
214
-
215
-
216
-
217
-
218
-
219
-
220
-
221
-
222
-
223
-
224
-
225
-
226
-
227
-
228
-
229
-
230
-
231
-
232
-
233
-
234
-
235
-
236
-
237
-
238
-
239
-
240
-
241
-
242
-
243
-
244
-
245
-
246
-
247
-
248
-
249
-
250
-
251
-
252
-
253
-
254
-
255
-
256
-
257
-
258
-
259
-
260
-
261
-
262
-
263
-
264
-
265
-
266
-
267
-
268
-
269
-
270
-
271
-
272
-
273
-
274
-
275
-
276
-
277
-
278
-
279
-
280
-
281
-
282
-
283
 |
 |