Dell PowerVault TL4000 Dell Model TL2000/TL4000 Tape Library- User's Guide - Page 221
New library detected. Please, remove library power and insert Library Controller Card from old
 |
View all Dell PowerVault TL4000 manuals
Add to My Manuals
Save this manual to your list of manuals |
Page 221 highlights
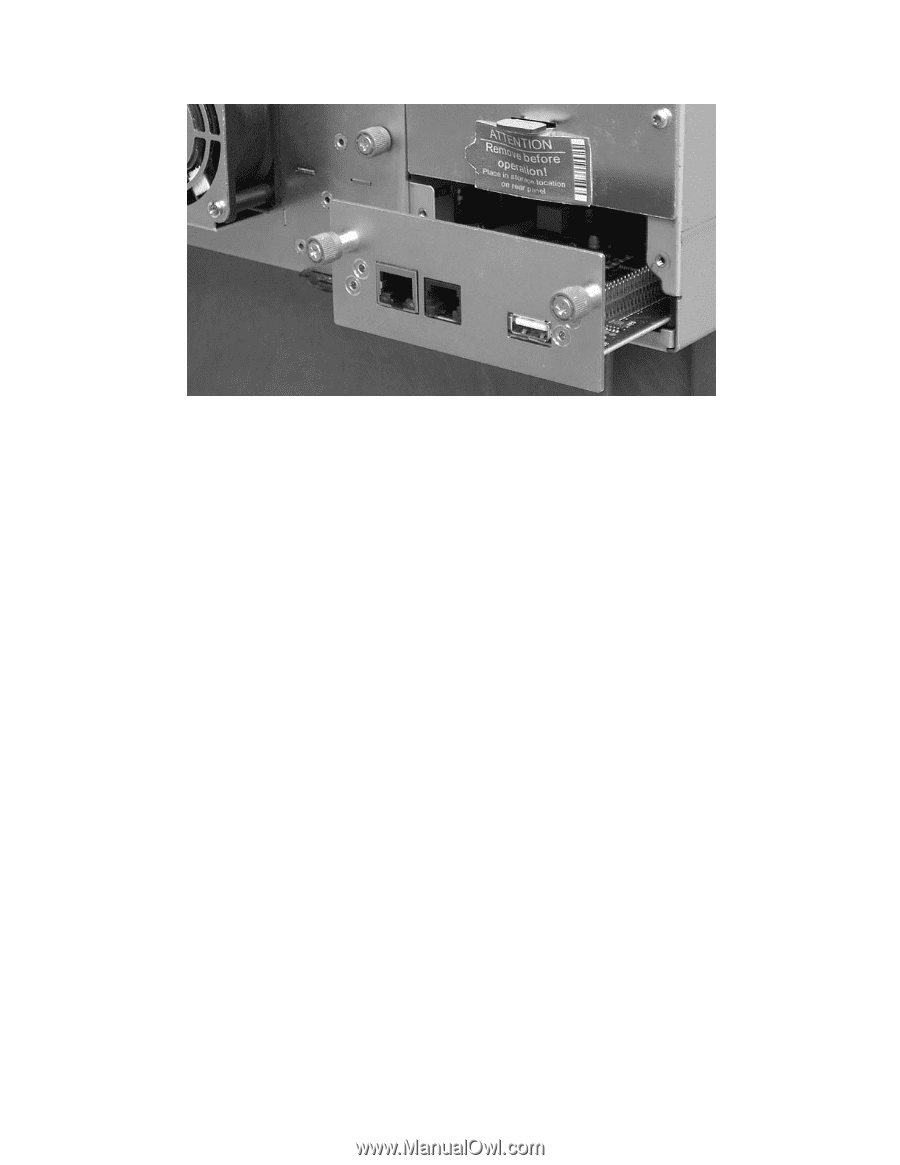
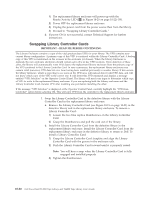
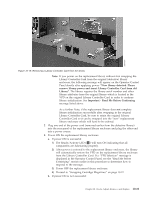
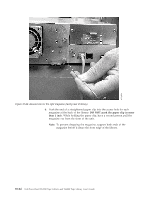
a66mi097 Figure 10-19. Removing a Library Controller Card from the library Note: If you power on the replacement library without first swapping the Library Controller Card from the original (defective) library enclosure, the following message will appear on the Operator Control Panel shortly after applying power: "New library detected. Please remove library power and insert Library Controller Card from old Library". The library requires the library serial number and other library attributes from the original library which is located in the VPD on the original Library Controller Card in order to continue library initialization. See Important - Read Me Before Continuing message listed above. As a further Note, if the replacement library does not complete library initialization successfully after swapping in the original Library Controller Card, be sure to retain the original Library Controller Card so it can be swapped into the "new" replacement library enclosure which will have to be ordered. 2. Plug one end of the power cord (removed earlier from the defective library) into the rear panel of the replacement library enclosure and plug the other end into a power source. 3. Power ON the replacement library enclosure. a. If power ON is successful: 1) The Ready/Activity LED ( 1 ) will turn ON indicating that all components are functioning properly. 2) After power is restored to the replacement library enclosure, the library will automatically restore the VPD on the replacement library enclosure from the Library Controller Card. If a "VPD Selection" message is displayed in the Operator Control Panel, see the "Read Me before Continuing" section earlier in this procedure to determine how to respond to the message. 3) Power OFF the replacement library enclosure. 4) Proceed to "Swapping Cartridge Magazines" on page 10-22. b. If power ON is not successful: Chapter 10. Check, Adjust, Remove, and Replace 10-21
-
 1
1 -
2
-
3
-
4
-
5
-
6
-
7
-
8
-
9
-
10
-
11
-
12
-
13
-
14
-
15
-
16
-
17
-
18
-
19
-
20
-
21
-
22
-
23
-
24
-
25
-
26
-
27
-
28
-
29
-
30
-
31
-
32
-
33
-
34
-
35
-
36
-
37
-
38
-
39
-
40
-
41
-
42
-
43
-
44
-
45
-
46
-
47
-
48
-
49
-
50
-
51
-
52
-
53
-
54
-
55
-
56
-
57
-
58
-
59
-
60
-
61
-
62
-
63
-
64
-
65
-
66
-
67
-
68
-
69
-
70
-
71
-
72
-
73
-
74
-
75
-
76
-
77
-
78
-
79
-
80
-
81
-
82
-
83
-
84
-
85
-
86
-
87
-
88
-
89
-
90
-
91
-
92
-
93
-
94
-
95
-
96
-
97
-
98
-
99
-
100
-
101
-
102
-
103
-
104
-
105
-
106
-
107
-
108
-
109
-
110
-
111
-
112
-
113
-
114
-
115
-
116
-
117
-
118
-
119
-
120
-
121
-
122
-
123
-
124
-
125
-
126
-
127
-
128
-
129
-
130
-
131
-
132
-
133
-
134
-
135
-
136
-
137
-
138
-
139
-
140
-
141
-
142
-
143
-
144
-
145
-
146
-
147
-
148
-
149
-
150
-
151
-
152
-
153
-
154
-
155
-
156
-
157
-
158
-
159
-
160
-
161
-
162
-
163
-
164
-
165
-
166
-
167
-
168
-
169
-
170
-
171
-
172
-
173
-
174
-
175
-
176
-
177
-
178
-
179
-
180
-
181
-
182
-
183
-
184
-
185
-
186
-
187
-
188
-
189
-
190
-
191
-
192
-
193
-
194
-
195
-
196
-
197
-
198
-
199
-
200
-
201
-
202
-
203
-
204
-
205
-
206
-
207
-
208
-
209
-
210
-
211
-
212
-
213
-
214
-
215
-
 216
216 -
 217
217 -
 218
218 -
 219
219 -
 220
220 -
 221
221 -
 222
222 -
 223
223 -
 224
224 -
 225
225 -
 226
226 -
227
-
228
-
229
-
230
-
231
-
232
-
233
-
234
-
235
-
236
-
237
-
238
-
239
-
240
-
241
-
242
-
243
-
244
-
245
-
246
-
247
-
248
-
249
-
250
-
251
-
252
-
253
-
254
-
255
-
256
-
257
-
258
-
259
-
260
-
261
-
262
-
263
-
264
-
265
-
266
-
267
-
268
-
269
-
270
-
271
-
272
-
273
-
274
-
275
-
276
-
277
-
278
-
279
-
280
-
281
-
282
-
283
 |
 |