Dell PowerVault TL4000 Dell Model TL2000/TL4000 Tape Library- User's Guide - Page 226
Proceed to Completing the Installation of the Replacement Library Enclosure
 |
View all Dell PowerVault TL4000 manuals
Add to My Manuals
Save this manual to your list of manuals |
Page 226 highlights
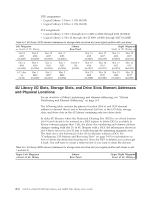
a77ug252 Figure 10-24. Mounting brackets and anchors for securing the library in a rack (one bracket and anchor on each side of the library) 2. With assistance, slide the replacement library enclosure onto the metal rails that are already in position in the rack (see Figure 10-25). Figure 10-25. Front view of rack showing screw placement 3. Tighten the mounting bracket screws ( 1 in Figure 10-12 on page 10-14) to anchor the replacement library enclosure to the rack. 4. Proceed to "Completing the Installation of the Replacement Library Enclosure" on page 10-27. 10-26 Dell PowerVault TL2000 Tape Library and TL4000 Tape Library User's Guide
-
 1
1 -
2
-
3
-
4
-
5
-
6
-
7
-
8
-
9
-
10
-
11
-
12
-
13
-
14
-
15
-
16
-
17
-
18
-
19
-
20
-
21
-
22
-
23
-
24
-
25
-
26
-
27
-
28
-
29
-
30
-
31
-
32
-
33
-
34
-
35
-
36
-
37
-
38
-
39
-
40
-
41
-
42
-
43
-
44
-
45
-
46
-
47
-
48
-
49
-
50
-
51
-
52
-
53
-
54
-
55
-
56
-
57
-
58
-
59
-
60
-
61
-
62
-
63
-
64
-
65
-
66
-
67
-
68
-
69
-
70
-
71
-
72
-
73
-
74
-
75
-
76
-
77
-
78
-
79
-
80
-
81
-
82
-
83
-
84
-
85
-
86
-
87
-
88
-
89
-
90
-
91
-
92
-
93
-
94
-
95
-
96
-
97
-
98
-
99
-
100
-
101
-
102
-
103
-
104
-
105
-
106
-
107
-
108
-
109
-
110
-
111
-
112
-
113
-
114
-
115
-
116
-
117
-
118
-
119
-
120
-
121
-
122
-
123
-
124
-
125
-
126
-
127
-
128
-
129
-
130
-
131
-
132
-
133
-
134
-
135
-
136
-
137
-
138
-
139
-
140
-
141
-
142
-
143
-
144
-
145
-
146
-
147
-
148
-
149
-
150
-
151
-
152
-
153
-
154
-
155
-
156
-
157
-
158
-
159
-
160
-
161
-
162
-
163
-
164
-
165
-
166
-
167
-
168
-
169
-
170
-
171
-
172
-
173
-
174
-
175
-
176
-
177
-
178
-
179
-
180
-
181
-
182
-
183
-
184
-
185
-
186
-
187
-
188
-
189
-
190
-
191
-
192
-
193
-
194
-
195
-
196
-
197
-
198
-
199
-
200
-
201
-
202
-
203
-
204
-
205
-
206
-
207
-
208
-
209
-
210
-
211
-
212
-
213
-
214
-
215
-
216
-
217
-
218
-
219
-
220
-
 221
221 -
 222
222 -
 223
223 -
 224
224 -
 225
225 -
 226
226 -
 227
227 -
 228
228 -
 229
229 -
 230
230 -
 231
231 -
232
-
233
-
234
-
235
-
236
-
237
-
238
-
239
-
240
-
241
-
242
-
243
-
244
-
245
-
246
-
247
-
248
-
249
-
250
-
251
-
252
-
253
-
254
-
255
-
256
-
257
-
258
-
259
-
260
-
261
-
262
-
263
-
264
-
265
-
266
-
267
-
268
-
269
-
270
-
271
-
272
-
273
-
274
-
275
-
276
-
277
-
278
-
279
-
280
-
281
-
282
-
283
 |
 |
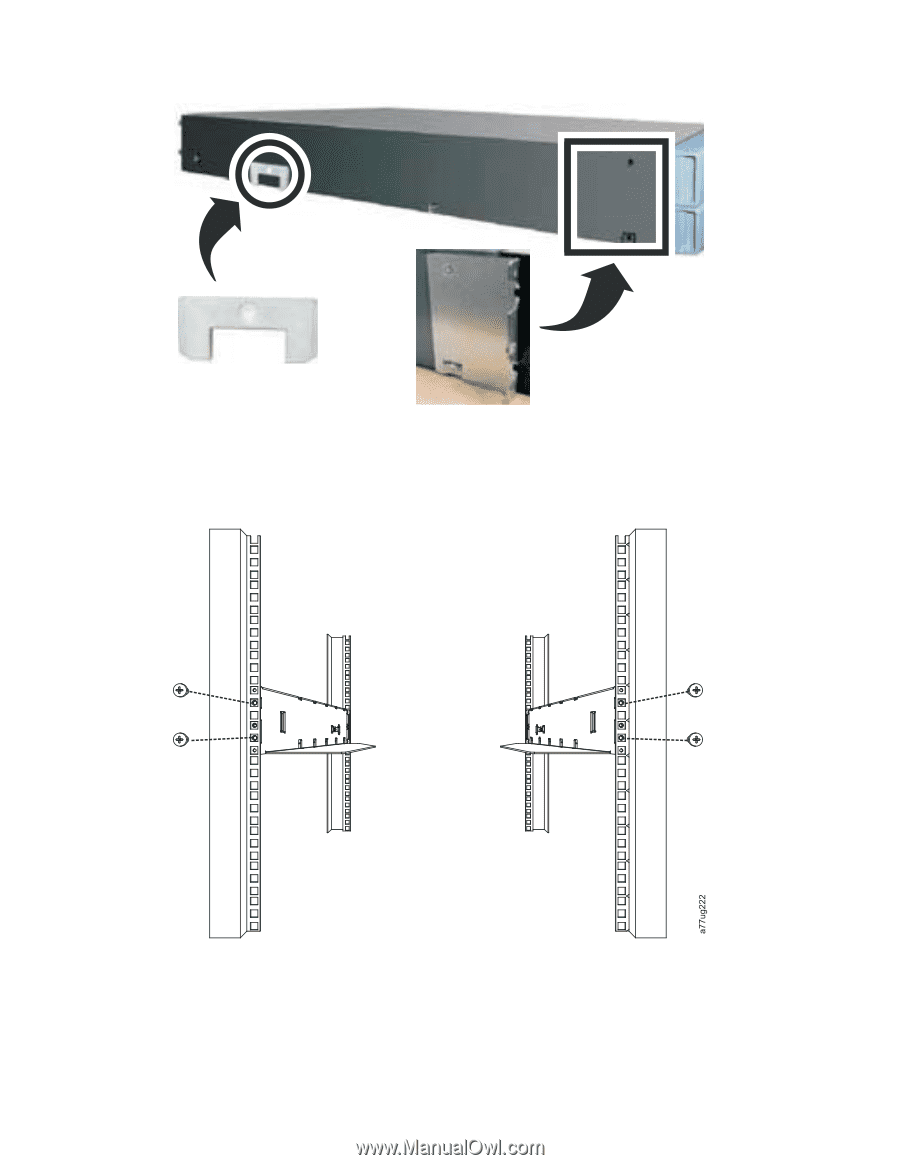
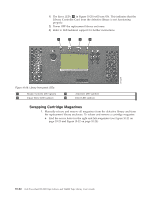
2.
With assistance, slide the replacement library enclosure onto the metal rails that
are already in position in the rack (see Figure 10-25).
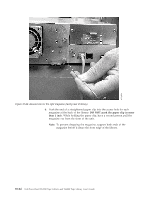
3.
Tighten the mounting bracket screws (
±1²
in Figure 10-12 on page 10-14) to
anchor the replacement library enclosure to the rack.
4.
Proceed to “Completing the Installation of the Replacement Library Enclosure”
on page 10-27.
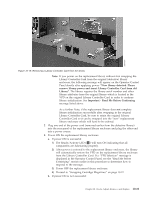
a77ug252
Figure 10-24. Mounting brackets and anchors for securing the library in a rack (one bracket and anchor on each side
of the library)
Figure 10-25. Front view of rack showing screw placement
10-26
Dell PowerVault TL2000 Tape Library and TL4000 Tape Library User's Guide