Dell PowerVault TL4000 Dell Model TL2000/TL4000 Tape Library- User's Guide - Page 73
Logging on to the Web User Interface, Gateway, Ethernet, Monitor, Library, Network
 |
View all Dell PowerVault TL4000 manuals
Add to My Manuals
Save this manual to your list of manuals |
Page 73 highlights
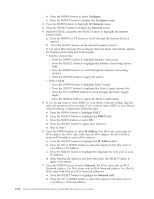
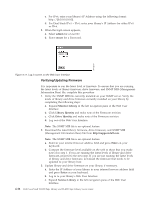
c. Press the SELECT button to highlight the digit(s) in the next octet of your library's Netmask address. d. After entering the digits for the last octet of your Netmask address, press the SELECT button to apply your entries. 8. Press the DOWN button to select Gateway. For IPv4, enter only an IPv4 Gateway address. For IPv6, enter only an IPv6 Gateway address. For IPv4 & IPv6, enter a Gateway address for both IPv4 and IPv6. a. Press the SELECT button to highlight the Gateway field. b. Press the UP or DOWN button to select the digit(s) in the first octet of your library's Gateway address. c. Press the SELECT button to highlight the digit(s) in the next octet of your library's Gateway address. d. After entering the digits for the last octet in your Gateway address, press the SELECT button to apply your entries. 9. Press the DOWN button to select Ethernet. a. Press the DOWN button to highlight the Ethernet field. b. Press the SELECT button to highlight the Ethernet setting. c. Press the DOWN button to select a new setting. d. Press the SELECT button to apply the new setting. 10. Press the DOWN button to highlight SAVE. Press the DOWN again to highlight CANCEL. Continue to press the DOWN button to switch between SAVE and CANCEL. v If SAVE is highlighted, press the SELECT button to apply your new configuration. If changes were made to the Network settings, a pop-up menu will display the option to reboot the library or cancel the reboot. If you select CANCEL in the pop-up menu, you will need to power cycle the library for the network changes to be applied. v If CANCEL is highlighted, press the SELECT button to cancel all of your entries and return to the Configure menu. Logging on to the Web User Interface To complete the configuration of your library using the Web User Interface, follow the steps below. 1. On your host computer, open an Internet browser. 2. In the browser address field, enter your library's IP Address. a. For DHCP and/or Stateless Autoconfig, use the Operator Control Panel to determine the IP Address assigned to your library. Navigate to Monitor → Library → Network. Scroll down to the library address information and make note of the address. Enter the IP Address in your internet browser address field to access your library with the Web User Interface. The library address information may include one or more of the following address types: v IP Address (IPv4 static or DHCP) v Static IPv6 Address v Link Local IPv6 Address v Assigned IPv6 address (DHCP or Stateless Autoconfig) b. For IPv4, enter your library's IP Address using the 0.0.0.0 format (four octets). Chapter 4. Installation and Configuration 4-17
-
 1
1 -
2
-
3
-
4
-
5
-
6
-
7
-
8
-
9
-
10
-
11
-
12
-
13
-
14
-
15
-
16
-
17
-
18
-
19
-
20
-
21
-
22
-
23
-
24
-
25
-
26
-
27
-
28
-
29
-
30
-
31
-
32
-
33
-
34
-
35
-
36
-
37
-
38
-
39
-
40
-
41
-
42
-
43
-
44
-
45
-
46
-
47
-
48
-
49
-
50
-
51
-
52
-
53
-
54
-
55
-
56
-
57
-
58
-
59
-
60
-
61
-
62
-
63
-
64
-
65
-
66
-
67
-
 68
68 -
 69
69 -
 70
70 -
 71
71 -
 72
72 -
 73
73 -
 74
74 -
 75
75 -
 76
76 -
 77
77 -
 78
78 -
79
-
80
-
81
-
82
-
83
-
84
-
85
-
86
-
87
-
88
-
89
-
90
-
91
-
92
-
93
-
94
-
95
-
96
-
97
-
98
-
99
-
100
-
101
-
102
-
103
-
104
-
105
-
106
-
107
-
108
-
109
-
110
-
111
-
112
-
113
-
114
-
115
-
116
-
117
-
118
-
119
-
120
-
121
-
122
-
123
-
124
-
125
-
126
-
127
-
128
-
129
-
130
-
131
-
132
-
133
-
134
-
135
-
136
-
137
-
138
-
139
-
140
-
141
-
142
-
143
-
144
-
145
-
146
-
147
-
148
-
149
-
150
-
151
-
152
-
153
-
154
-
155
-
156
-
157
-
158
-
159
-
160
-
161
-
162
-
163
-
164
-
165
-
166
-
167
-
168
-
169
-
170
-
171
-
172
-
173
-
174
-
175
-
176
-
177
-
178
-
179
-
180
-
181
-
182
-
183
-
184
-
185
-
186
-
187
-
188
-
189
-
190
-
191
-
192
-
193
-
194
-
195
-
196
-
197
-
198
-
199
-
200
-
201
-
202
-
203
-
204
-
205
-
206
-
207
-
208
-
209
-
210
-
211
-
212
-
213
-
214
-
215
-
216
-
217
-
218
-
219
-
220
-
221
-
222
-
223
-
224
-
225
-
226
-
227
-
228
-
229
-
230
-
231
-
232
-
233
-
234
-
235
-
236
-
237
-
238
-
239
-
240
-
241
-
242
-
243
-
244
-
245
-
246
-
247
-
248
-
249
-
250
-
251
-
252
-
253
-
254
-
255
-
256
-
257
-
258
-
259
-
260
-
261
-
262
-
263
-
264
-
265
-
266
-
267
-
268
-
269
-
270
-
271
-
272
-
273
-
274
-
275
-
276
-
277
-
278
-
279
-
280
-
281
-
282
-
283
 |
 |