Dell PowerVault TL4000 Dell Model TL2000/TL4000 Tape Library- User's Guide - Page 206
Installing a Tape Drive Sled, in
 |
View all Dell PowerVault TL4000 manuals
Add to My Manuals
Save this manual to your list of manuals |
Page 206 highlights
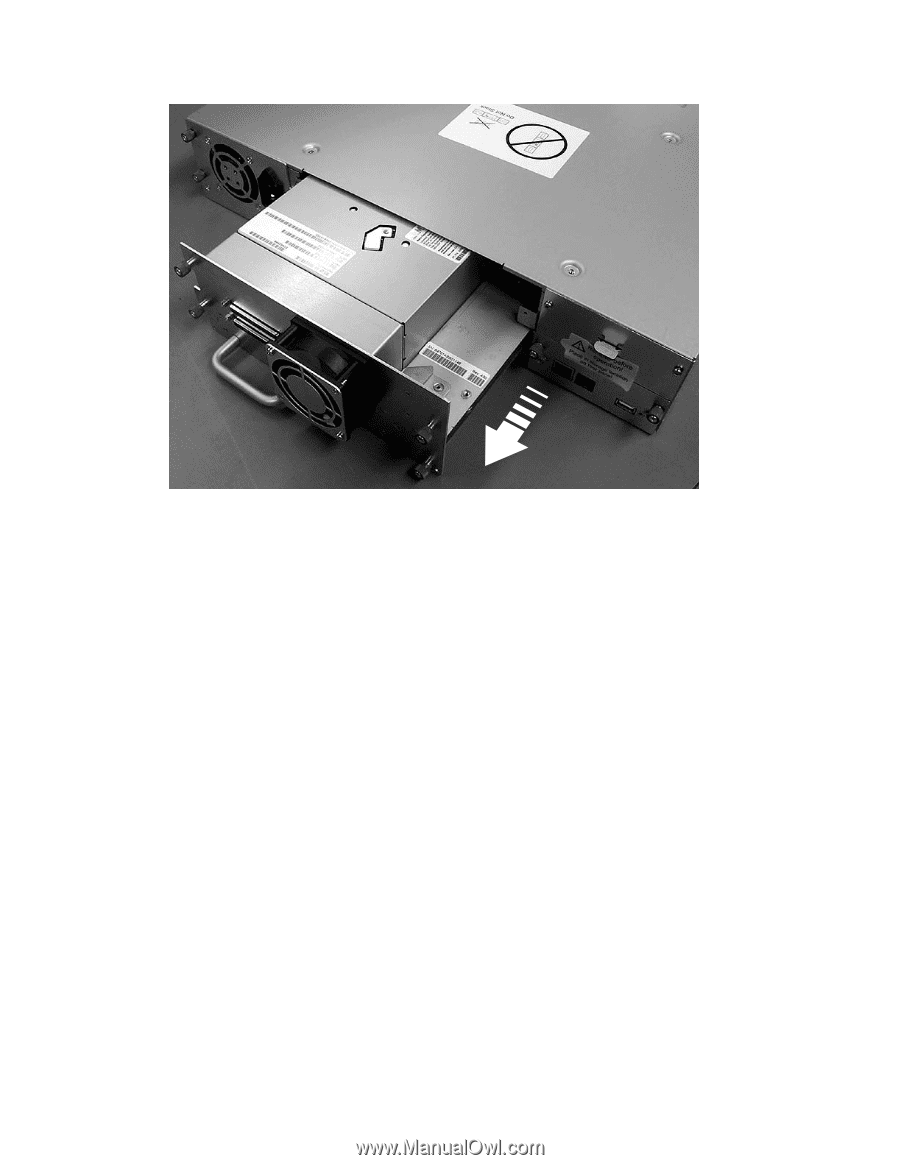
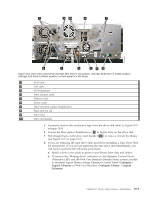
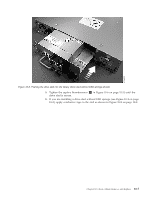
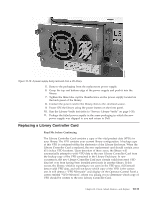
a77ug027 Figure 10-7. Pulling the drive sled out of the library (drive sled without ESD springs shown) Installing a Tape Drive Sled Note: Power OFF the library before installing a SCSI drive sled. Fibre Channel and SAS drive sleds are hot pluggable and may be removed and installed while the library is powered ON. Important: In a 4U library a full height drive sled may be installed in drive slot 1 (drive will occupy slot 1 and slot 2) or drive slot 3 (drive will occupy slot 3 and slot 4). A full height drive sled should never be installed in drive slot 2 (drive will occupy slot 2 and slot 3). 1. Before installing the new drive sled, inspect all connectors on the drive sled. Ensure that the connectors are intact, free of any foreign objects, and have no cracks, deformed, or bent contacts. 2. Extend the black pull-out tab ( 8 in Figure 10-6 on page 10-5) located underneath the library near the lower right corner of the drive sled. 3. Slowly insert the new drive sled into the drive slot while supporting the bottom of the drive sled (see Figure 10-8 on page 10-7). Ensure that the black tab remains extended ( 8 in Figure 10-6 on page 10-5). Important: Push in on the drive sled handle ( 10 in Figure 10-6 on page 10-5) while supporting the bottom of the drive sled until it is properly seated. Damage to the connector pins may occur if this procedure is not followed. 4. Push the drive sled slowly into the drive slot until the sled seats itself against the back of the library. 10-6 Dell PowerVault TL2000 Tape Library and TL4000 Tape Library User's Guide
-
 1
1 -
2
-
3
-
4
-
5
-
6
-
7
-
8
-
9
-
10
-
11
-
12
-
13
-
14
-
15
-
16
-
17
-
18
-
19
-
20
-
21
-
22
-
23
-
24
-
25
-
26
-
27
-
28
-
29
-
30
-
31
-
32
-
33
-
34
-
35
-
36
-
37
-
38
-
39
-
40
-
41
-
42
-
43
-
44
-
45
-
46
-
47
-
48
-
49
-
50
-
51
-
52
-
53
-
54
-
55
-
56
-
57
-
58
-
59
-
60
-
61
-
62
-
63
-
64
-
65
-
66
-
67
-
68
-
69
-
70
-
71
-
72
-
73
-
74
-
75
-
76
-
77
-
78
-
79
-
80
-
81
-
82
-
83
-
84
-
85
-
86
-
87
-
88
-
89
-
90
-
91
-
92
-
93
-
94
-
95
-
96
-
97
-
98
-
99
-
100
-
101
-
102
-
103
-
104
-
105
-
106
-
107
-
108
-
109
-
110
-
111
-
112
-
113
-
114
-
115
-
116
-
117
-
118
-
119
-
120
-
121
-
122
-
123
-
124
-
125
-
126
-
127
-
128
-
129
-
130
-
131
-
132
-
133
-
134
-
135
-
136
-
137
-
138
-
139
-
140
-
141
-
142
-
143
-
144
-
145
-
146
-
147
-
148
-
149
-
150
-
151
-
152
-
153
-
154
-
155
-
156
-
157
-
158
-
159
-
160
-
161
-
162
-
163
-
164
-
165
-
166
-
167
-
168
-
169
-
170
-
171
-
172
-
173
-
174
-
175
-
176
-
177
-
178
-
179
-
180
-
181
-
182
-
183
-
184
-
185
-
186
-
187
-
188
-
189
-
190
-
191
-
192
-
193
-
194
-
195
-
196
-
197
-
198
-
199
-
200
-
 201
201 -
 202
202 -
 203
203 -
 204
204 -
 205
205 -
 206
206 -
 207
207 -
 208
208 -
 209
209 -
 210
210 -
 211
211 -
212
-
213
-
214
-
215
-
216
-
217
-
218
-
219
-
220
-
221
-
222
-
223
-
224
-
225
-
226
-
227
-
228
-
229
-
230
-
231
-
232
-
233
-
234
-
235
-
236
-
237
-
238
-
239
-
240
-
241
-
242
-
243
-
244
-
245
-
246
-
247
-
248
-
249
-
250
-
251
-
252
-
253
-
254
-
255
-
256
-
257
-
258
-
259
-
260
-
261
-
262
-
263
-
264
-
265
-
266
-
267
-
268
-
269
-
270
-
271
-
272
-
273
-
274
-
275
-
276
-
277
-
278
-
279
-
280
-
281
-
282
-
283
 |
 |