Dell PowerVault TL4000 Dell Model TL2000/TL4000 Tape Library- User's Guide - Page 180
Isolating a Library Controller Card vs. Accessor Enclosure Problem, Service, Clean Drive
 |
View all Dell PowerVault TL4000 manuals
Add to My Manuals
Save this manual to your list of manuals |
Page 180 highlights
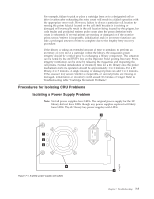
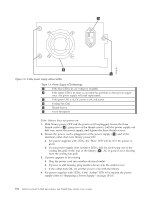
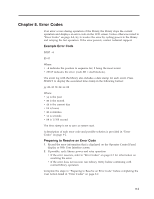
5. If air does not flow from the drive sled cooling fan grill on the rear of the library, replace the drive sled CRU. Several library error codes also point to cooling problems. See "Removing/Installing/Adding a Tape Drive Sled" on page 10-3. 6. If the drive is experiencing permanent or temporary errors or if the amber Clean LED is lit on the front panel of the library, select Clean Drive from the Operator Control Panel Service Menu (Service → Service → Clean Drive) and clean the drive. Use only an approved cleaning cartridge (see "Cleaning Cartridge" on page 6-4). 7. Run the Library Verify Diagnostic which includes a drive performance Read/Write test. Be sure to use a known good scratch or blank data cartridge. v If the drive test fails, replace the drive sled CRU (refer to "Removing/Installing/Adding a Tape Drive Sled" on page 10-3). 8. If the drive passes all the tests, inspect the media to ensure the media is compatible with the drive and not causing drive errors. Refer to Chapter 6, "Using Ultrium Media," on page 6-1. Isolating a Library Controller Card vs. Accessor Enclosure Problem 1. If possible, ensure that the library firmware is at the latest level, check the current library firmware level using the Operator Control Panel (Monitor → Library → Identity → Version) or the Web User Interface (Monitor Library → Library Identity), then. 2. Observe the LED on the Library Controller Card. v LED On solid - LCC failed or in a hang condition. v LED Off - LCC not fully inserted, or LCC failed, or library not connected to power source, or Power Supply defect. v LED flashing (1 flash per second) - normal operation v LED flashing (slower than once per second) - normal operation v LED flashing (faster than once per second) - LCC failed 3. With library power OFF, loosen the two thumb screws which secure the controller card to the library enclosure and slide it out. v Inspect the card for any broken components or other anomalies. v If the card appears to have no abnormalities, reseat the card back in the library, tighten the thumb screws, and turn library power ON. 4. If both the Operator Control Panel and Web User interfaces are inoperable or frozen and the latest firmware has been installed, the controller card CRU electronics is the most likely failure. If only the Web User Interface has failed, please see "Isolating Web User Interface Problems" on page 7-11 before replacing any CRUs. 5. If a control card error code has been obtained and reseating, power cycling, and updating the library firmware did not fix the problem, the controller card CRU is the most likely failing CRU (refer to "Replacing a Library Controller Card" on page 10-11). 6. If the error code indicates an accessor type error (slider, elevator, sled, etc.), release and remove both magazines (see "Control: Magazine" on page 5-17, "Manage Library: Release Magazine" on page 5-43, or "Releasing the Magazines Manually" on page 9-1) and observe the accessor path for any obvious obstruction or problems. Resolve any observed problem if possible. Execute a Library System Test. See "Service Library: Perform Diagnostics" on page 5-60 7-10 Dell PowerVault TL2000 Tape Library and TL4000 Tape Library User's Guide
-
 1
1 -
2
-
3
-
4
-
5
-
6
-
7
-
8
-
9
-
10
-
11
-
12
-
13
-
14
-
15
-
16
-
17
-
18
-
19
-
20
-
21
-
22
-
23
-
24
-
25
-
26
-
27
-
28
-
29
-
30
-
31
-
32
-
33
-
34
-
35
-
36
-
37
-
38
-
39
-
40
-
41
-
42
-
43
-
44
-
45
-
46
-
47
-
48
-
49
-
50
-
51
-
52
-
53
-
54
-
55
-
56
-
57
-
58
-
59
-
60
-
61
-
62
-
63
-
64
-
65
-
66
-
67
-
68
-
69
-
70
-
71
-
72
-
73
-
74
-
75
-
76
-
77
-
78
-
79
-
80
-
81
-
82
-
83
-
84
-
85
-
86
-
87
-
88
-
89
-
90
-
91
-
92
-
93
-
94
-
95
-
96
-
97
-
98
-
99
-
100
-
101
-
102
-
103
-
104
-
105
-
106
-
107
-
108
-
109
-
110
-
111
-
112
-
113
-
114
-
115
-
116
-
117
-
118
-
119
-
120
-
121
-
122
-
123
-
124
-
125
-
126
-
127
-
128
-
129
-
130
-
131
-
132
-
133
-
134
-
135
-
136
-
137
-
138
-
139
-
140
-
141
-
142
-
143
-
144
-
145
-
146
-
147
-
148
-
149
-
150
-
151
-
152
-
153
-
154
-
155
-
156
-
157
-
158
-
159
-
160
-
161
-
162
-
163
-
164
-
165
-
166
-
167
-
168
-
169
-
170
-
171
-
172
-
173
-
174
-
 175
175 -
 176
176 -
 177
177 -
 178
178 -
 179
179 -
 180
180 -
 181
181 -
 182
182 -
 183
183 -
 184
184 -
 185
185 -
186
-
187
-
188
-
189
-
190
-
191
-
192
-
193
-
194
-
195
-
196
-
197
-
198
-
199
-
200
-
201
-
202
-
203
-
204
-
205
-
206
-
207
-
208
-
209
-
210
-
211
-
212
-
213
-
214
-
215
-
216
-
217
-
218
-
219
-
220
-
221
-
222
-
223
-
224
-
225
-
226
-
227
-
228
-
229
-
230
-
231
-
232
-
233
-
234
-
235
-
236
-
237
-
238
-
239
-
240
-
241
-
242
-
243
-
244
-
245
-
246
-
247
-
248
-
249
-
250
-
251
-
252
-
253
-
254
-
255
-
256
-
257
-
258
-
259
-
260
-
261
-
262
-
263
-
264
-
265
-
266
-
267
-
268
-
269
-
270
-
271
-
272
-
273
-
274
-
275
-
276
-
277
-
278
-
279
-
280
-
281
-
282
-
283
 |
 |