Dell PowerVault TL4000 Dell Model TL2000/TL4000 Tape Library- User's Guide - Page 220
Swapping Library Controller Cards, IMPORTANT - READ ME BEFORE CONTINUING
 |
View all Dell PowerVault TL4000 manuals
Add to My Manuals
Save this manual to your list of manuals |
Page 220 highlights
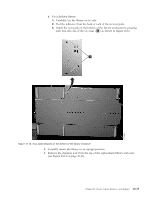
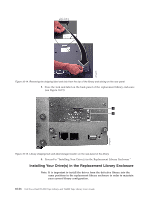
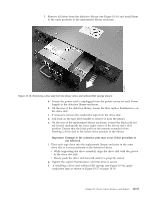
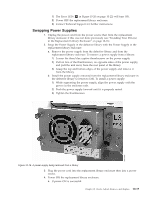
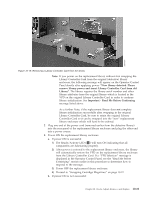
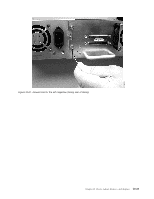
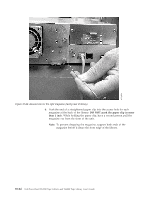
1) The replacement library enclosure will power up with the Ready/Activity LED ( 1 in Figure 10-20 on page 10-22) ON. 2) Power OFF the replacement library enclosure. 3) Unplug the power cord from the power source then from the library. 4) Proceed to "Swapping Library Controller Cards." b. If power ON is not successful, contact Technical Support for further instructions. Swapping Library Controller Cards IMPORTANT - READ ME BEFORE CONTINUING The Library Enclosure contains a copy of the vital product data (VPD) for your library. The VPD contains your current library configuration. A primary copy of this VPD is contained within the Library Controller Card. A backup copy of this VPD is maintained on the accessor in the enclosure (or chassis). When the Library Enclosure is replaced, the new enclosure electronics should contain zeros (0's) in key VPD locations. Upon detection of these zeros, the library will automatically write VPD data to the replacement library enclosure from the primary copy of the VPD contained in the Library Controller Card. In rare occurrences, the replacement library enclosure may contain valid (non-zero) VPD data left over from having been installed previously in another library. If this occurs, the library firmware, which is expecting to see zeros in the VPD area, will instead detect valid VPD data, and will not know which copy of the VPD is the correct one. It will detect this VPD mismatch and display a message entitled "VPD Selection" on the Operator Control Panel. The library will need your input to determine which copy of VPD to write to the replacement library enclosure. If you are replacing both the Library enclosure and the Library Controller Card, transfer VPD after installing one part before installing the other. If the message "VPD Selection" is displayed at the Operator Control Panel, carefully highlight the "VPD from Controller" option before selecting OK. This will copy VPD from the controller to the replacement library enclosure. 1. Swap the Library Controller Card in the defective library with the Library Controller Card in the replacement library enclosure. a. Remove the Library Controller Card (see Figure 10-19 on page 10-21) in the defective library and in the replacement library enclosure. To remove a Library Controller Card: 1) Loosen the two blue captive thumbscrews on the Library Controller Card. 2) Grasp the thumbscrews and pull the card out of the library. b. Install the Library Controller Card from the defective library in the replacement library enclosure. Install the Library Controller Card from the replacement library enclosure in the defective library to return to Dell. To install a Library Controller Card: 1) Grasp the Library Controller Card faceplate and align the Library Controller Card with the groove in the enclosure rails. 2) Push the Library Controller Card forward until it is properly seated. Note: You will hear a snap when the Library Controller Card is fully engaged and installed properly. 3) Tighten the thumbscrews. 10-20 Dell PowerVault TL2000 Tape Library and TL4000 Tape Library User's Guide
-
 1
1 -
2
-
3
-
4
-
5
-
6
-
7
-
8
-
9
-
10
-
11
-
12
-
13
-
14
-
15
-
16
-
17
-
18
-
19
-
20
-
21
-
22
-
23
-
24
-
25
-
26
-
27
-
28
-
29
-
30
-
31
-
32
-
33
-
34
-
35
-
36
-
37
-
38
-
39
-
40
-
41
-
42
-
43
-
44
-
45
-
46
-
47
-
48
-
49
-
50
-
51
-
52
-
53
-
54
-
55
-
56
-
57
-
58
-
59
-
60
-
61
-
62
-
63
-
64
-
65
-
66
-
67
-
68
-
69
-
70
-
71
-
72
-
73
-
74
-
75
-
76
-
77
-
78
-
79
-
80
-
81
-
82
-
83
-
84
-
85
-
86
-
87
-
88
-
89
-
90
-
91
-
92
-
93
-
94
-
95
-
96
-
97
-
98
-
99
-
100
-
101
-
102
-
103
-
104
-
105
-
106
-
107
-
108
-
109
-
110
-
111
-
112
-
113
-
114
-
115
-
116
-
117
-
118
-
119
-
120
-
121
-
122
-
123
-
124
-
125
-
126
-
127
-
128
-
129
-
130
-
131
-
132
-
133
-
134
-
135
-
136
-
137
-
138
-
139
-
140
-
141
-
142
-
143
-
144
-
145
-
146
-
147
-
148
-
149
-
150
-
151
-
152
-
153
-
154
-
155
-
156
-
157
-
158
-
159
-
160
-
161
-
162
-
163
-
164
-
165
-
166
-
167
-
168
-
169
-
170
-
171
-
172
-
173
-
174
-
175
-
176
-
177
-
178
-
179
-
180
-
181
-
182
-
183
-
184
-
185
-
186
-
187
-
188
-
189
-
190
-
191
-
192
-
193
-
194
-
195
-
196
-
197
-
198
-
199
-
200
-
201
-
202
-
203
-
204
-
205
-
206
-
207
-
208
-
209
-
210
-
211
-
212
-
213
-
214
-
 215
215 -
 216
216 -
 217
217 -
 218
218 -
 219
219 -
 220
220 -
 221
221 -
 222
222 -
 223
223 -
 224
224 -
 225
225 -
226
-
227
-
228
-
229
-
230
-
231
-
232
-
233
-
234
-
235
-
236
-
237
-
238
-
239
-
240
-
241
-
242
-
243
-
244
-
245
-
246
-
247
-
248
-
249
-
250
-
251
-
252
-
253
-
254
-
255
-
256
-
257
-
258
-
259
-
260
-
261
-
262
-
263
-
264
-
265
-
266
-
267
-
268
-
269
-
270
-
271
-
272
-
273
-
274
-
275
-
276
-
277
-
278
-
279
-
280
-
281
-
282
-
283
 |
 |