| Section |
Page |
| Product basics |
17 |
| Product features |
18 |
| Environmental features |
19 |
| Accessibility features |
19 |
| Product views |
20 |
| Front left view |
20 |
| Front right view |
21 |
| Back view |
21 |
| Cartridge door view |
22 |
| Power on and off |
23 |
| Turn the product on |
23 |
| Manage power |
23 |
| Turn the product off |
24 |
| Use the control panel |
25 |
| Control panel buttons |
25 |
| Control panel home screen |
26 |
| Control panel dashboard |
27 |
| Control panel application folders |
27 |
| Control panel shortcuts |
28 |
| Help features |
28 |
| Printer information |
29 |
| Help animations |
29 |
| Quiet Mode |
30 |
| To turn Quiet Mode on or off from the control panel |
30 |
| To turn Quiet Mode on or off from the EWS |
30 |
| Connect the product |
31 |
| Connect the product to a computer or a network |
32 |
| To connect the product using a USB cable |
32 |
| To connect the product to a network |
33 |
| Supported network protocols |
33 |
| Connect the product using a wired network |
33 |
| Connect the product using a wireless network (wireless models only) |
33 |
| To connect the product to a wireless network using the Wireless Setup Wizard |
34 |
| To connect the product to a wireless network using WPS |
34 |
| To connect the product to a wireless network manually |
35 |
| Use Wi-Fi Direct to connect a computer or device to the product |
36 |
| To turn on Wi-Fi Direct |
36 |
| To print from a wireless-capable mobile device |
36 |
| To print from a wireless-capable computer (Windows) |
37 |
| To print from a wireless-capable computer (OS X) |
37 |
| Install HP printer software for a wireless product already on the network |
38 |
| Open the printer software (Windows) |
38 |
| Manage network settings |
38 |
| View or change network settings |
38 |
| Set or change the product password |
39 |
| Manually configure TCP/IP parameters from the control panel |
39 |
| Link speed and duplex settings |
39 |
| Printer management and services |
41 |
| HP Embedded Web Server |
42 |
| About the EWS |
42 |
| About cookies |
42 |
| Open the EWS |
43 |
| Features |
43 |
| Home tab |
43 |
| Scan tab |
44 |
| Fax tab |
45 |
| Web Services tab |
45 |
| Network tab |
45 |
| Tools tab |
45 |
| Settings tab |
46 |
| Web Services |
47 |
| What are Web Services? |
47 |
| HP ePrint |
47 |
| Print apps |
47 |
| Set Up Web Services |
47 |
| Use Web Services |
48 |
| HP ePrint |
48 |
| Print apps |
49 |
| Remove Web Services |
50 |
| HP Web Jetadmin software |
50 |
| Product security features |
50 |
| Security statements |
51 |
| Firewall |
51 |
| Security settings |
52 |
| Firmware updates |
52 |
| HP Printer Assistant in the printer software (Windows) |
52 |
| Open the HP Printer Assistant |
52 |
| Features |
52 |
| Connected tab |
53 |
| Print, Scan & Fax tab |
53 |
| Shop tab |
53 |
| Help tab |
54 |
| Tools tab |
54 |
| Estimated Levels tab |
54 |
| HP Utility (OS X) |
54 |
| AirPrint™ (OS X) |
54 |
| Paper and print media |
55 |
| Understand paper use |
56 |
| Supported media sizes |
57 |
| Supported paper and print media sizes |
57 |
| Supported envelope sizes |
58 |
| Supported card and label sizes |
58 |
| Supported photo media sizes |
58 |
| Supported paper types and tray capacity |
59 |
| Tray 1 (multipurpose) on left side of the product |
59 |
| Tray 2 (default tray) and Trays 3 and 4 (accessory trays) |
60 |
| Configure trays |
60 |
| Load media |
61 |
| Load Tray 1 |
61 |
| Load Tray 2 |
62 |
| Load optional Tray 3 |
64 |
| Load optional Tray 4 |
65 |
| Load envelopes |
65 |
| Load letterhead or preprinted forms |
67 |
| Load the automatic document feeder |
68 |
| Load the scanner |
69 |
| Tips for selecting and using paper |
71 |
| Cartridges |
72 |
| HP PageWide cartridges |
73 |
| HP policy on non-HP cartridges |
73 |
| Counterfeit HP cartridges |
73 |
| Manage cartridges |
73 |
| Store cartridges |
74 |
| Print with General Office mode |
74 |
| Print when a cartridge is at estimated end of life |
74 |
| Check the estimated cartridge levels |
74 |
| Order cartridges |
75 |
| Recycle cartridges |
76 |
| Replace cartridges |
76 |
| Tips for working with cartridges |
78 |
| Print |
79 |
| Print from a computer |
80 |
| To print from a computer (Windows) |
80 |
| To print from a computer (OS X) |
81 |
| To set up printing shortcuts (Windows) |
82 |
| To set up printing presets (OS X) |
82 |
| To adjust or manage colors |
83 |
| Choose a preset color theme for a print job |
83 |
| Adjust the color options for a print job manually |
83 |
| Match colors to your computer screen |
84 |
| Control access to color printing |
85 |
| Print from the control panel |
85 |
| Print using job storage |
85 |
| To enable job storage |
85 |
| Disable or enable job storage (Windows) |
85 |
| Disable or enable job storage (OS X) |
85 |
| To apply job storage to one or all print jobs |
86 |
| Apply job storage to one or all print jobs (Windows) |
86 |
| Apply job storage to one or all print jobs (OS X) |
87 |
| To print a job stored on the printer |
87 |
| To delete a job stored on the printer |
87 |
| Print from a USB device |
88 |
| Print with NFC |
88 |
| Print with HP ePrint |
88 |
| Print off site by sending an email with the HP ePrint app |
88 |
| Print from an on-site computer or mobile device |
89 |
| Print with AirPrint (OS X) |
89 |
| Tips for print success |
90 |
| Cartridge tips |
90 |
| Paper loading tips |
90 |
| Printer settings tips (Windows) |
91 |
| Printer settings tips (OS X) |
91 |
| Copy and scan |
92 |
| Copy |
93 |
| Copy settings |
93 |
| Adjust lightness or darkness for copies |
93 |
| Select a paper tray and paper size for copies |
93 |
| Reduce or enlarge a copy |
93 |
| Load and copy identification cards |
94 |
| Copy photos |
95 |
| Load and copy mixed-size originals |
96 |
| Copy on both sides automatically |
96 |
| Cancel a copy job |
96 |
| Scan |
97 |
| Scan to a USB drive |
97 |
| Scan to a computer |
97 |
| To set up scan to computer |
97 |
| Set up scanning to a computer (Windows) |
98 |
| Set up scanning to a computer (OS X) |
98 |
| To scan to a computer from the control panel |
98 |
| Scan to email |
98 |
| To set up scan to email |
98 |
| To scan a document or photo to email |
99 |
| Scan a document or photo to email from the control panel |
99 |
| Scan a document or photo to email from the printer software |
99 |
| To change account settings |
99 |
| Scan to a network folder |
99 |
| To set up scan to a network folder |
100 |
| Set up scan to a network folder in the EWS |
100 |
| Set up scan to a network folder in the HP Printer Assistant |
100 |
| To scan to a network folder |
100 |
| Scan to a network folder from the control panel |
100 |
| Scan to a network folder from the printer software |
100 |
| Scan to SharePoint |
101 |
| To set up scan to SharePoint |
101 |
| To scan to SharePoint |
101 |
| Scan using HP scanning software |
101 |
| Scan using other software |
102 |
| To scan from a TWAIN-compliant program |
102 |
| To scan from a WIA-compliant program |
102 |
| Scan using Webscan |
103 |
| Scan documents as editable text |
103 |
| Guidelines for scanning documents as editable text |
103 |
| To scan a document to editable text (Windows) |
104 |
| To scan documents as editable text (OS X) |
105 |
| Tips for copy and scan success |
106 |
| Fax |
107 |
| Set up fax |
108 |
| Connect fax to a telephone line |
108 |
| Configure fax settings |
108 |
| To configure fax settings from the control panel |
108 |
| To configure fax settings using the HP Digital Fax Setup Wizard (Windows) |
109 |
| Set up HP Digital Fax |
109 |
| HP Digital Fax requirements |
109 |
| To set up HP Digital Fax |
110 |
| Set up HP Digital Fax (Windows) |
110 |
| Set up HP Digital Fax (OS X) |
110 |
| Set up HP Digital Fax in the EWS |
110 |
| To modify HP Digital Fax settings |
110 |
| Modify HP Digital Fax settings (Windows) |
110 |
| Modify HP Digital Fax settings (OS X) |
110 |
| Modify HP Digital Fax settings in the EWS |
110 |
| To turn off HP Digital Fax |
111 |
| Fax programs, systems, and software |
111 |
| Supported fax programs |
111 |
| Supported phone services - analog |
111 |
| Alternate phone services - digital |
111 |
| DSL |
111 |
| PBX |
111 |
| ISDN |
112 |
| VoIP |
112 |
| Set fax settings |
112 |
| Send-fax settings |
112 |
| Set pauses or flash hooks |
112 |
| Set a dialing prefix |
113 |
| Set tone-dialing or pulse-dialing |
113 |
| Set autoredial and the time between redials |
113 |
| Set the light/dark setting |
114 |
| Set the default resolution |
114 |
| Use cover-page templates |
115 |
| Receive-fax settings |
115 |
| Set fax forwarding |
115 |
| Block or unblock fax numbers |
116 |
| Set the number of rings-to-answer |
116 |
| Set distinctive ring |
117 |
| Use autoreduction for incoming faxes |
118 |
| Set the fax sounds volume |
118 |
| Set stamp-received faxes |
118 |
| Send a fax |
118 |
| Send a fax from the control panel |
119 |
| Use speed dials and group-dial entries |
119 |
| Send a standard fax from the computer |
119 |
| Send a fax from the software |
120 |
| Send a fax using monitor dialing |
121 |
| Send a fax using printer memory |
121 |
| Receive a fax |
122 |
| Receive a fax manually |
122 |
| Fax memory |
123 |
| Reprint a fax |
123 |
| Delete faxes from memory |
123 |
| Use the phone book |
123 |
| Create and edit individual speed-dial entries |
124 |
| Create and edit group-dial entries |
124 |
| Delete speed-dial entries |
124 |
| Use reports |
124 |
| Print fax confirmation reports |
125 |
| Print fax error reports |
126 |
| Print and view the fax log |
126 |
| Clear the fax log |
126 |
| Print the details of the last fax transaction |
127 |
| Print a Caller ID Report |
127 |
| View the Call History |
127 |
| Solve problems |
128 |
| Problem-solving checklist |
129 |
| Check that the product power is on |
129 |
| Check the control panel for error messages |
129 |
| Test print functionality |
129 |
| Test copy functionality |
130 |
| Test the fax-sending functionality |
130 |
| Test the fax-receiving functionality |
130 |
| Try sending a print job from a computer |
130 |
| Test the plug-and-print USB functionality |
130 |
| Factors that affect product performance |
130 |
| Information pages |
131 |
| Factory-set defaults |
132 |
| Cleaning routines |
132 |
| Clean the printhead |
133 |
| Clean the scanner glass strip and platen |
133 |
| Clean the document feeder pick rollers and separation pad |
134 |
| Clean the touch screen |
134 |
| Jams and paper-feed issues |
135 |
| The product does not pick up paper |
135 |
| The product picks up multiple sheets of paper |
135 |
| Prevent paper jams |
135 |
| Clear jams |
136 |
| Jam locations |
136 |
| Clear jams from the document feeder |
137 |
| Clear jams in Tray 1 (multipurpose tray) |
138 |
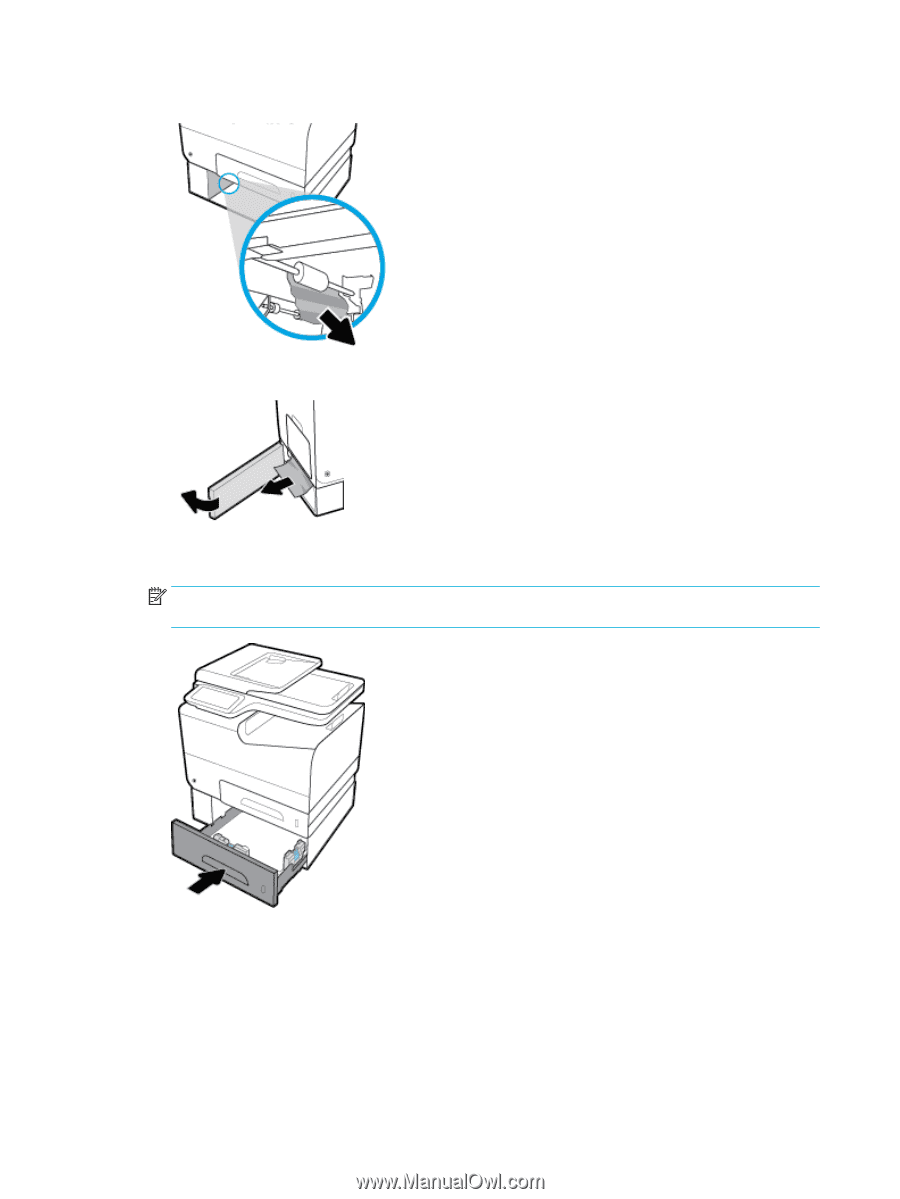
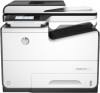
| Clear jams in Tray 2 |
138 |
| Clear jams in optional Tray 3 |
139 |
| Clear jams in optional Tray 4 |
140 |
| Clear jams in the left door |
142 |
| Clear jams in the output bin |
143 |
| Clear jams in the duplexer |
143 |
| Cartridge issues |
145 |
| Refilled or remanufactured cartridges |
145 |
| Interpret control panel messages for cartridges |
145 |
| Cartridge Depleted |
145 |
| Cartridge Low |
145 |
| Cartridge Very Low |
145 |
| Counterfeit or used [color] cartridge installed |
146 |
| Do not use SETUP cartridges |
146 |
| Genuine HP cartridge installed |
146 |
| Incompatible [color] |
146 |
| Incompatible cartridges |
146 |
| Install [color] cartridge |
147 |
| Non-HP cartridges installed |
147 |
| Printer Failure |
147 |
| Problem with Print System |
147 |
| Problem with Printer Preparation |
147 |
| Problem with SETUP cartridges |
148 |
| Use SETUP cartridges |
148 |
| Used [color] installed |
148 |
| Printing issues |
148 |
| The product does not print |
148 |
| The product prints slowly |
149 |
| Plug-and-print USB issues |
149 |
| The Memory Device Options menu does not open when you insert the USB accessory |
150 |
| The file does not print from the USB storage device |
150 |
| The file that you want to print is not listed in the Memory Device Options menu |
150 |
| Improve print quality |
150 |
| Check for genuine HP cartridges |
151 |
| Use paper that meets HP specifications |
151 |
| Use the correct paper type setting in the printer driver |
151 |
| Change the paper type and size setting (Windows) |
152 |
| Change the paper type and size setting (OS X) |
152 |
| Use the printer driver that best meets your printing needs |
152 |
| Align the printhead |
153 |
| Print a print-quality report |
153 |
| Scan issues |
153 |
| Fax issues |
153 |
| Fax troubleshooting checklist |
153 |
| Change error correction and fax speed |
154 |
| Set the fax-error-correction mode |
154 |
| Change the fax speed |
155 |
| Fax logs and reports |
155 |
| Print individual fax reports |
155 |
| Set the fax error report |
155 |
| Fax error messages |
156 |
| Communication error. |
156 |
| Document feeder door is open. Canceled fax. |
156 |
| Fax is busy. Canceled send. |
157 |
| Fax is busy. Redial pending. |
157 |
| Fax receive error. |
157 |
| Fax Send error. |
158 |
| Fax storage is full. Canceling the fax receive. |
158 |
| Fax storage is full. Canceling the fax send. |
158 |
| No dial tone. |
159 |
| No fax answer. Canceled send. |
159 |
| No fax answer. Redial pending. |
160 |
| No fax detected. |
160 |
| Solve problems sending faxes |
160 |
| An error message displays on the control panel |
161 |
| Document feeder paper jam |
161 |
| Scanner error |
161 |
| The control panel displays a Ready message with no attempt to send the fax. |
161 |
| The control panel displays the message \ |
161 |
| Faxes can be received, but not sent |
161 |
| Unable to use fax functions from the control panel |
162 |
| Unable to use speed dials |
162 |
| Unable to use group dials |
162 |
| Receive a recorded error message from the phone company when trying to send a fax |
162 |
| Unable to send a fax when a phone is connected to the product |
163 |
| Solve problems receiving faxes |
163 |
| An error message displays on the control panel |
163 |
| The fax does not respond |
163 |
| Voice mail is available on the fax line |
163 |
| The product is connected to a DSL phone service |
163 |
| The product uses a fax over IP or VoIP phone service |
163 |
| Sender receives a busy signal |
164 |
| A handset is connected to the product |
164 |
| A phone line splitter is being used |
164 |
| Cannot send or receive a fax on a PBX line |
164 |
| Solve general fax problems |
164 |
| Faxes are sending slowly |
164 |
| Fax quality is poor |
164 |
| Fax cuts off or prints on two pages |
165 |
| Connectivity issues |
165 |
| Solve USB direct-connect problems |
165 |
| Solve network problems |
165 |
| Poor physical connection |
166 |
| The computer is using the incorrect IP address for the product |
166 |
| The computer is unable to communicate with the product |
166 |
| The product is using incorrect link and duplex settings for the network |
166 |
| New software programs might be causing compatibility problems |
166 |
| The computer or workstation might be set up incorrectly |
167 |
| The product is disabled, or other network settings are incorrect |
167 |
| Wireless network issues |
167 |
| Wireless connectivity checklist |
167 |
| The product does not print, and the computer has a third-party firewall installed |
167 |
| The wireless connection does not work after moving the wireless router or product |
168 |
| Cannot connect more computers to the wireless product |
168 |
| The wireless product loses communication when connected to a VPN |
169 |
| The network does not appear in the wireless networks list |
169 |
| The wireless network is not functioning |
169 |
| Product software issues (Windows) |
169 |
| Product software issues (OS X) |
171 |
| The printer driver is not listed in the Print & Scan list |
171 |
| The product name does not appear in the product list in the Print & Scan list |
171 |
| The printer driver does not automatically set up the selected product in the Print & Scan list |
171 |
| A print job was not sent to the product that you wanted |
171 |
| When connected with a USB cable, the product does not appear in the Print & Scan list after the driv ... |
171 |
| You are using a generic printer driver when using a USB connection |
172 |
| Service and support |
173 |
| Customer support |
174 |
| HP limited warranty statement |
175 |
| UK, Ireland, and Malta |
176 |
| Austria, Belgium, Germany, and Luxemburg |
176 |
| Belgium, France, and Luxemburg |
177 |
| Italy |
178 |
| Spain |
178 |
| Denmark |
179 |
| Norway |
179 |
| Sweden |
179 |
| Portugal |
180 |
| Greece and Cyprus |
180 |
| Hungary |
180 |
| Czech Republic |
181 |
| Slovakia |
181 |
| Poland |
181 |
| Bulgaria |
182 |
| Romania |
182 |
| Belgium and the Netherlands |
182 |
| Finland |
183 |
| Slovenia |
183 |
| Croatia |
183 |
| Latvia |
183 |
| Lithuania |
184 |
| Estonia |
184 |
| Russia |
184 |
| Technical information |
185 |
| Product specifications |
186 |
| Print specifications |
186 |
| Physical specifications |
186 |
| Power consumption and electrical specifications |
186 |
| Acoustic emission specifications |
186 |
| Environmental specifications |
186 |
| Environmental product stewardship program |
188 |
| Protecting the environment |
189 |
| Ozone production |
189 |
| Power consumption |
189 |
| European Union Commission Regulation 1275/2008 |
189 |
| Paper |
189 |
| HP PageWide printing supplies |
189 |
| Plastics |
189 |
| Electronic hardware recycling |
190 |
| Material restrictions |
190 |
| General battery information |
190 |
| Battery disposal in Taiwan |
190 |
| California Perchlorate Material Notice |
190 |
| EU Battery Directive |
190 |
| Battery notice for Brazil |
191 |
| Chemical substances |
191 |
| EPEAT |
191 |
| Disposal of waste equipment by users |
191 |
| Toxic and hazardous substance table (China) |
192 |
| Restriction on hazardous substances statement (Turkey) |
192 |
| Restriction on hazardous substances statement (Ukraine) |
192 |
| Restriction of hazardous substance statement (India) |
192 |
| China energy label for printer, fax, and copier |
193 |
| China SEPA Eco Label user information |
193 |
| Regulatory information |
194 |
| Regulatory notices |
194 |
| Regulatory model identification number |
194 |
| FCC statement |
194 |
| VCCI statement (Japan) |
195 |
| Power cord instructions |
195 |
| Power cord statement (Japan) |
195 |
| EMC statement (Korea) |
195 |
| Visual display workplaces statement for Germany |
195 |
| European Union Regulatory Notice |
196 |
| European Union Regulatory Notice |
196 |
| Wireless models only |
196 |
| Models with fax capability only |
196 |
| Additional statements for telecom (fax) products |
197 |
| New Zealand telecom statements |
197 |
| Additional FCC statement for telecom products (US) |
197 |
| Industry Canada CS-03 requirements |
198 |
| Notice to users of the Canadian telephone network |
199 |
| Australia wired fax statement |
199 |
| Notice to users of the German telephone network |
199 |
| Additional statements for wireless products |
200 |
| Exposure to radio frequency radiation |
200 |
| Notice to users in Brazil |
200 |
| Canadian statements |
200 |
| Japan statement |
201 |
| Notice to users in Korea |
201 |
| Taiwan statement |
201 |
| Mexico statement |
201 |
 1
1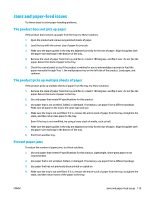 135
135 136
136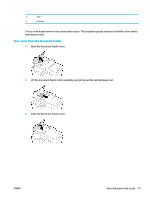 137
137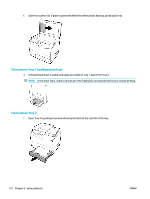 138
138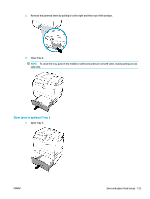 139
139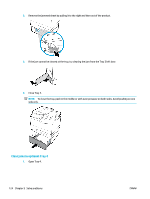 140
140 141
141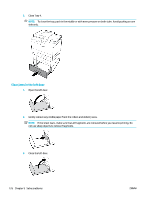 142
142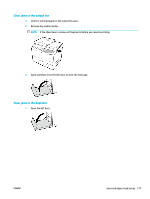 143
143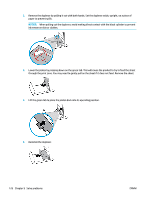 144
144 145
145