HP PageWide Pro 577dw User Guide - Page 98
Set up scanning to a computer (Windows), To scan to a computer from the control panel, Scan to email
 |
View all HP PageWide Pro 577dw manuals
Add to My Manuals
Save this manual to your list of manuals |
Page 98 highlights
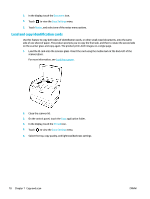
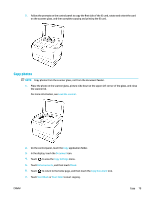
Set up scanning to a computer (Windows) 1. Open the printer software. For more information, see Open the printer software (Windows). 2. Go to the Scan section. 3. Select Manage Scan to Computer. 4. Click Enable. Set up scanning to a computer (OS X) 1. Open HP Utility. For more information, see Open HP Utility. 2. Select Scan to Computer. 3. Select Enable Scan to Computer. To scan to a computer from the control panel 1. Load your original print-side down on the scanner glass or print-side up in the automatic document feeder. For more information, see Load the scanner or Load the automatic document feeder. 2. On the control panel, touch the Scan application folder. 3. In the display, touch the Computer icon and select the computer. 4. Touch Scan Shortcut, select a scan option, and then touch Start Scan. Scan to email The Scan-to-Email App is an application that allows you to quickly scan and email photos or documents to the specified recipients directly from your HP printer. You can set up your email addresses, log in to your accounts with the given PIN codes, and then scan and email your documents. To set up scan to email 1. Make sure that HP Embedded Web Server is enabled on the printer. For more information, see HP Embedded Web Server. 2. On the control panel, touch the Scan application folder. 3. In the display, touch the Email icon. 4. On the screen, touch Next, and then touch one of the following: ● Using the HP Software Installed on a Computer: Follow the onscreen instructions for setting up the scan-to-email feature in the printer software. ● Using a Web Browser: Follow the onscreen instructions for setting up the scan-to-email feature in the HP Embedded Web Server (EWS). 82 Chapter 7 Copy and scan ENWW
-
 1
1 -
2
-
3
-
4
-
5
-
6
-
7
-
8
-
9
-
10
-
11
-
12
-
13
-
14
-
15
-
16
-
17
-
18
-
19
-
20
-
21
-
22
-
23
-
24
-
25
-
26
-
27
-
28
-
29
-
30
-
31
-
32
-
33
-
34
-
35
-
36
-
37
-
38
-
39
-
40
-
41
-
42
-
43
-
44
-
45
-
46
-
47
-
48
-
49
-
50
-
51
-
52
-
53
-
54
-
55
-
56
-
57
-
58
-
59
-
60
-
61
-
62
-
63
-
64
-
65
-
66
-
67
-
68
-
69
-
70
-
71
-
72
-
73
-
74
-
75
-
76
-
77
-
78
-
79
-
80
-
81
-
82
-
83
-
84
-
85
-
86
-
87
-
88
-
89
-
90
-
91
-
92
-
 93
93 -
 94
94 -
 95
95 -
 96
96 -
 97
97 -
 98
98 -
 99
99 -
 100
100 -
 101
101 -
 102
102 -
 103
103 -
104
-
105
-
106
-
107
-
108
-
109
-
110
-
111
-
112
-
113
-
114
-
115
-
116
-
117
-
118
-
119
-
120
-
121
-
122
-
123
-
124
-
125
-
126
-
127
-
128
-
129
-
130
-
131
-
132
-
133
-
134
-
135
-
136
-
137
-
138
-
139
-
140
-
141
-
142
-
143
-
144
-
145
-
146
-
147
-
148
-
149
-
150
-
151
-
152
-
153
-
154
-
155
-
156
-
157
-
158
-
159
-
160
-
161
-
162
-
163
-
164
-
165
-
166
-
167
-
168
-
169
-
170
-
171
-
172
-
173
-
174
-
175
-
176
-
177
-
178
-
179
-
180
-
181
-
182
-
183
-
184
-
185
-
186
-
187
-
188
-
189
-
190
-
191
-
192
-
193
-
194
-
195
-
196
-
197
-
198
-
199
-
200
-
201
-
202
-
203
-
204
-
205
 |
 |