HP PageWide Pro 577dw User Guide - Page 45
Fax tab, Web Services tab, Network tab, Tools tab, Network, Tools
 |
View all HP PageWide Pro 577dw manuals
Add to My Manuals
Save this manual to your list of manuals |
Page 45 highlights
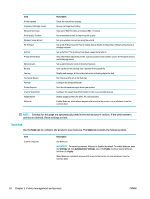
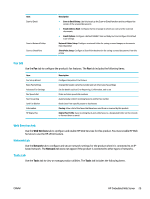
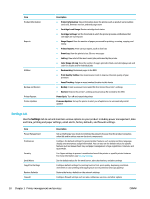
Item Scan to Email Scan to Network Folder Scan to SharePoint Description ● Scan to Email Setup: Use this to set up the Scan-to-Email function and to configure the sender of the scanned documents ● Email Address Book: Configure the list of people to whom you can send the scanned documents ● Email Options: Configure a default SUBJECT line and body text and configure the default scan settings Network Folder Setup: Configure a network folder for saving scanned images or documents from the printer SharePoint Setup: Configure a SharePoint destination for saving scanned documents from the printer Fax tab Use the Fax tab to configure the product's fax features. The Fax tab includes the following items. Item Fax Setup Wizard Basic Fax Settings Advanced Fax Settings Fax Speed-dial Fax Forwarding Junk Fax Blocker Information HP Digital Fax Description Configure the printer's fax feature Change the header name/fax number and set other basic fax settings Set fax details such as Error Reporting, Confirmation, and so on Enter and store speed dial numbers Automatically redirect incoming faxes to another fax number Block faxes from specific people or businesses Fax Log: View a list of the faxes that have been sent from or received by this product Digital Fax Profile: Save incoming black-and-white faxes to a designated folder on the network or forward them as email Web Services tab Use the Web Services tab to configure and enable HP Web Services for this product. You must enable HP Web Services to use the HP ePrint feature. Network tab Use the Network tab to configure and secure network settings for the product when it is connected to an IPbased network. The Network tab does not appear if the product is connected to other types of networks. Tools tab Use the Tools tab to view or manage product utilities. The Tools tab includes the following items. ENWW HP Embedded Web Server 29
-
 1
1 -
2
-
3
-
4
-
5
-
6
-
7
-
8
-
9
-
10
-
11
-
12
-
13
-
14
-
15
-
16
-
17
-
18
-
19
-
20
-
21
-
22
-
23
-
24
-
25
-
26
-
27
-
28
-
29
-
30
-
31
-
32
-
33
-
34
-
35
-
36
-
37
-
38
-
39
-
 40
40 -
 41
41 -
 42
42 -
 43
43 -
 44
44 -
 45
45 -
 46
46 -
 47
47 -
 48
48 -
 49
49 -
 50
50 -
51
-
52
-
53
-
54
-
55
-
56
-
57
-
58
-
59
-
60
-
61
-
62
-
63
-
64
-
65
-
66
-
67
-
68
-
69
-
70
-
71
-
72
-
73
-
74
-
75
-
76
-
77
-
78
-
79
-
80
-
81
-
82
-
83
-
84
-
85
-
86
-
87
-
88
-
89
-
90
-
91
-
92
-
93
-
94
-
95
-
96
-
97
-
98
-
99
-
100
-
101
-
102
-
103
-
104
-
105
-
106
-
107
-
108
-
109
-
110
-
111
-
112
-
113
-
114
-
115
-
116
-
117
-
118
-
119
-
120
-
121
-
122
-
123
-
124
-
125
-
126
-
127
-
128
-
129
-
130
-
131
-
132
-
133
-
134
-
135
-
136
-
137
-
138
-
139
-
140
-
141
-
142
-
143
-
144
-
145
-
146
-
147
-
148
-
149
-
150
-
151
-
152
-
153
-
154
-
155
-
156
-
157
-
158
-
159
-
160
-
161
-
162
-
163
-
164
-
165
-
166
-
167
-
168
-
169
-
170
-
171
-
172
-
173
-
174
-
175
-
176
-
177
-
178
-
179
-
180
-
181
-
182
-
183
-
184
-
185
-
186
-
187
-
188
-
189
-
190
-
191
-
192
-
193
-
194
-
195
-
196
-
197
-
198
-
199
-
200
-
201
-
202
-
203
-
204
-
205
 |
 |