HP Photosmart C5500 User Guide - Page 14
Zoom in, Zoom out, Fit to Print Photos, Red-Eye Removal, Start Copy Black, Start Copy Color - help
 |
View all HP Photosmart C5500 manuals
Add to My Manuals
Save this manual to your list of manuals |
Page 14 highlights
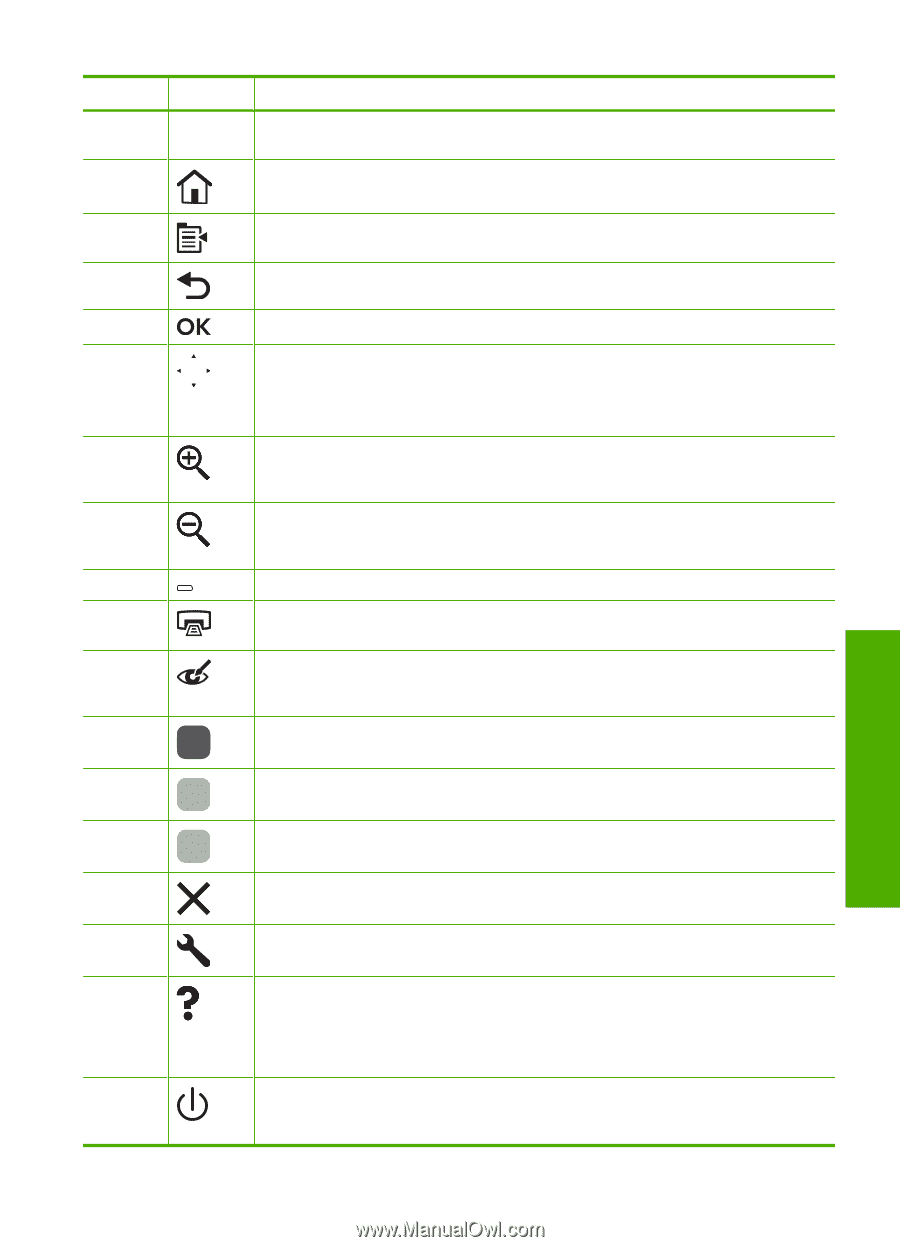
Label 1 2 3 4 5 6 Icon 7 8 9 10 11 12 13 14 15 16 17 18 Name and Description Color graphics display (also referred to as the display): Displays menus, photos, and messages. The display can be pulled up and angled for better viewing. Home: Returns to the Home screen (the default screen when you turn on the product). Menu: Presents a set of options related to the current display. Back: Returns to the previous screen on the display. OK: Selects a menu setting, value, or photo on the display. Directional pad: Allows you to navigate through photos and menu options by pressing the up, down, left, or right arrow buttons. If you are zooming in on a photo, you can also use the arrow buttons to pan around the photo and select a different area to print. Zoom in +: Zooms in to enlarge the image on the display. You can also use this button together with the arrows on the directional pad to adjust the crop box for printing. Zoom out -: Zooms out to show more of a photo. If you press this button when a photo is shown on the display at 100%, the Fit to Page feature is applied to the photo automatically. Attention light: Indicates a problem occurred. See the display for more information. Print Photos: Prints the photos selected on your memory card. If no photos are currently selected, the product prints the photo currently showing on the display. Red-Eye Removal: Turns the Red-Eye Removal feature on or off. This feature turns on when a memory card is inserted. The product automatically corrects red-eye coloring in all the photos in the print queue. Start Copy Black: Starts a black-and-white copy. Start Copy Color: Starts a color copy. Start Scan: Opens the Scan Menu where you can select a destination for your scan. Cancel: Stops the current operation. Setup: Opens the Setup menu where you can change product settings and perform maintenance functions. Help: Opens the Help Menu on the display where you can select a topic to learn more about it. From the Home screen, pressing Help lists the topics for which help is available. Depending on the topic you select, the topic will appear on the display or on your computer screen. When viewing screens other than the Home screen, the Help button provides help applicable to the current screen. On: Turns the product on or off. When the product is off, a minimal amount of power is still used. To completely remove power, turn off the product, and then unplug the power cord. Overview Control panel overview 11
-
 1
1 -
2
-
3
-
4
-
5
-
6
-
7
-
8
-
 9
9 -
 10
10 -
 11
11 -
 12
12 -
 13
13 -
 14
14 -
 15
15 -
 16
16 -
 17
17 -
 18
18 -
 19
19 -
20
-
21
-
22
-
23
-
24
-
25
-
26
-
27
-
28
-
29
-
30
-
31
-
32
-
33
-
34
-
35
-
36
-
37
-
38
-
39
-
40
-
41
-
42
-
43
-
44
-
45
-
46
-
47
-
48
-
49
-
50
-
51
-
52
-
53
-
54
-
55
-
56
-
57
-
58
-
59
-
60
-
61
-
62
-
63
-
64
-
65
-
66
-
67
-
68
-
69
-
70
-
71
-
72
-
73
-
74
-
75
-
76
-
77
-
78
-
79
-
80
-
81
-
82
-
83
-
84
-
85
-
86
-
87
-
88
-
89
-
90
-
91
-
92
-
93
-
94
-
95
-
96
-
97
-
98
-
99
-
100
-
101
-
102
-
103
-
104
-
105
-
106
-
107
-
108
-
109
-
110
-
111
-
112
-
113
-
114
-
115
-
116
-
117
-
118
-
119
-
120
-
121
-
122
-
123
-
124
-
125
-
126
-
127
-
128
-
129
-
130
-
131
-
132
-
133
-
134
-
135
-
136
-
137
-
138
-
139
-
140
-
141
-
142
-
143
-
144
-
145
-
146
-
147
-
148
-
149
-
150
-
151
-
152
-
153
-
154
-
155
-
156
-
157
-
158
-
159
-
160
-
161
-
162
-
163
-
164
-
165
-
166
-
167
-
168
-
169
-
170
-
171
-
172
-
173
-
174
-
175
-
176
-
177
-
178
-
179
-
180
-
181
-
182
-
183
-
184
-
185
-
186
-
187
-
188
-
189
-
190
-
191
-
192
-
193
-
194
-
195
-
196
-
197
-
198
-
199
-
200
-
201
-
202
-
203
-
204
-
205
-
206
-
207
-
208
-
209
-
210
-
211
-
212
-
213
-
214
-
215
-
216
-
217
-
218
-
219
-
220
-
221
-
222
-
223
-
224
-
225
-
226
-
227
-
228
-
229
-
230
-
231
-
232
-
233
-
234
-
235
-
236
-
237
-
238
-
239
-
240
-
241
-
242
-
243
-
244
-
245
-
246
-
247
-
248
-
249
-
250
-
251
-
252
-
253
-
254
-
255
-
256
-
257
-
258
-
259
-
260
-
261
-
262
-
263
-
264
-
265
-
266
-
267
-
268
-
269
-
270
-
271
-
272
-
273
-
274
-
275
-
276
-
277
-
278
-
279
-
280
-
281
-
282
-
283
-
284
-
285
-
286
-
287
-
288
-
289
-
290
-
291
-
292
 |
 |