HP Photosmart C5500 User Guide - Page 151
The text edges are jagged, To clean the rollers, Cause, Solution, Contact HP
 |
View all HP Photosmart C5500 manuals
Add to My Manuals
Save this manual to your list of manuals |
Page 151 highlights
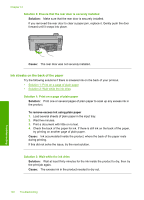
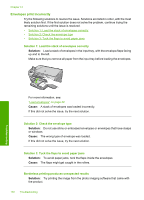
Chapter 14 To clean the rollers 1. Turn off the product and remove the power cord. 2. Press in the tab on the left side of the rear door to release the door. Remove the door by pulling it away from the product. Troubleshooting 3. Dip the lint-free cloth into the purified or distilled water, and squeeze any excess water from it. 4. Clean the rubber rollers to remove any dust or dirt buildup. 5. Replace the rear door. Gently push the door forward until it snaps into place. 6. Plug the power cord back in, and turn on the product. 7. Try to print again. Cause: The rollers were dirty and needed to be cleaned. If this did not solve the issue, try the next solution. Solution 4: Contact HP support for service Solution: If you have completed all of the steps provided in the previous solutions and are still having a problem, contact HP support for service. Go to: www.hp.com/support. If prompted, choose your country/region, and then click Contact HP for technical support. Cause: You might need assistance to enable the product or software to function properly. The text edges are jagged Try the following solutions if the text in your printouts is not sharp and the edges are rough. • Solution 1: Use TrueType or OpenType fonts • Solution 2: Align the print cartridges 148 Troubleshooting
-
 1
1 -
2
-
3
-
4
-
5
-
6
-
7
-
8
-
9
-
10
-
11
-
12
-
13
-
14
-
15
-
16
-
17
-
18
-
19
-
20
-
21
-
22
-
23
-
24
-
25
-
26
-
27
-
28
-
29
-
30
-
31
-
32
-
33
-
34
-
35
-
36
-
37
-
38
-
39
-
40
-
41
-
42
-
43
-
44
-
45
-
46
-
47
-
48
-
49
-
50
-
51
-
52
-
53
-
54
-
55
-
56
-
57
-
58
-
59
-
60
-
61
-
62
-
63
-
64
-
65
-
66
-
67
-
68
-
69
-
70
-
71
-
72
-
73
-
74
-
75
-
76
-
77
-
78
-
79
-
80
-
81
-
82
-
83
-
84
-
85
-
86
-
87
-
88
-
89
-
90
-
91
-
92
-
93
-
94
-
95
-
96
-
97
-
98
-
99
-
100
-
101
-
102
-
103
-
104
-
105
-
106
-
107
-
108
-
109
-
110
-
111
-
112
-
113
-
114
-
115
-
116
-
117
-
118
-
119
-
120
-
121
-
122
-
123
-
124
-
125
-
126
-
127
-
128
-
129
-
130
-
131
-
132
-
133
-
134
-
135
-
136
-
137
-
138
-
139
-
140
-
141
-
142
-
143
-
144
-
145
-
 146
146 -
 147
147 -
 148
148 -
 149
149 -
 150
150 -
 151
151 -
 152
152 -
 153
153 -
 154
154 -
 155
155 -
 156
156 -
157
-
158
-
159
-
160
-
161
-
162
-
163
-
164
-
165
-
166
-
167
-
168
-
169
-
170
-
171
-
172
-
173
-
174
-
175
-
176
-
177
-
178
-
179
-
180
-
181
-
182
-
183
-
184
-
185
-
186
-
187
-
188
-
189
-
190
-
191
-
192
-
193
-
194
-
195
-
196
-
197
-
198
-
199
-
200
-
201
-
202
-
203
-
204
-
205
-
206
-
207
-
208
-
209
-
210
-
211
-
212
-
213
-
214
-
215
-
216
-
217
-
218
-
219
-
220
-
221
-
222
-
223
-
224
-
225
-
226
-
227
-
228
-
229
-
230
-
231
-
232
-
233
-
234
-
235
-
236
-
237
-
238
-
239
-
240
-
241
-
242
-
243
-
244
-
245
-
246
-
247
-
248
-
249
-
250
-
251
-
252
-
253
-
254
-
255
-
256
-
257
-
258
-
259
-
260
-
261
-
262
-
263
-
264
-
265
-
266
-
267
-
268
-
269
-
270
-
271
-
272
-
273
-
274
-
275
-
276
-
277
-
278
-
279
-
280
-
281
-
282
-
283
-
284
-
285
-
286
-
287
-
288
-
289
-
290
-
291
-
292
 |
 |
