HP Photosmart C5500 User Guide - Page 244
CAUTION, Paper mismatch, To clear a paper jam from the rear door, Cause, Solution
 |
View all HP Photosmart C5500 manuals
Add to My Manuals
Save this manual to your list of manuals |
Page 244 highlights
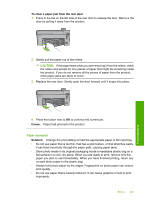
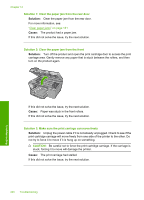
To clear a paper jam from the rear door 1. Press in the tab on the left side of the rear door to release the door. Remove the door by pulling it away from the product. 2. Gently pull the paper out of the rollers. CAUTION: If the paper tears when you are removing it from the rollers, check the rollers and wheels for torn pieces of paper that might be remaining inside the product. If you do not remove all the pieces of paper from the product, more paper jams are likely to occur. 3. Replace the rear door. Gently push the door forward until it snaps into place. 4. Press the button next to OK to continue the current job. Cause: Paper had jammed in the product. Paper mismatch Solution: Change the print setting or load the appropriate paper in the input tray. • Do not use paper that is too thin, that has a slick texture, or that stretches easily. It can feed incorrectly through the paper path, causing paper jams. • Store photo media in its original packaging inside a resealable plastic bag on a flat surface in a cool, dry place. When you are ready to print, remove only the paper you plan to use immediately. When you have finished printing, return any unused photo paper to the plastic bag. • Always hold photo paper by the edges. Fingerprints on photo paper can reduce print quality. • Do not use paper that is heavily textured. It can cause graphics or text to print improperly. Errors 241 Troubleshooting
-
 1
1 -
2
-
3
-
4
-
5
-
6
-
7
-
8
-
9
-
10
-
11
-
12
-
13
-
14
-
15
-
16
-
17
-
18
-
19
-
20
-
21
-
22
-
23
-
24
-
25
-
26
-
27
-
28
-
29
-
30
-
31
-
32
-
33
-
34
-
35
-
36
-
37
-
38
-
39
-
40
-
41
-
42
-
43
-
44
-
45
-
46
-
47
-
48
-
49
-
50
-
51
-
52
-
53
-
54
-
55
-
56
-
57
-
58
-
59
-
60
-
61
-
62
-
63
-
64
-
65
-
66
-
67
-
68
-
69
-
70
-
71
-
72
-
73
-
74
-
75
-
76
-
77
-
78
-
79
-
80
-
81
-
82
-
83
-
84
-
85
-
86
-
87
-
88
-
89
-
90
-
91
-
92
-
93
-
94
-
95
-
96
-
97
-
98
-
99
-
100
-
101
-
102
-
103
-
104
-
105
-
106
-
107
-
108
-
109
-
110
-
111
-
112
-
113
-
114
-
115
-
116
-
117
-
118
-
119
-
120
-
121
-
122
-
123
-
124
-
125
-
126
-
127
-
128
-
129
-
130
-
131
-
132
-
133
-
134
-
135
-
136
-
137
-
138
-
139
-
140
-
141
-
142
-
143
-
144
-
145
-
146
-
147
-
148
-
149
-
150
-
151
-
152
-
153
-
154
-
155
-
156
-
157
-
158
-
159
-
160
-
161
-
162
-
163
-
164
-
165
-
166
-
167
-
168
-
169
-
170
-
171
-
172
-
173
-
174
-
175
-
176
-
177
-
178
-
179
-
180
-
181
-
182
-
183
-
184
-
185
-
186
-
187
-
188
-
189
-
190
-
191
-
192
-
193
-
194
-
195
-
196
-
197
-
198
-
199
-
200
-
201
-
202
-
203
-
204
-
205
-
206
-
207
-
208
-
209
-
210
-
211
-
212
-
213
-
214
-
215
-
216
-
217
-
218
-
219
-
220
-
221
-
222
-
223
-
224
-
225
-
226
-
227
-
228
-
229
-
230
-
231
-
232
-
233
-
234
-
235
-
236
-
237
-
238
-
 239
239 -
 240
240 -
 241
241 -
 242
242 -
 243
243 -
 244
244 -
 245
245 -
 246
246 -
 247
247 -
 248
248 -
 249
249 -
250
-
251
-
252
-
253
-
254
-
255
-
256
-
257
-
258
-
259
-
260
-
261
-
262
-
263
-
264
-
265
-
266
-
267
-
268
-
269
-
270
-
271
-
272
-
273
-
274
-
275
-
276
-
277
-
278
-
279
-
280
-
281
-
282
-
283
-
284
-
285
-
286
-
287
-
288
-
289
-
290
-
291
-
292
 |
 |
