HP Photosmart C5500 User Guide - Page 82
Color, Effect, Related topics, No Effect, Black & White, Sepia, Antique
 |
View all HP Photosmart C5500 manuals
Add to My Manuals
Save this manual to your list of manuals |
Page 82 highlights
2. In the Edit Photos menu, press the up arrow or down arrow button to highlight Color Effect, and then press OK. 3. Press the up arrow or down arrow button to select one of the following color effect options, and then press OK: No Effect Black & White Sepia Antique Does not apply any special color effects to your photo. Prints the photo in black and white. Applies brown tones, similar to photos produced in the early 1900s, to your photo. Applies brown tones along with some pale colors to your photo. With this option, your photo will look like it was hand-tinted. Related topics • "Print photos" on page 72 • "Make reprints of your photos" on page 93 Photos Edit photos using the control panel 79
-
 1
1 -
2
-
3
-
4
-
5
-
6
-
7
-
8
-
9
-
10
-
11
-
12
-
13
-
14
-
15
-
16
-
17
-
18
-
19
-
20
-
21
-
22
-
23
-
24
-
25
-
26
-
27
-
28
-
29
-
30
-
31
-
32
-
33
-
34
-
35
-
36
-
37
-
38
-
39
-
40
-
41
-
42
-
43
-
44
-
45
-
46
-
47
-
48
-
49
-
50
-
51
-
52
-
53
-
54
-
55
-
56
-
57
-
58
-
59
-
60
-
61
-
62
-
63
-
64
-
65
-
66
-
67
-
68
-
69
-
70
-
71
-
72
-
73
-
74
-
75
-
76
-
 77
77 -
 78
78 -
 79
79 -
 80
80 -
 81
81 -
 82
82 -
 83
83 -
 84
84 -
 85
85 -
 86
86 -
 87
87 -
88
-
89
-
90
-
91
-
92
-
93
-
94
-
95
-
96
-
97
-
98
-
99
-
100
-
101
-
102
-
103
-
104
-
105
-
106
-
107
-
108
-
109
-
110
-
111
-
112
-
113
-
114
-
115
-
116
-
117
-
118
-
119
-
120
-
121
-
122
-
123
-
124
-
125
-
126
-
127
-
128
-
129
-
130
-
131
-
132
-
133
-
134
-
135
-
136
-
137
-
138
-
139
-
140
-
141
-
142
-
143
-
144
-
145
-
146
-
147
-
148
-
149
-
150
-
151
-
152
-
153
-
154
-
155
-
156
-
157
-
158
-
159
-
160
-
161
-
162
-
163
-
164
-
165
-
166
-
167
-
168
-
169
-
170
-
171
-
172
-
173
-
174
-
175
-
176
-
177
-
178
-
179
-
180
-
181
-
182
-
183
-
184
-
185
-
186
-
187
-
188
-
189
-
190
-
191
-
192
-
193
-
194
-
195
-
196
-
197
-
198
-
199
-
200
-
201
-
202
-
203
-
204
-
205
-
206
-
207
-
208
-
209
-
210
-
211
-
212
-
213
-
214
-
215
-
216
-
217
-
218
-
219
-
220
-
221
-
222
-
223
-
224
-
225
-
226
-
227
-
228
-
229
-
230
-
231
-
232
-
233
-
234
-
235
-
236
-
237
-
238
-
239
-
240
-
241
-
242
-
243
-
244
-
245
-
246
-
247
-
248
-
249
-
250
-
251
-
252
-
253
-
254
-
255
-
256
-
257
-
258
-
259
-
260
-
261
-
262
-
263
-
264
-
265
-
266
-
267
-
268
-
269
-
270
-
271
-
272
-
273
-
274
-
275
-
276
-
277
-
278
-
279
-
280
-
281
-
282
-
283
-
284
-
285
-
286
-
287
-
288
-
289
-
290
-
291
-
292
 |
 |

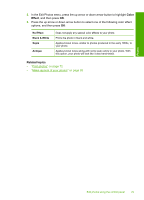
2.
In the Edit Photos menu, press the up arrow or down arrow button to highlight
Color
Effect
, and then press
OK
.
3.
Press the up arrow or down arrow button to select one of the following color effect
options, and then press
OK
:
No Effect
Does not apply any special color effects to your photo.
Black & White
Prints the photo in black and white.
Sepia
Applies brown tones, similar to photos produced in the early 1900s, to
your photo.
Antique
Applies brown tones along with some pale colors to your photo. With
this option, your photo will look like it was hand-tinted.
Related topics
•
“
Print photos” on page 72
•
“
Make reprints of your photos” on page 93
Edit photos using the control panel
79
Photos