HP Sprout Pro G2 Maintenance & Service Guide - Page 58
System board
 |
View all HP Sprout Pro G2 manuals
Add to My Manuals
Save this manual to your list of manuals |
Page 58 highlights
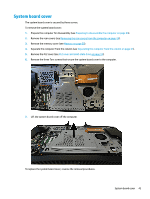
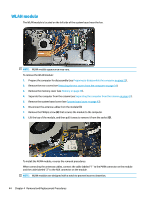
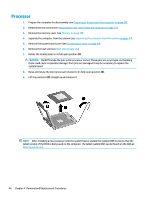
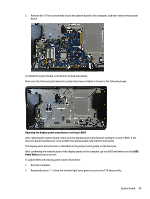
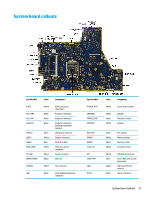
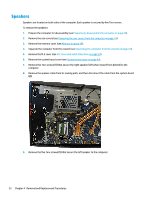
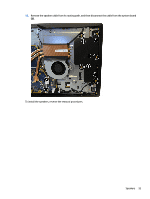
System board Before removing the system board, following these steps: 1. Prepare the computer for disassembly (see Preparing to disassemble the computer on page 23). 2. Remove the rear covers (see Removing the rear covers from the computer on page 24). 3. Remove the memory cover (see Memory on page 29). 4. Separate the computer from the column (see Separating the computer from the column on page 41). 5. Remove the system board cover (see System board cover on page 43). 6. Remove the heat sink (see Heat sink on page 45). 7. Remove the fan (see Fan assembly on page 47). When replacing the system board, be sure to remove the following components (as needed) from the defective system board and install on the replacement system board: ● Wireless USB receiver (see Wireless USB receiver on page 31) ● Solid-state drive (see M.2 cover and solid-state drive on page 33) ● Memory modules (see Memory on page 29) ● WLAN/Bluetooth module (see WLAN module on page 44) ● Processor (see Processor on page 46) Before removing the system board, following these steps: 1. Disconnect all remaining cables from the system board, noting their location for reinstallation as shown in the following image. 48 Chapter 4 Removal and Replacement Procedures
-
 1
1 -
2
-
3
-
4
-
5
-
6
-
7
-
8
-
9
-
10
-
11
-
12
-
13
-
14
-
15
-
16
-
17
-
18
-
19
-
20
-
21
-
22
-
23
-
24
-
25
-
26
-
27
-
28
-
29
-
30
-
31
-
32
-
33
-
34
-
35
-
36
-
37
-
38
-
39
-
40
-
41
-
42
-
43
-
44
-
45
-
46
-
47
-
48
-
49
-
50
-
51
-
52
-
 53
53 -
 54
54 -
 55
55 -
 56
56 -
 57
57 -
 58
58 -
 59
59 -
 60
60 -
 61
61 -
 62
62 -
 63
63 -
64
-
65
-
66
-
67
-
68
-
69
-
70
-
71
-
72
-
73
-
74
-
75
-
76
-
77
-
78
-
79
-
80
-
81
-
82
-
83
-
84
-
85
-
86
-
87
-
88
-
89
-
90
-
91
-
92
-
93
-
94
-
95
-
96
-
97
-
98
-
99
-
100
-
101
-
102
-
103
-
104
-
105
-
106
-
107
-
108
-
109
-
110
-
111
-
112
-
113
-
114
-
115
-
116
-
117
-
118
-
119
-
120
-
121
-
122
-
123
-
124
-
125
-
126
-
127
-
128
-
129
-
130
-
131
-
132
-
133
-
134
-
135
-
136
 |
 |
