HP Sprout Pro G2 Maintenance & Service Guide - Page 74
Slide the power connector out of the front of the column
 |
View all HP Sprout Pro G2 manuals
Add to My Manuals
Save this manual to your list of manuals |
Page 74 highlights
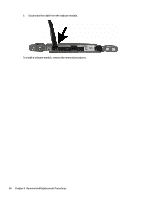
10. Disconnect the white and black cables from the power supply (3). 11. Position the column so you can access the power supply from the side. 12. Disconnect the cable from the top of the power supply (1). 13. Slide the power connector out of the front of the column (2). To install the power supply, reverse the removal procedures. 64 Chapter 4 Removal and Replacement Procedures
-
 1
1 -
2
-
3
-
4
-
5
-
6
-
7
-
8
-
9
-
10
-
11
-
12
-
13
-
14
-
15
-
16
-
17
-
18
-
19
-
20
-
21
-
22
-
23
-
24
-
25
-
26
-
27
-
28
-
29
-
30
-
31
-
32
-
33
-
34
-
35
-
36
-
37
-
38
-
39
-
40
-
41
-
42
-
43
-
44
-
45
-
46
-
47
-
48
-
49
-
50
-
51
-
52
-
53
-
54
-
55
-
56
-
57
-
58
-
59
-
60
-
61
-
62
-
63
-
64
-
65
-
66
-
67
-
68
-
 69
69 -
 70
70 -
 71
71 -
 72
72 -
 73
73 -
 74
74 -
 75
75 -
 76
76 -
 77
77 -
 78
78 -
 79
79 -
80
-
81
-
82
-
83
-
84
-
85
-
86
-
87
-
88
-
89
-
90
-
91
-
92
-
93
-
94
-
95
-
96
-
97
-
98
-
99
-
100
-
101
-
102
-
103
-
104
-
105
-
106
-
107
-
108
-
109
-
110
-
111
-
112
-
113
-
114
-
115
-
116
-
117
-
118
-
119
-
120
-
121
-
122
-
123
-
124
-
125
-
126
-
127
-
128
-
129
-
130
-
131
-
132
-
133
-
134
-
135
-
136
 |
 |
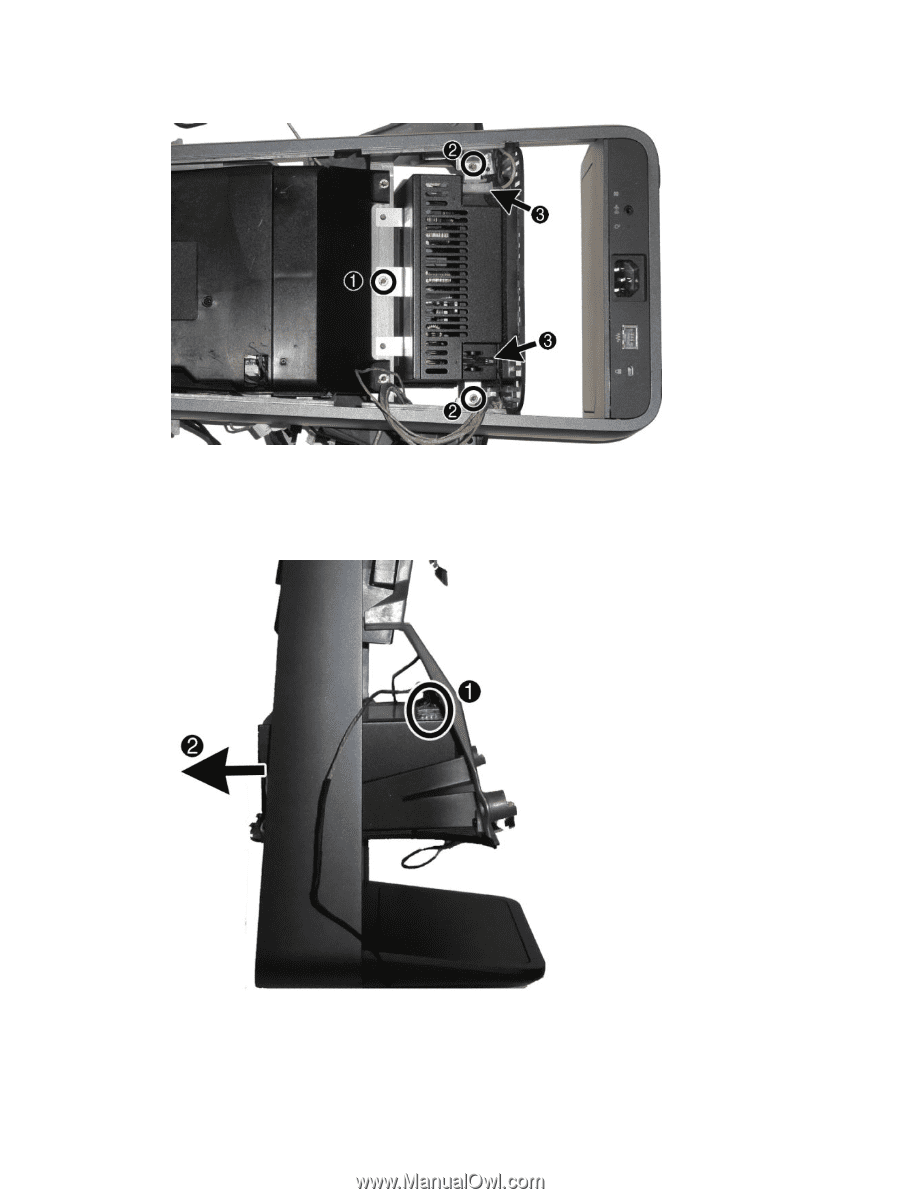
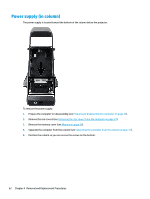
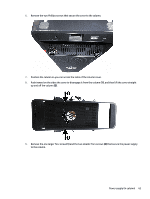
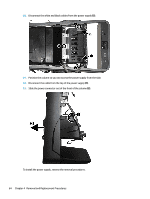
10.
Disconnect the white and black cables from the power supply
(3)
.
11.
Position the column so you can access the power supply from the side.
12.
Disconnect the cable from the top of the power supply
(1)
.
13.
Slide the power connector out of the front of the column
(2)
.
To install the power supply, reverse the removal procedures.
64
Chapter 4
Removal and Replacement Procedures