HP Xw460c Administrator's Guide for Microsoft Windows on HP ProLiant Blade Wor - Page 16
Setting Remote Console Mode, Remote Console Mode menu
 |
View all HP Xw460c manuals
Add to My Manuals
Save this manual to your list of manuals |
Page 16 highlights
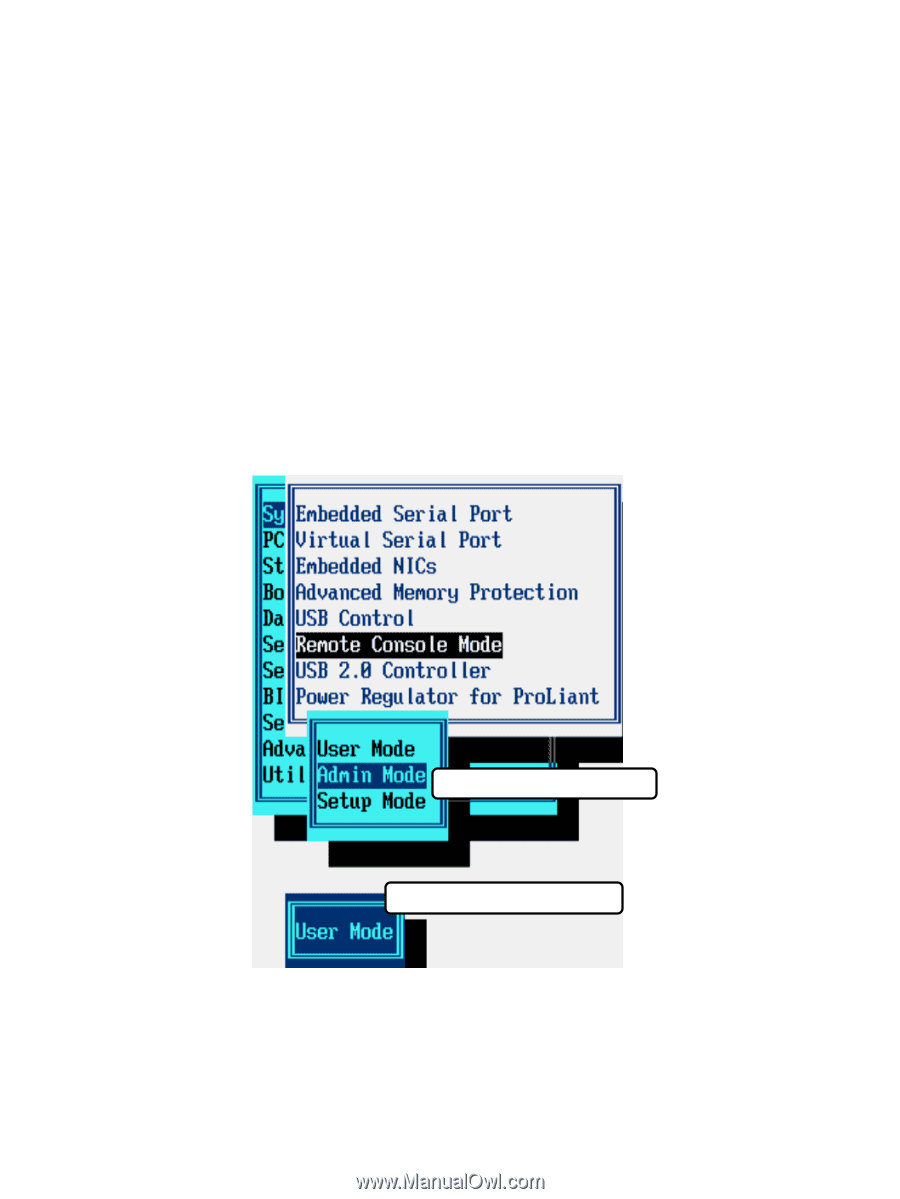
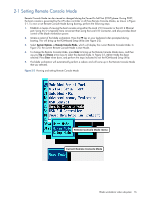
2-1 Setting Remote Console Mode Remote Console Mode can be viewed or changed during the Power-On Self Test (POST) phase. During POST, the boot console is generated by the ATI video controller in all three Remote Console Modes, as shown in Figure 2-1. To view or set Remote Console Mode during booting, perform the following steps: 1. Establish a means of viewing the boot console using either the Local I/O Connector or the iLO 2 Ethernet port. Using iLO 2 is typically more convenient than using the Local I/O Connector, and also provides direct control of the blade workstation power. 2. Initiate a restart of the blade workstation. Press the F9 key on your keyboard when prompted during booting. This will bring up the ROM-based Setup Utility (see Figure 2-2). 3. Select System Options -> Remote Console Mode, which will display the current Remote Console Mode. In Figure 2-2, the current Remote Console Mode is User Mode. 4. To change the Remote Console Mode, press Enter to bring up the Remote Console Mode menu, and then use your Up and Down arrow keys to select the desired mode. In Figure 2-2, Admin Mode has been selected. Press Enter when done, and perform the steps indicated to exit the ROM-based Setup Utility. 5. The blade workstation will automatically perform a reboot, and will come up in the Remote Console Mode that you selected. Figure 2-2 Viewing and setting Remote Console Mode Remote Console Mode menu Current Remote Console Mode Blade workstation video subsystem 16
-
 1
1 -
2
-
3
-
4
-
5
-
6
-
7
-
8
-
9
-
10
-
 11
11 -
 12
12 -
 13
13 -
 14
14 -
 15
15 -
 16
16 -
 17
17 -
 18
18 -
 19
19 -
 20
20 -
 21
21 -
22
-
23
-
24
-
25
-
26
-
27
-
28
-
29
-
30
-
31
-
32
-
33
-
34
-
35
-
36
-
37
-
38
-
39
-
40
-
41
-
42
-
43
-
44
-
45
-
46
-
47
-
48
-
49
-
50
-
51
-
52
-
53
-
54
-
55
-
56
-
57
-
58
-
59
-
60
-
61
-
62
-
63
-
64
-
65
-
66
-
67
-
68
-
69
-
70
-
71
-
72
-
73
-
74
-
75
-
76
-
77
-
78
-
79
-
80
-
81
-
82
-
83
-
84
-
85
-
86
-
87
-
88
-
89
-
90
-
91
-
92
-
93
-
94
-
95
-
96
-
97
-
98
-
99
-
100
-
101
-
102
-
103
-
104
-
105
 |
 |