Figures
6
Figures
Figure 1-1
Simplified HP Blade Workstation Solution documentation hierarchy
..................................................
11
Figure 2-1
Video subsystem architecture and operating modes
........................................................................
14
Figure 2-2
Viewing and setting Remote Console Mode
...................................................................................
16
Figure 2-3
Admin Mode
.............................................................................................................................
17
Figure 2-4
Setup Mode
...............................................................................................................................
18
Figure 2-5
User Mode
................................................................................................................................
19
Figure 3-1
The HP Graphics Expansion Blade attaches to the xw460c blade workstation
....................................
23
Figure 3-2
Connecting media to the blade workstation
...................................................................................
24
Figure 3-3
Connecting a monitor, keyboard, and mouse to the blade workstation
..............................................
25
Figure 3-4
The OOBE Administrator password screen
.....................................................................................
26
Figure 3-5
System Management Homepage
..................................................................................................
27
Figure 3-6
Boot console display of the iLO 2 IP address
..................................................................................
28
Figure 3-7
iLO 2 login screen
......................................................................................................................
28
Figure 3-8
Viewing the two blade workstation NICs
.......................................................................................
29
Figure 3-9
NIC IP addresses
........................................................................................................................
30
Figure 3-10
Determining the first NIC
..........................................................................................................
30
Figure 3-11
Advanced Settings dialog
..........................................................................................................
30
Figure 4-1
Windows setup screen
................................................................................................................
36
Figure 4-2
Mass storage setup screen
...........................................................................................................
37
Figure 4-3
Storage driver prompt screen
.......................................................................................................
37
Figure 4-4
SCSI adapter selection screen
......................................................................................................
38
Figure 4-5
Windows XP Pro setup screen
......................................................................................................
38
Figure 4-6
Windows XP EULA
.....................................................................................................................
39
Figure 4-7
Windows setup manual installation screen
.....................................................................................
40
Figure 4-8
Windows logo testing screen
.......................................................................................................
40
Figure 4-9
Product key screen
.....................................................................................................................
41
Figure 4-10
Computer Name and Administrator Password screen
....................................................................
42
Figure 4-11
Installation of SNMP
.................................................................................................................
43
Figure 4-12
SNMP service properties
...........................................................................................................
44
Figure 8-1
Process to capture the blade workstation OS image
........................................................................
52
Figure 9-1
Process to deploy an OS image to the blade workstation
.................................................................
55
Figure 10-1
Example unattended installation directories
..................................................................................
59
Figure 10-2
SoftPaq that provides support files for unattended installation of Windows
.......................................
60
Figure 11-1
RGS Receiver Single Sign-on authentication prompt
......................................................................
69
Figure 11-2
Blade Easy Login screen
............................................................................................................
70
Figure 11-3 Rebooting Windows on the blade
................................................................................................
74
Figure 12-1
Enclosure front and rear views
...................................................................................................
76
Figure 12-2
Detailed blade information
........................................................................................................
77
Figure 12-3
Blade power management
.........................................................................................................
77
Figure 12-4
iLO 2 status summary
................................................................................................................
78
Figure 12-5
Remote Console selection
..........................................................................................................
79
Figure 12-6
Boot console
............................................................................................................................
80
Figure 12-7
Windows desktop
.....................................................................................................................
81
Figure 12-8
The Ctrl+Alt+Del button
.............................................................................................................
81
Figure 12-9
Connecting virtual media
...........................................................................................................
82
Figure 12-10
PC files accessible from the blade workstation Windows desktop
.................................................
83
Figure 12-11
Mounting of virtual media to the blade workstation using the Integrated Remote Console
.................
83
Figure 12-12
Remote Desktop Connection menu
............................................................................................
84
Figure 12-13
Blade IP address
.....................................................................................................................
84
Figure 12-14
RDC Windows desktop
...........................................................................................................
85
Figure 12-15
SMH login screen
...................................................................................................................
86
Figure 12-16
System status page
.................................................................................................................
86
Figure 12-17
Accessing SMH from the Start Menu
.........................................................................................
87
Figure A-1
Operating system selection options
...............................................................................................
98

 1
1 2
2 3
3 4
4 5
5 6
6 7
7 8
8 9
9 10
10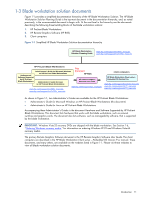 11
11 12
12