HP Xw460c Administrator's Guide for Microsoft Windows on HP ProLiant Blade Wor - Page 48
Restoring Windows XP-32, Hardware configuration, Restoring Windows XP-32 from the RestorePlus! CD
 |
View all HP Xw460c manuals
Add to My Manuals
Save this manual to your list of manuals |
Page 48 highlights
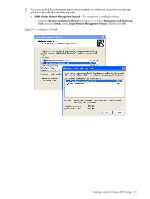
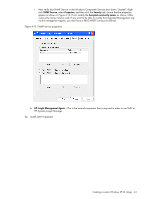
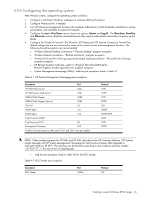
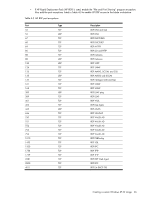
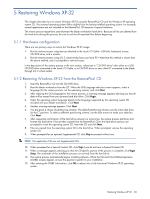
5 Restoring Windows XP-32 This chapter describes how to restore Windows XP-32 using the RestorePlus! CD and the Windows XP operating system CD. The restored operating system differs slightly from the factory-installed operating system. For example, several applications are not included on the RestorePlus! CD because of space limitations. The restore process repartitions and reformats the blade workstation hard drive. Because all files are deleted from the hard drive during this process, be sure to archive all important files before beginning. 5-1-1 Hardware configuration There are two primary ways to restore the Windows XP-32 image: 1. Run the restore process using devices attached to the Local I/O Cable-USB hub, keyboard, mouse, CD/DVD drive, and a monitor. 2. Run the restore process using iLO 2 virtual media from your local PC-Note that this method is slower than the above method, and is susceptible to network issues. In the description of the restore process in the next section, references to "CD/DVD drive" refer either to a USB CD/DVD drive connected to the Local I/O Cable, or a CD/DVD drive on your client PC connected to the blade through iLO 2 virtual media. 5-1-2 Restoring Windows XP-32 from the RestorePlus! CD 1. Insert the RestorePlus! CD into the CD/DVD drive. 2. Boot the blade workstation from the CD. When the GUI Language selection screen appears, select a language (for the restore process, not the operating system), and click Next. 3. After selecting the GUI Language for the restore process, a warning message appears advising you that all data will be erased from your primary hard disk drive. Click Begin. 4. Select the operating system language based on the language supported by the operating system CD included with your blade workstation. Click Next. 5. Another warning message appears. Click Next. 6. You are given a choice of partitioning schemes. The default partitioning scheme uses the entire disk drive for the C: partition. To select a different partitioning scheme, use the blue arrows to make your selection. Click Next. 7. After requesting confirmation of the hard drive erasure two more times, the restore process partitions and formats the hard drive. Files are then copied from the RestorePlus! CD to the hard drive and you are prompted to insert the operating system CD. Insert the CD and click Next. 8. Files are copied from the operating system CD to the hard drive. When prompted, remove the operating system CD. 9. When prompted for an optional Supplemental CD, click Skip to proceed without one. NOTE: The application CDs are not Supplemental CDs. 10. When prompted for a Special Content CD, click Skip if you do not have a Special Content CD. 11. When a message appears advising you that the CD-specific portion of the process is complete, click Begin Setup. The remainder of the installation process runs entirely from the hard drive. 12. The restore process automatically begins installing software. When the Microsoft Out-Of-Box-Experience (OOBE) screens appear, answer the questions specific to your installation. 13. After entering the OOBE information, click OK to reboot into a fully functional Windows XP-32 operating system. Restoring Windows XP-32 48
-
 1
1 -
2
-
3
-
4
-
5
-
6
-
7
-
8
-
9
-
10
-
11
-
12
-
13
-
14
-
15
-
16
-
17
-
18
-
19
-
20
-
21
-
22
-
23
-
24
-
25
-
26
-
27
-
28
-
29
-
30
-
31
-
32
-
33
-
34
-
35
-
36
-
37
-
38
-
39
-
40
-
41
-
42
-
 43
43 -
 44
44 -
 45
45 -
 46
46 -
 47
47 -
 48
48 -
 49
49 -
 50
50 -
 51
51 -
 52
52 -
 53
53 -
54
-
55
-
56
-
57
-
58
-
59
-
60
-
61
-
62
-
63
-
64
-
65
-
66
-
67
-
68
-
69
-
70
-
71
-
72
-
73
-
74
-
75
-
76
-
77
-
78
-
79
-
80
-
81
-
82
-
83
-
84
-
85
-
86
-
87
-
88
-
89
-
90
-
91
-
92
-
93
-
94
-
95
-
96
-
97
-
98
-
99
-
100
-
101
-
102
-
103
-
104
-
105
 |
 |