HP Xw460c Administrator's Guide for Microsoft Windows on HP ProLiant Blade Wor - Page 53
Tools, Remote Agent Installer, Change Settings button, Use only Microsoft Sysprep utility
 |
View all HP Xw460c manuals
Add to My Manuals
Save this manual to your list of manuals |
Page 53 highlights
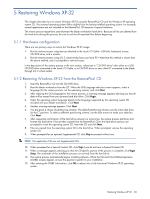
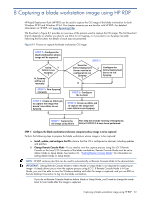
To capture an OS image and deploy it to multiple other computers, the Sysprep tool needs to be run to set a new SID and to apply new system settings, such as the computer name. If you plan to use Altiris Deployment Server to run Sysprep, continue with STEP 2 below. If you plan to run Sysprep manually, proceed to STEP 5. STEP 2: If required, configure the Altiris Deployment Server to run Sysprep Depending on your RDP configuration, this step may have already been completed. To configure the Altiris Deployment Server to run Sysprep, refer to the Deployment Solution documentation available from Altiris at www.altiris.com. STEP 3: Configure the A-Client (Altiris Agent) so that it is installed on the blade workstation If you are using Altiris to run Sysprep, you'll need to configure the A-client (Altiris Agent) so that it is installed on the blade workstation by performing these steps: a. On the Altiris Deployment Server, click Tools→ Remote Agent Installer. The Remote Agent Installer screen displays. Select "Use this username and password for client/s". (Use an Administrative account local to target), Click Next. b. Accept the default install directory path or choose your own, and select "Enable this agent to use SIDgen and/or Microsoft Sysprep". c. If you wish to configure optional settings on the A-client, click the "Change Settings" button. When done click "next". d. Click the dropdown arrow and select Use only Microsoft Sysprep utility. Locate the DEPLOY.cab file you downloaded in STEP 2, and in the XP/2003 box using the browse button next to "Windows XP/2003". Click "Next". e. Select "Add client(s) to default group", or select the group you would like them to be added to. f. On the "Selecting Clients" screen, select or add the Names or IP address of the blade workstations you wish to install A-client(s) on by using the "Add" button. You can select multiple workstations at a time. When finished adding workstations, select finish, and it will show the progress and results of the Altiris Agent installation. STEP 4: Create a job that captures the image using Altiris to run Sysprep Perform the following steps to create a new job that captures the OS image using Altiris to run Sysprep: a. Under the jobs pane, right-click in the white area and select "New Job". Enter a name for the job that is unique. Double click the new job, Click "Add>>" and select "Create Disk Image". b. On the "Save Disk Image to a file" screen, next to the name field click the browse button and locate the images folder (\Images) and enter a unique image name for your image. Click Save. c. Select "Prepare using Sysprep" and enter the Product key to be used. If you have a specific pre-boot environment you want to run the image in, select it at the bottom of the screen, in the case of the Windows Blade the default should be WinPE. d. Accept the defaults on the "Return Codes" screen. Continue with STEP 7. Capturing a blade workstation image using HP RDP 53
-
 1
1 -
2
-
3
-
4
-
5
-
6
-
7
-
8
-
9
-
10
-
11
-
12
-
13
-
14
-
15
-
16
-
17
-
18
-
19
-
20
-
21
-
22
-
23
-
24
-
25
-
26
-
27
-
28
-
29
-
30
-
31
-
32
-
33
-
34
-
35
-
36
-
37
-
38
-
39
-
40
-
41
-
42
-
43
-
44
-
45
-
46
-
47
-
 48
48 -
 49
49 -
 50
50 -
 51
51 -
 52
52 -
 53
53 -
 54
54 -
 55
55 -
 56
56 -
 57
57 -
 58
58 -
59
-
60
-
61
-
62
-
63
-
64
-
65
-
66
-
67
-
68
-
69
-
70
-
71
-
72
-
73
-
74
-
75
-
76
-
77
-
78
-
79
-
80
-
81
-
82
-
83
-
84
-
85
-
86
-
87
-
88
-
89
-
90
-
91
-
92
-
93
-
94
-
95
-
96
-
97
-
98
-
99
-
100
-
101
-
102
-
103
-
104
-
105
 |
 |