HP Xw460c Administrator's Guide for Microsoft Windows on HP ProLiant Blade Wor - Page 68
User Information, Introduction, Powering on the HP blade workstation client
 |
View all HP Xw460c manuals
Add to My Manuals
Save this manual to your list of manuals |
Page 68 highlights
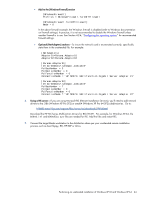
11 User Information 11-1 Introduction This chapter is intended for the user of the HP Blade Workstation Solution and describes how to interact with the blade workstation from the client computer. The following topics are included in this chapter: • Powering on the blade workstation client • Changing the behavior of RGS • Connecting from the client to the blade • Sending Ctrl+Alt+Del to the blade workstation • Accessing blade workstation desktop windows • Moving desktop windows between monitors • Spanning multiple displays with a desktop window • Maximizing a window to a single display • Supported USB devices • Synchronizing a PDA • Adjusting audio volume on the client and blade • Disconnecting the client from the blade workstations • Reconnecting to disconnected sessions NOTE: In the following sections, "you" refers to the user. 11-2 Powering on the HP blade workstation client To power on the blade workstation client, press the power button on the blade front panel. The computer cycles through a startup sequence in less than a minute and then displays either an Enterprise Directory authentication window or the remote display control panel. If a Webmin administration screen appears, your client has not been properly configured. Contact your administrator for assistance. 11-3 Changing the behavior of RGS It is sometimes necessary to change the behavior of RGS. This is done using the RGS Receiver Control Panel, the Remote Display Window Toolbar, or the Virtual KVM. The Receiver Control Panel allows you to change all connections between a client and one or more blades. The Remote Display Window Toolbar controls only a single connection. The Virtual KVM allows switching between connections in situations where you have more display area on your blades than you have monitors on the client. For more information about configuring RGS, see the HP Remote Graphics User's Guide. The RGS Receiver must be in Setup Mode (where keyboard and mouse input are directed to the RGS Receiver) to access the RGS controls. When the RGS Receiver is in Setup Mode, the display fades to gray as a visual queue. Setup Mode is activated by entering certain key sequences while the RGS Receiver window is selected. By default, the key sequence to enter Setup Mode is press Shift, press Space, and release Space (or, more simply, hold down the Shift key, then press and release the Space bar). Once in Setup Mode (while still holding the Shift key), you can: • Press the M key (Setup Mode + M) to bring up the Receiver Control Panel. • Press the H key (Setup Mode + H) to bring up the Remote Display Window Toolbar. • Press the Tab key to access the Virtual KVM. If these key sequences don't work, contact your administrator. User Information 68
-
 1
1 -
2
-
3
-
4
-
5
-
6
-
7
-
8
-
9
-
10
-
11
-
12
-
13
-
14
-
15
-
16
-
17
-
18
-
19
-
20
-
21
-
22
-
23
-
24
-
25
-
26
-
27
-
28
-
29
-
30
-
31
-
32
-
33
-
34
-
35
-
36
-
37
-
38
-
39
-
40
-
41
-
42
-
43
-
44
-
45
-
46
-
47
-
48
-
49
-
50
-
51
-
52
-
53
-
54
-
55
-
56
-
57
-
58
-
59
-
60
-
61
-
62
-
 63
63 -
 64
64 -
 65
65 -
 66
66 -
 67
67 -
 68
68 -
 69
69 -
 70
70 -
 71
71 -
 72
72 -
 73
73 -
74
-
75
-
76
-
77
-
78
-
79
-
80
-
81
-
82
-
83
-
84
-
85
-
86
-
87
-
88
-
89
-
90
-
91
-
92
-
93
-
94
-
95
-
96
-
97
-
98
-
99
-
100
-
101
-
102
-
103
-
104
-
105
 |
 |