HP Xw460c Administrator's Guide for Microsoft Windows on HP ProLiant Blade Wor - Page 71
Sending Ctrl+Alt+Delete to the blade workstation, Accessing blade workstation desktop windows
 |
View all HP Xw460c manuals
Add to My Manuals
Save this manual to your list of manuals |
Page 71 highlights
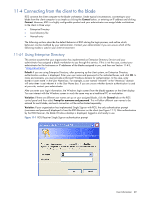
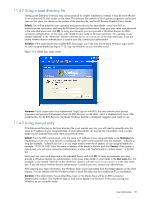
Variation: If your organization has implemented Single Sign-on, the only authentication prompt (username and password) displayed is from the RGS Receiver on the client. After authentication by the RGS Receiver, the blade Windows desktop of the blade is displayed, logged-in and ready to use. 11-5 Sending Ctrl+Alt+Delete to the blade workstation Microsoft Windows requires that you enter Ctrl+Alt+Delete to log in, to access the Windows Task Manager, or to lock the desktop. If you are accessing a blade workstation from the following clients, the process is identical to a desk side system-the Ctrl+Alt+Delete key sequence is forwarded directly to the blade: • HP Blade Workstation Client • HP dc72 Blade Workstation Client • HP dc73 Blade Workstation Client If you are using a client running Microsoft Windows, Ctrl+Alt+Delete is intercepted by Windows. When this happens, the Microsoft Windows Security screen is generated by the client computer, not by the blade workstation-click Cancel if this occurs. Open the RGS Remote Display Window Toolbar as described in Section 11-3, "Changing the behavior of RGS", and then click the Ctrl+Alt+Del button shown below: You can also use the alternate sequence, Ctrl+Alt+End, from a Microsoft Windows client. If this sequence is disabled in RGS, enable it as follows: 1. Open the RGS Control Panel (Setup Mode + M). 2. Click the Advanced button. 3. Click the Hotkeys tab. 4. Select Send CTRL-ALT-END key sequence as CTRL-ALT-DEL. 11-6 Accessing blade workstation desktop windows If your client computer is configured with four monitors (see Section 3-1, "Setting up the client access device"), you can have as many as four active desktop windows from four blade workstations displayed simultaneously at full resolution on your client computer. Assuming your client computer has been properly configured, the mouse pointer should move logically from one monitor to the next as if the display area is one large monitor. To access the desktop of a particular blade workstation, move the mouse pointer to that desktop area. If the aggregate display area of your blade workstations exceeds the display area provided by the monitors on your desk (such that one blade display covers another), you can use the RGS Virtual KVM to bring forward the desktop window from the desired blade as follows: 1. Enter Setup Mode as described in Section 11-3, "Changing the behavior of RGS." 2. Press the Tab key. A window appears on the desktop showing a thumbnail view of each desktop. 3. Use the Tab key to highlight the desired desktop, and release the Setup Mode key. 4. Alternatively, you can put the system in Setup Mode, and then press a number key corresponding to the desired blade. User Information 71
-
 1
1 -
2
-
3
-
4
-
5
-
6
-
7
-
8
-
9
-
10
-
11
-
12
-
13
-
14
-
15
-
16
-
17
-
18
-
19
-
20
-
21
-
22
-
23
-
24
-
25
-
26
-
27
-
28
-
29
-
30
-
31
-
32
-
33
-
34
-
35
-
36
-
37
-
38
-
39
-
40
-
41
-
42
-
43
-
44
-
45
-
46
-
47
-
48
-
49
-
50
-
51
-
52
-
53
-
54
-
55
-
56
-
57
-
58
-
59
-
60
-
61
-
62
-
63
-
64
-
65
-
 66
66 -
 67
67 -
 68
68 -
 69
69 -
 70
70 -
 71
71 -
 72
72 -
 73
73 -
 74
74 -
 75
75 -
 76
76 -
77
-
78
-
79
-
80
-
81
-
82
-
83
-
84
-
85
-
86
-
87
-
88
-
89
-
90
-
91
-
92
-
93
-
94
-
95
-
96
-
97
-
98
-
99
-
100
-
101
-
102
-
103
-
104
-
105
 |
 |