Lantronix xPrintServer - Office User Guide - Page 15
Installation, xPrintServer® Office Edition Print Server User Guide, Ethernet LEDs
 |
View all Lantronix xPrintServer - Office manuals
Add to My Manuals
Save this manual to your list of manuals |
Page 15 highlights
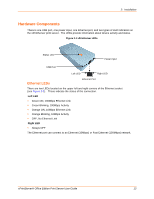
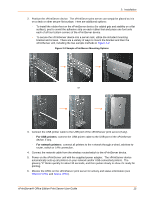
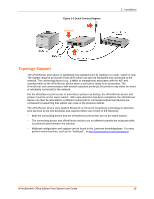
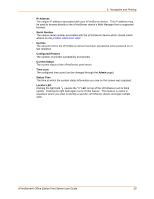
2: Installation 2. Position the xPrintServer device. The xPrintServer print server can simply be placed as it is on a desk or other secure flat surface. Here are additional options: - To install the rubber feet on the xPrintServer device (for added grip and stability on a flat surface), peel to unveil the adhesive strip on each rubber foot and press one foot onto each of all four bottom corners of the xPrintServer device. - To secure the xPrintServer device into a server rack, utilize the included mounting bracket and screws. There are a variety of ways to mount the bracket and then the xPrintServer unit, including the two sample methods in Figure 2-2. Figure 2-2 Sample xPrintServer Mounting Options or 3. Connect the USB printer cable to the USB port of the xPrintServer print server (if any). - For USB printers: connect the USB printer cable to the USB port of the xPrintServer device, if any. - For network printers: connect all printers to the n etwork through a wired, wireless-torouter, switch or LAN connection. 4. Connect the network cable from the wireless router/switch to the xPrintServer device. 5. Power on the xPrintServer unit with the supplied power adapter. The xPrintServer device automatically sets-up all printers on your network and/or USB-connected printers. The glowing "X" blinks quickly for about 30 seconds, and then pulses slowly to show it's ready for printing. 6. Monitor the LEDs on the xPrintServer print server for activity and status information (see Ethernet LEDs and Status LEDs). xPrintServer® Office Edition Print Server User Guide 15
-
 1
1 -
2
-
3
-
4
-
5
-
6
-
7
-
8
-
9
-
 10
10 -
 11
11 -
 12
12 -
 13
13 -
 14
14 -
 15
15 -
 16
16 -
 17
17 -
 18
18 -
 19
19 -
 20
20 -
21
-
22
-
23
-
24
-
25
-
26
-
27
-
28
-
29
-
30
-
31
-
32
-
33
-
34
-
35
-
36
-
37
-
38
-
39
-
40
-
41
-
42
-
43
-
44
-
45
-
46
-
47
-
48
-
49
-
50
-
51
-
52
-
53
-
54
-
55
-
56
-
57
-
58
-
59
-
60
-
61
-
62
-
63
-
64
-
65
-
66
-
67
-
68
-
69
-
70
-
71
-
72
-
73
-
74
-
75
-
76
-
77
-
78
-
79
-
80
-
81
-
82
-
83
-
84
-
85
-
86
-
87
-
88
-
89
-
90
-
91
-
92
-
93
-
94
 |
 |
