Lantronix xPrintServer - Office User Guide - Page 65
Managing Security Certificates and SSL/TLS Keys, Testing Proxy Server Connectivity
 |
View all Lantronix xPrintServer - Office manuals
Add to My Manuals
Save this manual to your list of manuals |
Page 65 highlights
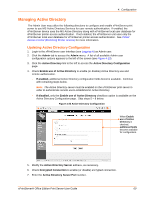
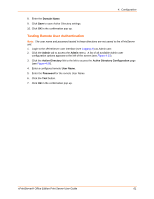
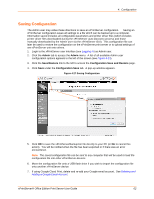
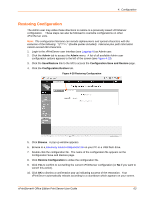
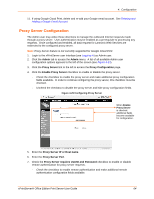
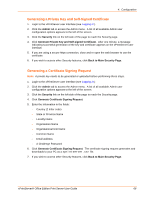
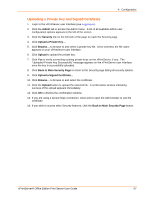
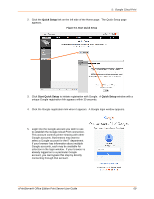
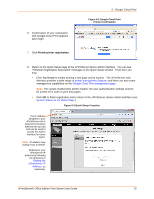
4: Configuration - Uncheck the checkbox to disable remote authentication and hide remote authentication fields. 8. If Proxy Server requires UserID and Password is checked, enter a UserID and Password. 9. Click Save. 10. Click OK to dismiss the confirmation pop-up that appears. Testing Proxy Server Connectivity 1. Login to the xPrintServer user interface (see Logging In) as Admin user. 2. Click the Admin tab to access the Admin menu. A list of all available Admin user configuration options appears to the left of the screen (see Figure 4-13). 3. Click the Proxy Server link to the left to access the Proxy Configuration page (see Figure 4-29). 4. Click Test Connectivity to internet. 5. Click OK to dismiss pop-up indicating success or failure of connection. Managing Security Certificates and SSL/TLS Keys This section provides directions for generating private keys, self-signed certificates, and certificate signing requests. Directions are also available for uploading a private key or signed certificate. Only the Admin user may manage security certificates and keys through the xPrintServer user interface. Note: SSL doesn't support private DSA keys. You must use an RSA key. Figure 4-30 SSL/TLS Key and Certificate Management xPrintServer® Office Edition Print Server User Guide 65
-
 1
1 -
2
-
3
-
4
-
5
-
6
-
7
-
8
-
9
-
10
-
11
-
12
-
13
-
14
-
15
-
16
-
17
-
18
-
19
-
20
-
21
-
22
-
23
-
24
-
25
-
26
-
27
-
28
-
29
-
30
-
31
-
32
-
33
-
34
-
35
-
36
-
37
-
38
-
39
-
40
-
41
-
42
-
43
-
44
-
45
-
46
-
47
-
48
-
49
-
50
-
51
-
52
-
53
-
54
-
55
-
56
-
57
-
58
-
59
-
 60
60 -
 61
61 -
 62
62 -
 63
63 -
 64
64 -
 65
65 -
 66
66 -
 67
67 -
 68
68 -
 69
69 -
 70
70 -
71
-
72
-
73
-
74
-
75
-
76
-
77
-
78
-
79
-
80
-
81
-
82
-
83
-
84
-
85
-
86
-
87
-
88
-
89
-
90
-
91
-
92
-
93
-
94
 |
 |
