Lantronix xPrintServer - Office User Guide - Page 63
Restoring Configuration, Admin, Save/Restore, Configuration Save and Restore, Browse
 |
View all Lantronix xPrintServer - Office manuals
Add to My Manuals
Save this manual to your list of manuals |
Page 63 highlights
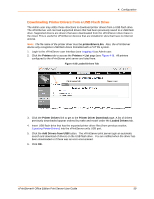
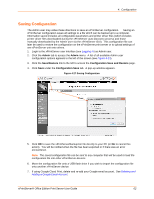
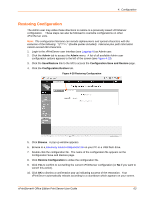
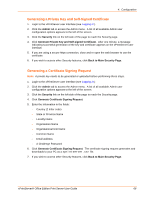
4: Configuration Restoring Configuration The Admin user may utilize these directions to restore to a previously saved xPrintServer configuration. These steps can also be followed to overwrite configurations on other xPrintServer units. Note: The configuration filename can include alphanumeric and special characters with the exclusion of the following double quotes included). Filename plus path information cannot exceed 250 characters. 1. Login to the xPrintServer user interface (see Logging In) as Admin user. 2. Click the Admin tab to access the Admin menu. A list of all available Admin user configuration options appears to the left of the screen (see Figure 4-13). 3. Click the Save/Restore link to the left to access the Configuration Save and Restore page. 4. Click the Configuration Restore tab. Figure 4-28 Restoring Configuration 5. Click Browse. A pop-up window appears. 6. Browse to a previously saved configuration file on your PC or a USB flash drive. 7. Double-click the configuration file. The name of the configuration file appears on the Configuration Save and Restore page. 8. Click Restore Configuration to utilize the configuration file. 9. Click Yes to confirm to overwriting the current xPrintServer configuration (or No if you want to cancel this action). 10. Click OK to dismiss a confirmation pop-up indicating success of the restoration. Your xPrintServer automatically reboots according to a countdown which appears on your screen. xPrintServer® Office Edition Print Server User Guide 63
-
 1
1 -
2
-
3
-
4
-
5
-
6
-
7
-
8
-
9
-
10
-
11
-
12
-
13
-
14
-
15
-
16
-
17
-
18
-
19
-
20
-
21
-
22
-
23
-
24
-
25
-
26
-
27
-
28
-
29
-
30
-
31
-
32
-
33
-
34
-
35
-
36
-
37
-
38
-
39
-
40
-
41
-
42
-
43
-
44
-
45
-
46
-
47
-
48
-
49
-
50
-
51
-
52
-
53
-
54
-
55
-
56
-
57
-
 58
58 -
 59
59 -
 60
60 -
 61
61 -
 62
62 -
 63
63 -
 64
64 -
 65
65 -
 66
66 -
 67
67 -
 68
68 -
69
-
70
-
71
-
72
-
73
-
74
-
75
-
76
-
77
-
78
-
79
-
80
-
81
-
82
-
83
-
84
-
85
-
86
-
87
-
88
-
89
-
90
-
91
-
92
-
93
-
94
 |
 |
