Lantronix xPrintServer - Office User Guide - Page 42
Deleting All Con d Printers, Re-run Discovery, Detected Printers, Printer, Printers > List
 |
View all Lantronix xPrintServer - Office manuals
Add to My Manuals
Save this manual to your list of manuals |
Page 42 highlights
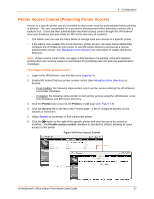
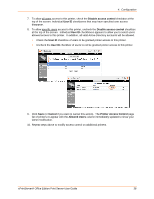
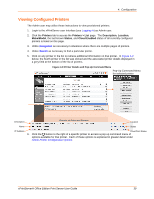
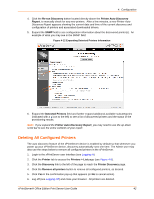
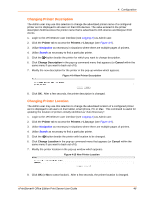
4: Configuration 4. Click the Re-run Discovery button located directly above the Printer Auto Discovery Report, to manually check for any new printers. After a few minutes, a new Printer Auto Discovery Report appears showing the current date and time of the current discovery and configuration of printers and associated downloaded drivers. 5. Expand the SNMP field to see configuration information about the discovered printer(s). An example of what you may see in the SNMP field: Figure 4-12 Expanding Detected Printers Information 6. Expand the Detected Printers field and further expand additional available subcategories (indicated with a icon to the left) to see a list of discovered printers and the status of the provisioning results. Note: If you expand the Printer Auto Discovery Report, you may need to use the up-down scroll bar to see the entire contents of your report. Deleting All Configured Printers The auto discovery feature of the xPrintServer device is enabled by default so that whenever you power up your xPrintServer device, discovery automatically runs one time. The Admin user may also use the steps below to remove all configured printers in the xPrintServer. 1. Login to the xPrintServer user interface (see Logging In). 2. Click the Printer tab to access the Printers > List page (see Figure 4-9). 3. Click the Discovery link to the left of the page to reach the Printer Discovery page. 4. Click the Remove all printers button to remove all configured printers, as desired. 5. Click Yes in the confirmation pop-up that appears (or No to cancel action). 6. Log-off (see Logging Off) and close your browser. All printers are deleted. xPrintServer® Office Edition Print Server User Guide 42
-
 1
1 -
2
-
3
-
4
-
5
-
6
-
7
-
8
-
9
-
10
-
11
-
12
-
13
-
14
-
15
-
16
-
17
-
18
-
19
-
20
-
21
-
22
-
23
-
24
-
25
-
26
-
27
-
28
-
29
-
30
-
31
-
32
-
33
-
34
-
35
-
36
-
 37
37 -
 38
38 -
 39
39 -
 40
40 -
 41
41 -
 42
42 -
 43
43 -
 44
44 -
 45
45 -
 46
46 -
 47
47 -
48
-
49
-
50
-
51
-
52
-
53
-
54
-
55
-
56
-
57
-
58
-
59
-
60
-
61
-
62
-
63
-
64
-
65
-
66
-
67
-
68
-
69
-
70
-
71
-
72
-
73
-
74
-
75
-
76
-
77
-
78
-
79
-
80
-
81
-
82
-
83
-
84
-
85
-
86
-
87
-
88
-
89
-
90
-
91
-
92
-
93
-
94
 |
 |
