Lantronix xPrintServer - Office User Guide - Page 82
Updating Firmware via a Local USB Port, Check for Firmware Update
 |
View all Lantronix xPrintServer - Office manuals
Add to My Manuals
Save this manual to your list of manuals |
Page 82 highlights
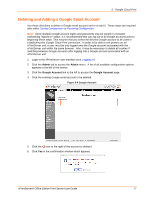
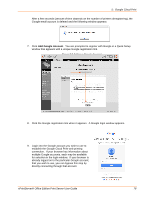
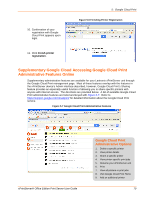
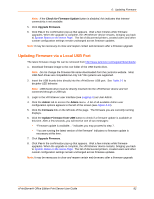
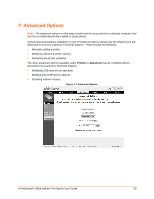
6: Updating Firmware Note: If the Check for Firmware Update button is disabled, this indicates that Internet connectivity is not available. 5. Click Upgrade Firmware. 6. Click Yes in the confirmation pop-up that appears. Wait a few minutes while firmware upgrades. When the upgrade is complete, the xPrintServer device restarts, bringing you back to System Status on the Home Page. The list of discovered printers, created users and other custom configuration settings remain unchanged across firmware updates. Note: It may be necessary to close and reopen certain web browsers after a firmware upgrade. Updating Firmware via a Local USB Port The latest firmware image file can be retrieved from http://www.lantronix.com/support/downloads/. 1. Download firmware image to the root folder of the USB thumb drive. Note: Do not change the firmware file name downloaded from the Lantronix website. Most USB flash drives are compatible but only FAT file systems are supported. 2. Insert the USB thumb drive directly into the xPrintServer USB port. See Table 2-1 to decipher LED behavior. Note: USB thumb drive must be directly inserted into the xPrintServer device and not connected through a USB hub. 3. Login to the xPrintServer user interface (see Logging In) as User Admin. 4. Click the Admin tab to access the Admin menu. A list of all available Admin user configuration options appears to the left of the screen (see Figure 4-13). 5. Click the Firmware link on the left side of the page. The firmware you are currently running displays. 6. Click the Update Firmware from USB button to check if a firmware update is available at this time. After a few seconds, you will receive one of two messages: "Firmware update is available..." indicates you may proceed to step 7. "You are running the latest version of the firmware" indicates no firmware update is necessary at this time. 7. Click Upgrade Firmware. 8. Click Yes in the confirmation pop-up that appears. Wait a few minutes while firmware upgrades. When the upgrade is complete, the xPrintServer device restarts, bringing you back to System Status on the Home Page. The list of discovered printers, created users and other custom configuration settings remain unchanged across firmware updates. Note: It may be necessary to close and reopen certain web browsers after a firmware upgrade. xPrintServer® Office Edition Print Server User Guide 82
-
 1
1 -
2
-
3
-
4
-
5
-
6
-
7
-
8
-
9
-
10
-
11
-
12
-
13
-
14
-
15
-
16
-
17
-
18
-
19
-
20
-
21
-
22
-
23
-
24
-
25
-
26
-
27
-
28
-
29
-
30
-
31
-
32
-
33
-
34
-
35
-
36
-
37
-
38
-
39
-
40
-
41
-
42
-
43
-
44
-
45
-
46
-
47
-
48
-
49
-
50
-
51
-
52
-
53
-
54
-
55
-
56
-
57
-
58
-
59
-
60
-
61
-
62
-
63
-
64
-
65
-
66
-
67
-
68
-
69
-
70
-
71
-
72
-
73
-
74
-
75
-
76
-
 77
77 -
 78
78 -
 79
79 -
 80
80 -
 81
81 -
 82
82 -
 83
83 -
 84
84 -
 85
85 -
 86
86 -
 87
87 -
88
-
89
-
90
-
91
-
92
-
93
-
94
 |
 |