Lantronix xPrintServer - Office User Guide - Page 24
Printing from an iOS Device, Printer, Printer Options
 |
View all Lantronix xPrintServer - Office manuals
Add to My Manuals
Save this manual to your list of manuals |
Page 24 highlights
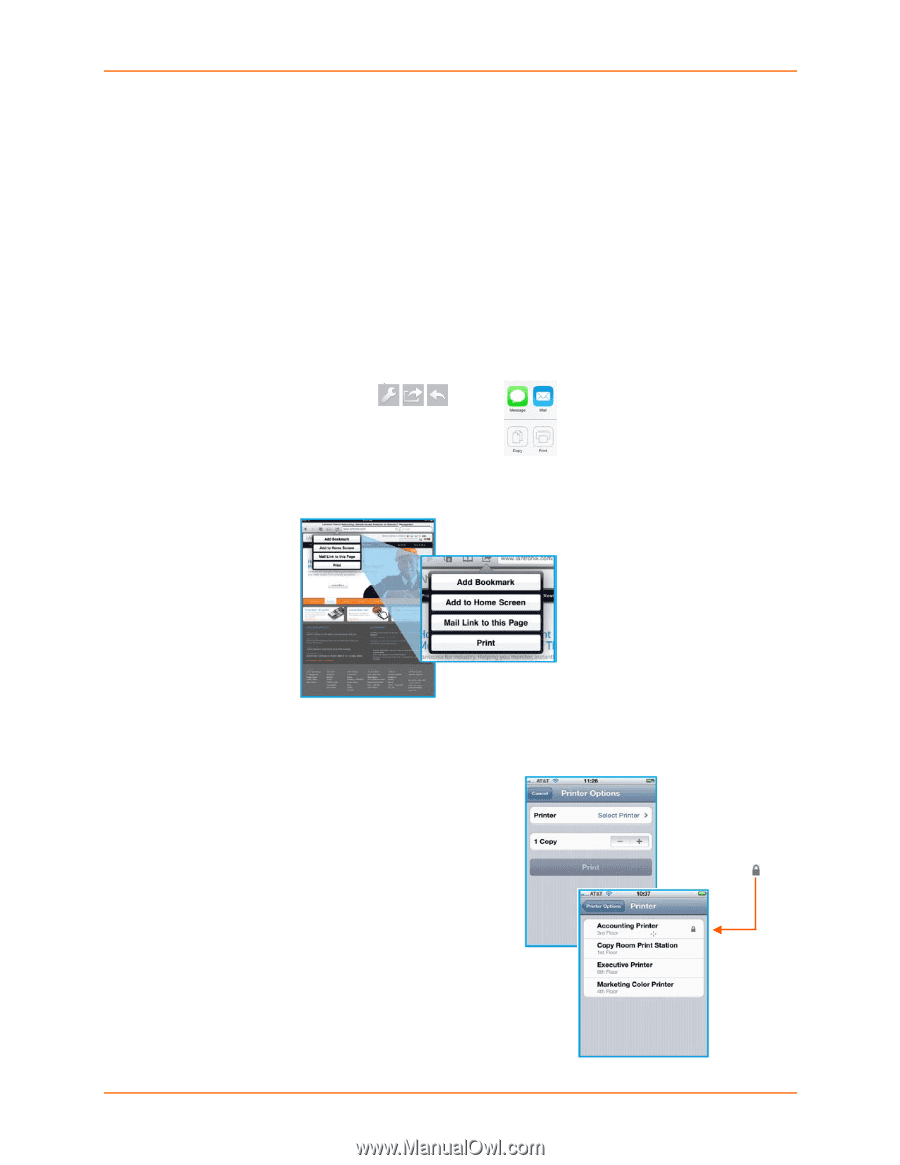
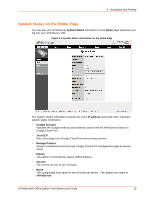
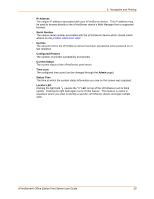
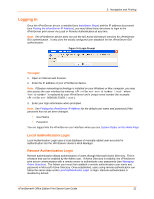
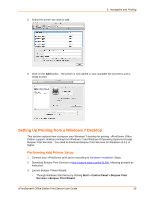
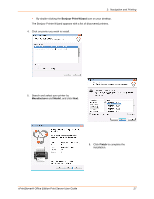
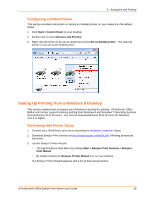
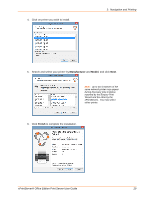
3: Navigation and Printing Printing from an iOS Device Note: If your iOS device is running iOS 7 or later, please update your xPrintServer firmware to version 3.2.0 or later. This section explains how to print from your iOS device (e.g., iPad, iPod or iPhone). Use these steps to print from your iPad, iPhone or other iOS device. 1. Connect your xPrintServer print server according to Hardware Installation Steps. 2. Using your iPad, iPhone or other iOS device, open web page, email, photo, etc. you wish to print and choose the icon to open the native print menu. Figure 3-7 Sample View of Buttons on iOS devices or Note: The appearance of iOS device buttons will differ in appearance according to the type of Apple device and iOS version. Figure 3-8 Sample View of Native Print Menu Note: A list of available commands will appear on the native print menu and will differ in appearance according to the type of Apple device and iOS version. 3. Choose Printer in the Printer Options menu that appears. All available networked printers display on your iOS device, including protected printers (see Figure 3-9 below). 4. Select the appropriate printer. 5. Login, as necessary. User authentication is required when a protected printer is selected (see Figure 3-9). 6. Select the number of copies to print. Note: Printer Options appear differently on different iOS devices. Some printers are protected, as indicated by a padlock icon. 7. Click Print. Your print job is sent to the selected printer Figure 3-9 Sample View of Printer Options xPrintServer® Office Edition Print Server User Guide 24
-
 1
1 -
2
-
3
-
4
-
5
-
6
-
7
-
8
-
9
-
10
-
11
-
12
-
13
-
14
-
15
-
16
-
17
-
18
-
 19
19 -
 20
20 -
 21
21 -
 22
22 -
 23
23 -
 24
24 -
 25
25 -
 26
26 -
 27
27 -
 28
28 -
 29
29 -
30
-
31
-
32
-
33
-
34
-
35
-
36
-
37
-
38
-
39
-
40
-
41
-
42
-
43
-
44
-
45
-
46
-
47
-
48
-
49
-
50
-
51
-
52
-
53
-
54
-
55
-
56
-
57
-
58
-
59
-
60
-
61
-
62
-
63
-
64
-
65
-
66
-
67
-
68
-
69
-
70
-
71
-
72
-
73
-
74
-
75
-
76
-
77
-
78
-
79
-
80
-
81
-
82
-
83
-
84
-
85
-
86
-
87
-
88
-
89
-
90
-
91
-
92
-
93
-
94
 |
 |