Lantronix xPrintServer - Office User Guide - Page 32
Account Translation, Changing Passwords, To change your password
 |
View all Lantronix xPrintServer - Office manuals
Add to My Manuals
Save this manual to your list of manuals |
Page 32 highlights
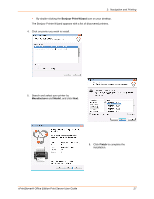
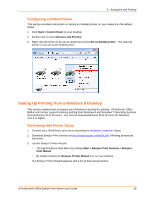
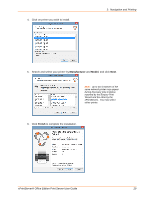
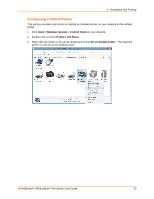
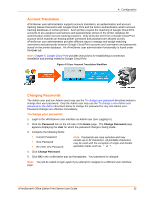
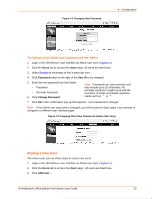
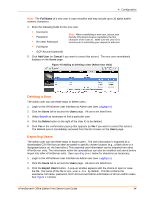
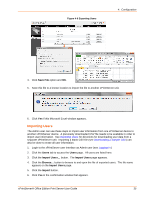
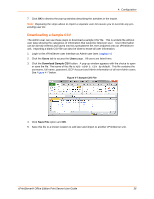
4: Configuration Account Translation xPrintServer user administration supports account translation, an authentication and account tracking feature that works with Google Cloud Print and the built-in authentication and/or account tracking databases of certain printers. Such printers require the matching of Google Cloud Print accounts to pre-assigned username(s) and passwords(s) stored on the printer database for authentication and/or account tracking purposes. Only print jobs sent from a Google Cloud Print account which matches an existing printer username and password are allowed to print. xPrintServer user administration provides different ways to manage and assign matching usernames and passwords between Google Cloud Print accounts and usernames and passwords stored on the printer database. All xPrintServer user administration functionality is found under the User tab. Note: Chapter 5: Google Cloud Print provides instructions for establishing a connection, installation and printing related to Google Cloud Print. Figure 4-2 User Account Translation Workflow Changing Passwords The Admin user and non-Admin users may use the To change your password directions below to change their user password. Only the Admin user may use the To change a non-Admin user password as the Admin directions below to change the password for any non-Admin user. Password changes are effective immediately. To change your password: 1. Login to the xPrintServer user interface as Admin user (see Logging In.) 2. Click the Password link on the left side of the Home page. The Change Password page appears displaying the User for which the password change is being made. 3. Complete the following fields: Current Password New Password Re-enter new Password Note: Passwords are case-sensitive and may include up to 32 characters. All printable characters may be used with the exception of single and double quotation marks such as: ' or ". 4. Click Change Password. 5. Click OK in the confirmation pop-up that appears. Your password is changed. Note: You will be asked to login again if you attempt to navigate to a different user interface page. xPrintServer® Office Edition Print Server User Guide 32
-
 1
1 -
2
-
3
-
4
-
5
-
6
-
7
-
8
-
9
-
10
-
11
-
12
-
13
-
14
-
15
-
16
-
17
-
18
-
19
-
20
-
21
-
22
-
23
-
24
-
25
-
26
-
 27
27 -
 28
28 -
 29
29 -
 30
30 -
 31
31 -
 32
32 -
 33
33 -
 34
34 -
 35
35 -
 36
36 -
 37
37 -
38
-
39
-
40
-
41
-
42
-
43
-
44
-
45
-
46
-
47
-
48
-
49
-
50
-
51
-
52
-
53
-
54
-
55
-
56
-
57
-
58
-
59
-
60
-
61
-
62
-
63
-
64
-
65
-
66
-
67
-
68
-
69
-
70
-
71
-
72
-
73
-
74
-
75
-
76
-
77
-
78
-
79
-
80
-
81
-
82
-
83
-
84
-
85
-
86
-
87
-
88
-
89
-
90
-
91
-
92
-
93
-
94
 |
 |
