Lantronix xPrintServer - Office User Guide - Page 50
Showing Marker Supply Levels, Printer, Printers > List, Supply Levels, Cancel
 |
View all Lantronix xPrintServer - Office manuals
Add to My Manuals
Save this manual to your list of manuals |
Page 50 highlights
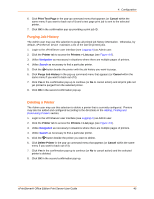
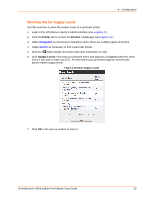
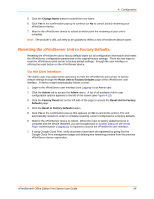
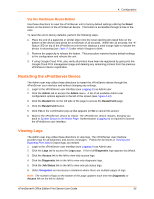
4: Configuration Showing Marker Supply Levels Use this selection to show the marker levels of a particular printer. 1. Login to the xPrintServer device's Admin interface (see Logging In.) 2. Click the Printer tab to access the Printers > List page (see Figure 4-9.) 3. Utilize Navigation as necessary in situations where there are multiple pages of printers. 4. Utilize Search as necessary to find a particular printer. 5. Click the button beside the printer with toner information to view. 6. Click Supply Levels in the pop-up command menu that appears (or Cancel within the same menu if you want to back out of it.) An information pop-up window appears showing the printer marker supply levels: Figure 4-18 Show Supply Levels 7. Click OK in the pop-up window to close it. xPrintServer® Office Edition Print Server User Guide 50
-
 1
1 -
2
-
3
-
4
-
5
-
6
-
7
-
8
-
9
-
10
-
11
-
12
-
13
-
14
-
15
-
16
-
17
-
18
-
19
-
20
-
21
-
22
-
23
-
24
-
25
-
26
-
27
-
28
-
29
-
30
-
31
-
32
-
33
-
34
-
35
-
36
-
37
-
38
-
39
-
40
-
41
-
42
-
43
-
44
-
 45
45 -
 46
46 -
 47
47 -
 48
48 -
 49
49 -
 50
50 -
 51
51 -
 52
52 -
 53
53 -
 54
54 -
 55
55 -
56
-
57
-
58
-
59
-
60
-
61
-
62
-
63
-
64
-
65
-
66
-
67
-
68
-
69
-
70
-
71
-
72
-
73
-
74
-
75
-
76
-
77
-
78
-
79
-
80
-
81
-
82
-
83
-
84
-
85
-
86
-
87
-
88
-
89
-
90
-
91
-
92
-
93
-
94
 |
 |
