Lantronix xPrintServer - Office User Guide - Page 66
Generating a Private Key and Self-Signed Certificate, Generating a Certificate Signing Request, Admin
 |
View all Lantronix xPrintServer - Office manuals
Add to My Manuals
Save this manual to your list of manuals |
Page 66 highlights
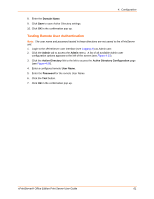
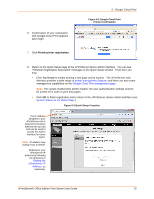
4: Configuration Generating a Private Key and Self-Signed Certificate 1. Login to the xPrintServer user interface (see Logging In.) 2. Click the Admin tab to access the Admin menu. A list of all available Admin user configuration options appears to the left of the screen. 3. Click the Security link on the left side of the page to reach the Security page. 4. Click Generate Private Key and Self-signed Certificate. After one minute, a message indicating successful generation of the key and certificate appears on the xPrintServer user interface. 5. If you are using a secure https connection, close and re-open the web browser to use the certificate. 6. If you wish to access other Security features, click Back to Main Security Page. Generating a Certificate Signing Request Note: A private key needs to be generated or uploaded before performing these steps. 1. Login to the xPrintServer user interface (see Logging In.) 2. Click the Admin tab to access the Admin menu. A list of all available Admin user configuration options appears to the left of the screen. 3. Click the Security link on the left side of the page to reach the Security page. 4. Click Generate Certificate Signing Request. 5. Enter the information in the fields: - Country (2 letter code) - State or Province Name - Locality Name - Organization Name - Organizational Unit Name - Common Name - Email Address - A Challenge Password 6. Click Generate Certificate Signing Request. The certificate signing request generates and downloads to your PC as a xprintserver.csr file. 7. If you wish to access other Security features, click Back to Main Security Page. xPrintServer® Office Edition Print Server User Guide 66
-
 1
1 -
2
-
3
-
4
-
5
-
6
-
7
-
8
-
9
-
10
-
11
-
12
-
13
-
14
-
15
-
16
-
17
-
18
-
19
-
20
-
21
-
22
-
23
-
24
-
25
-
26
-
27
-
28
-
29
-
30
-
31
-
32
-
33
-
34
-
35
-
36
-
37
-
38
-
39
-
40
-
41
-
42
-
43
-
44
-
45
-
46
-
47
-
48
-
49
-
50
-
51
-
52
-
53
-
54
-
55
-
56
-
57
-
58
-
59
-
60
-
 61
61 -
 62
62 -
 63
63 -
 64
64 -
 65
65 -
 66
66 -
 67
67 -
 68
68 -
 69
69 -
 70
70 -
 71
71 -
72
-
73
-
74
-
75
-
76
-
77
-
78
-
79
-
80
-
81
-
82
-
83
-
84
-
85
-
86
-
87
-
88
-
89
-
90
-
91
-
92
-
93
-
94
 |
 |
