Lantronix xPrintServer - Office User Guide - Page 60
Managing Active Directory, Updating Active Directory Configuration
 |
View all Lantronix xPrintServer - Office manuals
Add to My Manuals
Save this manual to your list of manuals |
Page 60 highlights
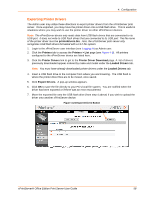
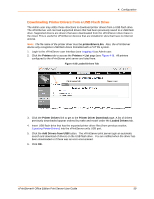
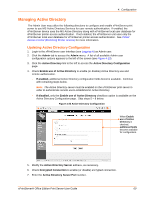
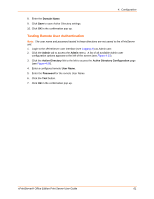
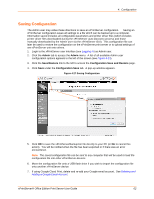
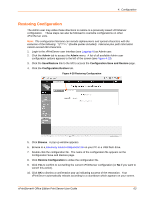
4: Configuration Managing Active Directory The Admin User may utilize the following directions to configure and enable xPrintServer print server to use MS Active Directory Services for user remote authentication. If enabled, the xPrintServer device uses the MS Active Directory along with xPrintServer local user database for xPrintServer printer access authentication. If not enabled, the xPrintServer unit uses only the xPrintServer local user database for xPrintServer printer access authentication. See Printer Access Control (Protecting Printer Access) for more information. Updating Active Directory Configuration 1. Login to the xPrintServer user interface (see Logging In) as Admin user. 2. Click the Admin tab to access the Admin menu. A list of all available Admin user configuration options appears to the left of the screen (see Figure 4-13). 3. Click the Active Directory link to the left to access the Active Directory Configuration page. 4. Check Enable use of Active Directory to enable (or disable) Active Directory use and remote authorization. - If enabled, additional Active Directory configuration fields become available. Continue with remaining steps below. Note: The Active Directory server must be enabled on the xPrintServer print server in order to authenticate remote users established in Active Directory. - If disabled, only the Enable use of Active Directory checkbox option is available on the Active Directory Configuration page. Skip steps 5 - 8 below. Figure 4-26 Active Directory Configuration When Enable use of Active Directory is checked, additional fields become available for configuration. 5. Modify the Active Directory Server address, as necessary. 6. Check Encrypted Connection to enable (or disable) encrypted connection. 7. Enter the Active Directory Server Port number. xPrintServer® Office Edition Print Server User Guide 60
-
 1
1 -
2
-
3
-
4
-
5
-
6
-
7
-
8
-
9
-
10
-
11
-
12
-
13
-
14
-
15
-
16
-
17
-
18
-
19
-
20
-
21
-
22
-
23
-
24
-
25
-
26
-
27
-
28
-
29
-
30
-
31
-
32
-
33
-
34
-
35
-
36
-
37
-
38
-
39
-
40
-
41
-
42
-
43
-
44
-
45
-
46
-
47
-
48
-
49
-
50
-
51
-
52
-
53
-
54
-
 55
55 -
 56
56 -
 57
57 -
 58
58 -
 59
59 -
 60
60 -
 61
61 -
 62
62 -
 63
63 -
 64
64 -
 65
65 -
66
-
67
-
68
-
69
-
70
-
71
-
72
-
73
-
74
-
75
-
76
-
77
-
78
-
79
-
80
-
81
-
82
-
83
-
84
-
85
-
86
-
87
-
88
-
89
-
90
-
91
-
92
-
93
-
94
 |
 |
