Lantronix xPrintServer - Office User Guide - Page 55
Restarting the xPrintServer Device, Viewing Logs, Via the Hardware Reset Button
 |
View all Lantronix xPrintServer - Office manuals
Add to My Manuals
Save this manual to your list of manuals |
Page 55 highlights
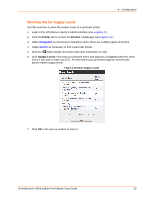
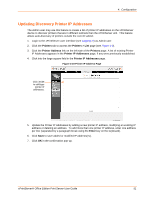
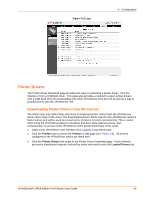
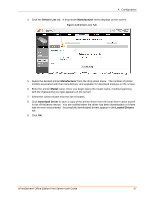
4: Configuration Via the Hardware Reset Button Use these directions to reset the xPrintServer unit to factory default settings utilizing the Reset button on the bottom of the xPrintServer device. This button is accessible through a hole in the case. To reset the unit to factory defaults, perform the following steps: 1. Place the end of a paperclip or similar object into the reset opening (pin-sized hole on the bottom of the device) and press for a minimum of 10 seconds. Within the 10 seconds, the "X" Status LED on top of the xPrintServer print server displays a solid orange light to indicate the device is rebooting (see Table 2-1) after which it begins to blink. 2. Remove the paperclip to release the button. This procedure restores factory default settings to the configuration and reboots the unit. 3. If using Google Cloud Print, also verify all printers have been de-registered by going into the Google Cloud Print management page and deleting any remaining printers from the previous xPrintServer device registration. Restarting the xPrintServer Device The Admin user may utilize these directions to restart the xPrintServer device through the xPrintServer user interface and without changing any settings. 1. Login to the xPrintServer user interface (see Logging In) as Admin user. 2. Click the Admin tab to access the Admin menu. A list of all available Admin user configuration options appears to the left of the screen (see Figure 4-13). 3. Click the Restart link on the left side of the page to access the Restart Unit page. 4. Click the Restart Unit button. 5. Click Yes in the confirmation pop-up that appears (or No to cancel this action). 6. Wait for the xPrintServer device to reboot. The xPrintServer device restarts, bringing you back to System Status on the Home Page. Authentication (Logging In) is required to access the xPrintServer user interface. Viewing Logs The Admin user may utilize these directions to view logs. The xPrintServer user interface provides logs for all diagnostic and access messages. Follow the directions in Viewing and Exporting Print Jobs to export logs, as needed. 1. Login to the xPrintServer user interface (see Logging In) as Admin user. 2. Click the Logs tab to access the Logs page. A list of all Diagnostic logs appears by default. 3. Click the Access link to the left to view only access logs. 4. Click the Diagnostic link to the left to view only diagnostic logs. 5. Click the Job Status link to the left to view only job status logs. 6. Utilize Navigation as necessary in situations where there are multiple pages of logs. Note: The number of logs on the bottom of the page updates each time the Diagnostic or Access link on the left is clicked. xPrintServer® Office Edition Print Server User Guide 55
-
 1
1 -
2
-
3
-
4
-
5
-
6
-
7
-
8
-
9
-
10
-
11
-
12
-
13
-
14
-
15
-
16
-
17
-
18
-
19
-
20
-
21
-
22
-
23
-
24
-
25
-
26
-
27
-
28
-
29
-
30
-
31
-
32
-
33
-
34
-
35
-
36
-
37
-
38
-
39
-
40
-
41
-
42
-
43
-
44
-
45
-
46
-
47
-
48
-
49
-
 50
50 -
 51
51 -
 52
52 -
 53
53 -
 54
54 -
 55
55 -
 56
56 -
 57
57 -
 58
58 -
 59
59 -
 60
60 -
61
-
62
-
63
-
64
-
65
-
66
-
67
-
68
-
69
-
70
-
71
-
72
-
73
-
74
-
75
-
76
-
77
-
78
-
79
-
80
-
81
-
82
-
83
-
84
-
85
-
86
-
87
-
88
-
89
-
90
-
91
-
92
-
93
-
94
 |
 |
