Lantronix xPrintServer - Office User Guide - Page 43
Setting Real Time Clock, To modify the Time-zone
 |
View all Lantronix xPrintServer - Office manuals
Add to My Manuals
Save this manual to your list of manuals |
Page 43 highlights
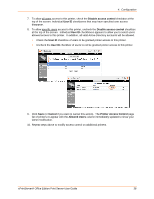
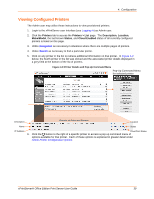
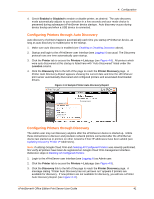
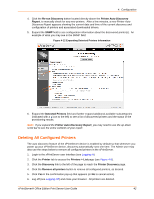
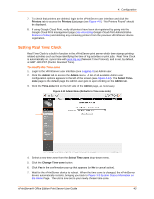
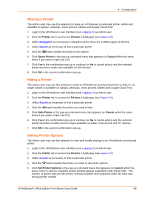
4: Configuration 7. To check that printers are deleted, login to the xPrintServer user interface and click the Printers tab to access the Printers List page (see Figure 4-9.) "No Printers Found" should be displayed. 8. If using Google Cloud Print, verify all printers have been de-registered by going into the Google Cloud Print management page (see Accessing Google Cloud Print Administrative Features Online) and deleting any remaining printers from the previous xPrintServer device registration. Setting Real Time Clock Real Time Clock is a built-in function in the xPrintServer print server which time-stamps printingrelated activities such as those identifying the time of log activities or print jobs. Real Time Clock is automatically on, syncs time with pool.ntp.org (Network Time Protocol), and is set, by default, at GMT -800 PST (Pacific Standard Time). To modify the Time-zone 1. Login to the xPrintServer user interface (see Logging In) as Admin user. 2. Click the Admin tab to access the Admin menu. A list of all available Admin user configuration options appears to the left of the screen (see Figure 4-13). The Select Timezone page is the default page the Admin user gets to upon clicking on the Admin tab. 3. Click the Time-zone link on the left side of the Admin page, as necessary. Figure 4-13 Admin Menu (Defaults to Time-zone Link) 4. Select a new time zone from the Select Time-zone drop-down menu. 5. Click the Change Time-zone button. 6. Click Yes in the confirmation pop-up that appears (or No to cancel action). 7. Wait for the xPrintServer device to reboot. When the time zone is changed, the xPrintServer device automatically restarts, bringing you back to Figure 3-3 System Status Information on the Home Page. The unit is now set to your newly chosen time zone. xPrintServer® Office Edition Print Server User Guide 43
-
 1
1 -
2
-
3
-
4
-
5
-
6
-
7
-
8
-
9
-
10
-
11
-
12
-
13
-
14
-
15
-
16
-
17
-
18
-
19
-
20
-
21
-
22
-
23
-
24
-
25
-
26
-
27
-
28
-
29
-
30
-
31
-
32
-
33
-
34
-
35
-
36
-
37
-
 38
38 -
 39
39 -
 40
40 -
 41
41 -
 42
42 -
 43
43 -
 44
44 -
 45
45 -
 46
46 -
 47
47 -
 48
48 -
49
-
50
-
51
-
52
-
53
-
54
-
55
-
56
-
57
-
58
-
59
-
60
-
61
-
62
-
63
-
64
-
65
-
66
-
67
-
68
-
69
-
70
-
71
-
72
-
73
-
74
-
75
-
76
-
77
-
78
-
79
-
80
-
81
-
82
-
83
-
84
-
85
-
86
-
87
-
88
-
89
-
90
-
91
-
92
-
93
-
94
 |
 |
