Lantronix xPrintServer - Office User Guide - Page 48
Sharing a Printer, Setting Printer Options, Printer, Printers > List, Cancel
 |
View all Lantronix xPrintServer - Office manuals
Add to My Manuals
Save this manual to your list of manuals |
Page 48 highlights
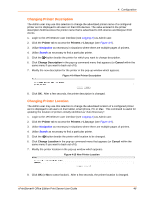
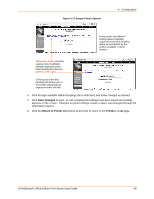
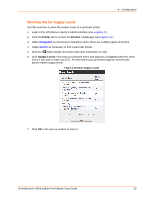
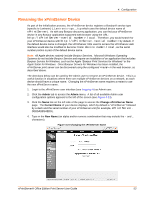
4: Configuration Sharing a Printer The Admin user may use this selection to make an xPrintServer-provisioned printer visible and available to laptops, desktops, smart phones, tablets and Google Cloud Print . 1. Login to the xPrintServer user interface (see Logging In) as Admin user. 2. Click the Printer tab to access the Printers > List page (see Figure 4-9). 3. Utilize Navigation as necessary in situations where there are multiple pages of printers. 4. Utilize Search as necessary to find a particular printer. 5. Click the button beside the printer to be shared. 6. Click Share Printer in the pop-up command menu that appears (or Cancel within the same menu if you want to back out of it). 7. Click Yes in the confirmation pop-up to continue (or No to cancel action) and the selected printer becomes visible and available on iOS devices. 8. Click OK in the second confirmation pop-up. Hiding a Printer The Admin user may use this selection to hide an xPrintServer-provisioned printer so that it is no longer visible or available on laptops, desktops, smart phones, tablets and Google Cloud Print. 1. Login to the xPrintServer user interface (see Logging In) as Admin user. 2. Click the Printer tab to access the Printers > List page (see Figure 4-9). 3. Utilize Search as necessary to find a particular printer. 4. Click the button beside the printer you wish to hide. 5. Click Hide Printer in the pop-up command menu that appears (or Cancel within the same menu if you want to back out of it). 6. Click Yes in the confirmation pop-up to continue (or No to cancel action) and the selected printer becomes invisible and no longer available on tablet, smart phone and PC devices. 7. Click OK in the second confirmation pop-up. Setting Printer Options The Admin user may use this selection to view and modify settings in an xPrintServer-provisioned printer. 1. Login to the xPrintServer user interface (see Logging In) as Admin user. 2. Click the Printer tab to access the Printers > List page (see Figure 4-9). 3. Utilize Search as necessary to find a particular printer. 4. Click the button beside the printer you wish to set printer options. 5. Click Set Printer Options in the pop-up command menu that appears (or Cancel within the same menu to cancel). Available printer settings appear organized under printer tabs. The number of printer tabs and the printer settings available and organized under the tabs vary among printer models. xPrintServer® Office Edition Print Server User Guide 48
-
 1
1 -
2
-
3
-
4
-
5
-
6
-
7
-
8
-
9
-
10
-
11
-
12
-
13
-
14
-
15
-
16
-
17
-
18
-
19
-
20
-
21
-
22
-
23
-
24
-
25
-
26
-
27
-
28
-
29
-
30
-
31
-
32
-
33
-
34
-
35
-
36
-
37
-
38
-
39
-
40
-
41
-
42
-
 43
43 -
 44
44 -
 45
45 -
 46
46 -
 47
47 -
 48
48 -
 49
49 -
 50
50 -
 51
51 -
 52
52 -
 53
53 -
54
-
55
-
56
-
57
-
58
-
59
-
60
-
61
-
62
-
63
-
64
-
65
-
66
-
67
-
68
-
69
-
70
-
71
-
72
-
73
-
74
-
75
-
76
-
77
-
78
-
79
-
80
-
81
-
82
-
83
-
84
-
85
-
86
-
87
-
88
-
89
-
90
-
91
-
92
-
93
-
94
 |
 |
