Lantronix xPrintServer - Office User Guide - Page 68
: Google Cloud Print, Establishing a Google Cloud Print Connection
 |
View all Lantronix xPrintServer - Office manuals
Add to My Manuals
Save this manual to your list of manuals |
Page 68 highlights
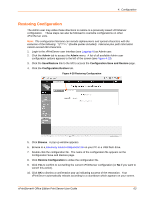
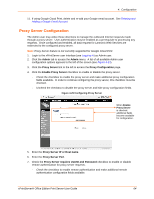
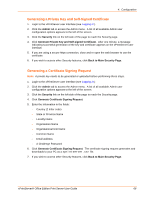
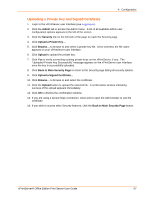
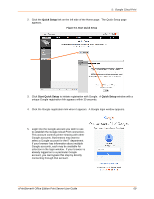
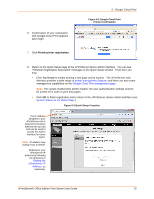
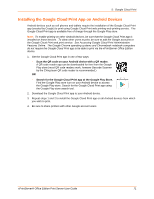
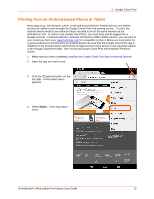
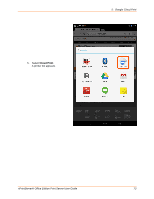
5: Google Cloud Print The xPrintServer Office edition device supports Google Cloud Print service for Android and Chrome technology users beginning with firmware version 5.0.0, and going forward. Note: Proxy Server feature is not currently supported for Google Cloud Print. Establishing a Google Cloud Print Connection After performing Hardware Installation Steps, follow these directions to register a Google Cloud Print connection to a new xPrintServer unit. This connection does not need to be re-established after the initial connection is made unless Resetting the xPrintServer Unit to Factory Defaults is performed. Note: A Google account and up-to-date web browser are required for establishing a Google Cloud Print connection. Since multiple Google account logins and passwords may be stored in a browser maintaining "signed-in" status, it is recommended that you make sure to log out of all Google accounts prior to beginning these steps. One way of doing this is by using the incognito/privacy mode in a browser. This way you may select the desired Google account to be used in establishing this Google Cloud Print connection. Only one Google account can be associated with an xPrintServer unit at any time. When using the Test GCP or Manage Printers links, make sure your browser is logged into the Google account associated with the xPrintServer device. To print from more than one printer please use the Google Print Sharing feature. See Accessing Google Cloud Print Administrative Features Online. Your device (smart phone/table/PC) must be on the same wired or Wi-Fi network as your xPrintServer unit. 1. Login to the Admin interface of your xPrintServer device in one of two ways below. You will need to access either the QR code on the QR product label or the serial product number on the product information label on the underside of your xPrintServer device. Scan the QR code on the QR product label using your Android smartphone or tablet and click the link displayed on your QR code reader to access the xPrintServer device Admin interface where you may log in (see Figure 3-2 Redirected to Login Prompt.) Note: QR code readers are available for Android smartphones and tablets at the Google Play™ store. Lantronix recommends using the ZXing Barcode Scanner app, which may be found at https://play.google.com/store/apps/details?id=com.google.zxing.client.android. OR Type http://www.findmyxps.com directly into a web browser and enter the alphanumeric serial number from the product information label. Web browsers can be accessed on a smartphone, tablet or PC. The serial number is alphanumeric and 12 characters in length. A login window in the xPrintServer device Admin interface appears for login (see.Figure 3-2 Redirected to Login Prompt) xPrintServer® Office Edition Print Server User Guide 68
-
 1
1 -
2
-
3
-
4
-
5
-
6
-
7
-
8
-
9
-
10
-
11
-
12
-
13
-
14
-
15
-
16
-
17
-
18
-
19
-
20
-
21
-
22
-
23
-
24
-
25
-
26
-
27
-
28
-
29
-
30
-
31
-
32
-
33
-
34
-
35
-
36
-
37
-
38
-
39
-
40
-
41
-
42
-
43
-
44
-
45
-
46
-
47
-
48
-
49
-
50
-
51
-
52
-
53
-
54
-
55
-
56
-
57
-
58
-
59
-
60
-
61
-
62
-
 63
63 -
 64
64 -
 65
65 -
 66
66 -
 67
67 -
 68
68 -
 69
69 -
 70
70 -
 71
71 -
 72
72 -
 73
73 -
74
-
75
-
76
-
77
-
78
-
79
-
80
-
81
-
82
-
83
-
84
-
85
-
86
-
87
-
88
-
89
-
90
-
91
-
92
-
93
-
94
 |
 |