Lantronix xPrintServer - Office User Guide - Page 34
Deleting a User, Exporting Users, Add User, Cancel, Users, Delete
 |
View all Lantronix xPrintServer - Office manuals
Add to My Manuals
Save this manual to your list of manuals |
Page 34 highlights
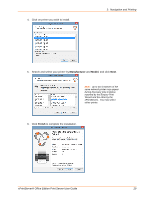
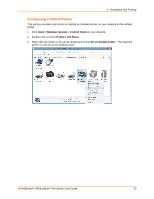
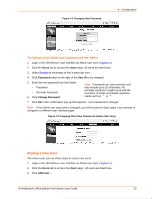
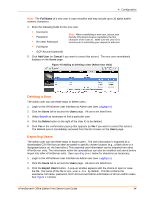
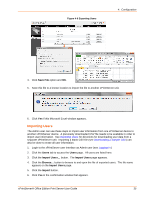
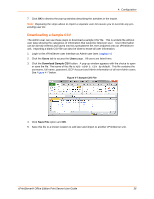
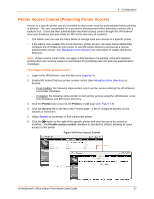
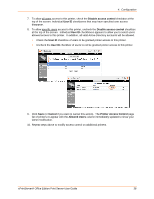
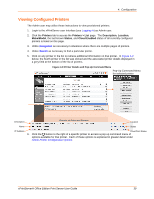
4: Configuration Note: The Full Name of a new user is case sensitive and may include up to 32 alpha and/or numeric characters. 4. Enter the following fields for the new user: Username Password Re-enter Password Full Name Note: When establishing a new user, please note that the iOS device browser capitalizes the first character of the User ID. Make sure the User ID is correct prior to submitting your request to add user. GCP Account (optional) 5. Click Add User (or Cancel if you want to cancel this action.) The new user immediately displays on the Users page. Figure 4-5 Adding or Deleting a User (Admin User Only) Deleting a User The Admin user can use these steps to delete users. 1. Login to the xPrintServer user interface as Admin user (see Logging In.) 2. Click the Users tab to access the Users page. All users are listed here. 3. Utilize Search as necessary to find a particular user. 4. Click the Delete button to the right of the User ID to be deleted. 5. Click Yes in the confirmation pop-up that appears (or No if you want to cancel this action.) . The deleted user is immediately removed from the list of users on the Users page. Exporting Users The Admin user can use these steps to export users. The user information is exported as a downloaded CSV file that can then be saved to specific chosen location (e.g., a flash drive or a designated place on the hard drive.) This exported user information can be imported into other xPrintServer units. The information within the spreadsheet can also be modified and saved before import into other xPrintServer units. See Importing Users below for directions as necessary. 1. Login to the xPrintServer user interface as Admin user (see Logging In.) 2. Click the Users tab to access the Users page. All users are listed here. 3. Click the Export Users button. A pop-up window appears with the choice to open or save the file. The name of this file is xps-users.csv by default. This file contains the username, full name, password, GCP Account and Admin information of all non-Admin users. See Figure 4-6 below. xPrintServer® Office Edition Print Server User Guide 34
-
 1
1 -
2
-
3
-
4
-
5
-
6
-
7
-
8
-
9
-
10
-
11
-
12
-
13
-
14
-
15
-
16
-
17
-
18
-
19
-
20
-
21
-
22
-
23
-
24
-
25
-
26
-
27
-
28
-
 29
29 -
 30
30 -
 31
31 -
 32
32 -
 33
33 -
 34
34 -
 35
35 -
 36
36 -
 37
37 -
 38
38 -
 39
39 -
40
-
41
-
42
-
43
-
44
-
45
-
46
-
47
-
48
-
49
-
50
-
51
-
52
-
53
-
54
-
55
-
56
-
57
-
58
-
59
-
60
-
61
-
62
-
63
-
64
-
65
-
66
-
67
-
68
-
69
-
70
-
71
-
72
-
73
-
74
-
75
-
76
-
77
-
78
-
79
-
80
-
81
-
82
-
83
-
84
-
85
-
86
-
87
-
88
-
89
-
90
-
91
-
92
-
93
-
94
 |
 |
