Lantronix xPrintServer - Office User Guide - Page 80
Accessing Google Cloud Print Administrative Features Online
 |
View all Lantronix xPrintServer - Office manuals
Add to My Manuals
Save this manual to your list of manuals |
Page 80 highlights
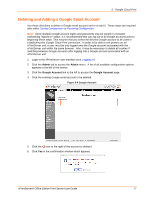
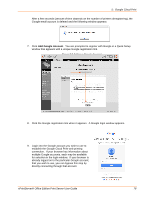
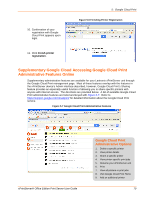
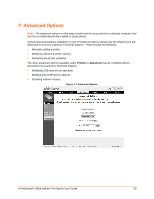
5: Google Cloud Print Accessing Google Cloud Print Administrative Features Online 1. Make sure you are logged into the Google account registered to the xPrintServer unit. Reference Establishing a Google Cloud Print Connection as necessary. 2. Go to https://www.google.com/cloudprint#printers to access the Google Cloud Print management page. Note: The Google Cloud Print management page appears only when you are logged into the Google account registered to the xPrintServer unit, within the same browser. Sharing a Printer through Google Cloud Print Service Note: This features supplements the xPrintServer device Admin interface's Sharing a Printer and Hiding a Printer capability. 1. Click on a specific printer to be shared. 2. Click Share to access the share settings window for this printer. 3. Click Change to access share options. 4. Define the access for this printer: - Click Anyone with the link has access to the printer; or - Click Private to specify individuals allowed access. 5. Click Save. You are brought back to the printer share settings page. 6. Finish configuring your share settings depending on your choice of action in step 4 above: - If you selected Anyone with the link, copy the entire printer URL within the Link to share field and click Close (you may now share the copied link to anyone with internet access); or - If you selected Private, enter the individual emails and groups allowed access and click Share. xPrintServer® Office Edition Print Server User Guide 80
-
 1
1 -
2
-
3
-
4
-
5
-
6
-
7
-
8
-
9
-
10
-
11
-
12
-
13
-
14
-
15
-
16
-
17
-
18
-
19
-
20
-
21
-
22
-
23
-
24
-
25
-
26
-
27
-
28
-
29
-
30
-
31
-
32
-
33
-
34
-
35
-
36
-
37
-
38
-
39
-
40
-
41
-
42
-
43
-
44
-
45
-
46
-
47
-
48
-
49
-
50
-
51
-
52
-
53
-
54
-
55
-
56
-
57
-
58
-
59
-
60
-
61
-
62
-
63
-
64
-
65
-
66
-
67
-
68
-
69
-
70
-
71
-
72
-
73
-
74
-
 75
75 -
 76
76 -
 77
77 -
 78
78 -
 79
79 -
 80
80 -
 81
81 -
 82
82 -
 83
83 -
 84
84 -
 85
85 -
86
-
87
-
88
-
89
-
90
-
91
-
92
-
93
-
94
 |
 |
