Netgear GSM7212P GSM5212P/GSM7212P/GSM7212F/GSM7224P User Manual - Page 214
IPv6 Class Configuration, Precedence Value, IP ToS, ToS Bits, ToS Mask, CANCEL, APPLY, DiffServ
 |
View all Netgear GSM7212P manuals
Add to My Manuals
Save this manual to your list of manuals |
Page 214 highlights
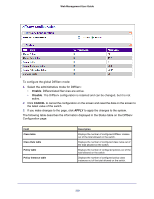
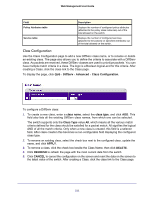
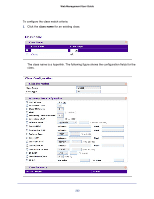
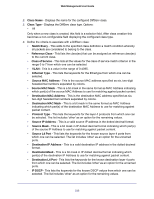
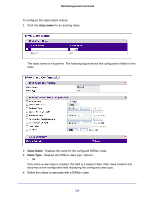
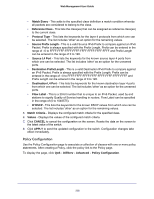
Web Management User Guide • Precedence Value -This lists the keywords for the IP Precedence value in the range 0 to 7. • IP ToS - Configure the IP ToS field: • ToS Bits - This is the Type of Service octet value in the range 00 to ff to compare against. • ToS Mask - This indicates which ToS bits are subject to comparison against the Service Type value. 5. Click CANCEL to cancel the configuration on the screen. Resets the data on the screen to the latest value of the switch. 6. Click APPLY to send the updated configuration to the switch. Configuration changes take effect immediately. IPv6 Class Configuration Use the IPv6 Class Configuration page to add a new IPv6 DiffServ class name, or to rename or delete an existing class. The page also allows you to define the criteria to associate with a DiffServ class. As packets are received, these DiffServ classes are used to prioritize packets. You can have multiple match criteria in a class. The logic is a Boolean logical-and for this criteria. After creating a Class, click the class link to the Class page. To display the page, click QoS DiffServ Advanced IPv6 Class Configuration. To configure a DiffServ class: 1. To create a new class, enter a class name, select the class type, and click ADD. This field also lists all the existing DiffServ class names, from which one can be selected. The switch supports only the Class Type value All, which means all the various match criteria defined for the class should be satisfied for a packet match. All signifies the logical AND of all the match criteria. Only when a new class is created, this field is a selector field. After class creation this becomes a non-configurable field displaying the configured class type. 2. To rename an existing class, select the check box next to the configured class, update the name, and click APPLY. 3. To remove a class, click the check box beside the Class Name, then click DELETE. 4. Click REFRESH to refresh the page with the most current data from the switch. 5. Click CANCEL to cancel the configuration on the screen and reset the data on the screen to the latest value of the switch. After creating a Class, click the class link to the Class page. 214
-
 1
1 -
2
-
3
-
4
-
5
-
6
-
7
-
8
-
9
-
10
-
11
-
12
-
13
-
14
-
15
-
16
-
17
-
18
-
19
-
20
-
21
-
22
-
23
-
24
-
25
-
26
-
27
-
28
-
29
-
30
-
31
-
32
-
33
-
34
-
35
-
36
-
37
-
38
-
39
-
40
-
41
-
42
-
43
-
44
-
45
-
46
-
47
-
48
-
49
-
50
-
51
-
52
-
53
-
54
-
55
-
56
-
57
-
58
-
59
-
60
-
61
-
62
-
63
-
64
-
65
-
66
-
67
-
68
-
69
-
70
-
71
-
72
-
73
-
74
-
75
-
76
-
77
-
78
-
79
-
80
-
81
-
82
-
83
-
84
-
85
-
86
-
87
-
88
-
89
-
90
-
91
-
92
-
93
-
94
-
95
-
96
-
97
-
98
-
99
-
100
-
101
-
102
-
103
-
104
-
105
-
106
-
107
-
108
-
109
-
110
-
111
-
112
-
113
-
114
-
115
-
116
-
117
-
118
-
119
-
120
-
121
-
122
-
123
-
124
-
125
-
126
-
127
-
128
-
129
-
130
-
131
-
132
-
133
-
134
-
135
-
136
-
137
-
138
-
139
-
140
-
141
-
142
-
143
-
144
-
145
-
146
-
147
-
148
-
149
-
150
-
151
-
152
-
153
-
154
-
155
-
156
-
157
-
158
-
159
-
160
-
161
-
162
-
163
-
164
-
165
-
166
-
167
-
168
-
169
-
170
-
171
-
172
-
173
-
174
-
175
-
176
-
177
-
178
-
179
-
180
-
181
-
182
-
183
-
184
-
185
-
186
-
187
-
188
-
189
-
190
-
191
-
192
-
193
-
194
-
195
-
196
-
197
-
198
-
199
-
200
-
201
-
202
-
203
-
204
-
205
-
206
-
207
-
208
-
 209
209 -
 210
210 -
 211
211 -
 212
212 -
 213
213 -
 214
214 -
 215
215 -
 216
216 -
 217
217 -
 218
218 -
 219
219 -
220
-
221
-
222
-
223
-
224
-
225
-
226
-
227
-
228
-
229
-
230
-
231
-
232
-
233
-
234
-
235
-
236
-
237
-
238
-
239
-
240
-
241
-
242
-
243
-
244
-
245
-
246
-
247
-
248
-
249
-
250
-
251
-
252
-
253
-
254
-
255
-
256
-
257
-
258
-
259
-
260
-
261
-
262
-
263
-
264
-
265
-
266
-
267
-
268
-
269
-
270
-
271
-
272
-
273
-
274
-
275
-
276
-
277
-
278
-
279
-
280
-
281
-
282
-
283
-
284
-
285
-
286
-
287
-
288
-
289
-
290
-
291
-
292
-
293
-
294
-
295
-
296
-
297
-
298
-
299
-
300
-
301
-
302
-
303
-
304
-
305
-
306
-
307
-
308
-
309
-
310
-
311
-
312
-
313
-
314
-
315
-
316
-
317
-
318
-
319
-
320
-
321
-
322
-
323
-
324
-
325
-
326
-
327
-
328
-
329
-
330
-
331
-
332
-
333
-
334
-
335
-
336
-
337
-
338
-
339
-
340
-
341
-
342
-
343
-
344
-
345
-
346
-
347
-
348
-
349
-
350
-
351
-
352
-
353
-
354
-
355
-
356
-
357
-
358
-
359
-
360
-
361
-
362
-
363
-
364
-
365
-
366
-
367
-
368
-
369
-
370
-
371
-
372
-
373
-
374
-
375
-
376
-
377
-
378
-
379
-
380
-
381
-
382
-
383
-
384
-
385
 |
 |
