Canon PC300 Instruction Manual - Page 101
Address Book Settings, Exporting and Importing Address Books on p. 6-18., See Registering New
 |
View all Canon PC300 manuals
Add to My Manuals
Save this manual to your list of manuals |
Page 101 highlights
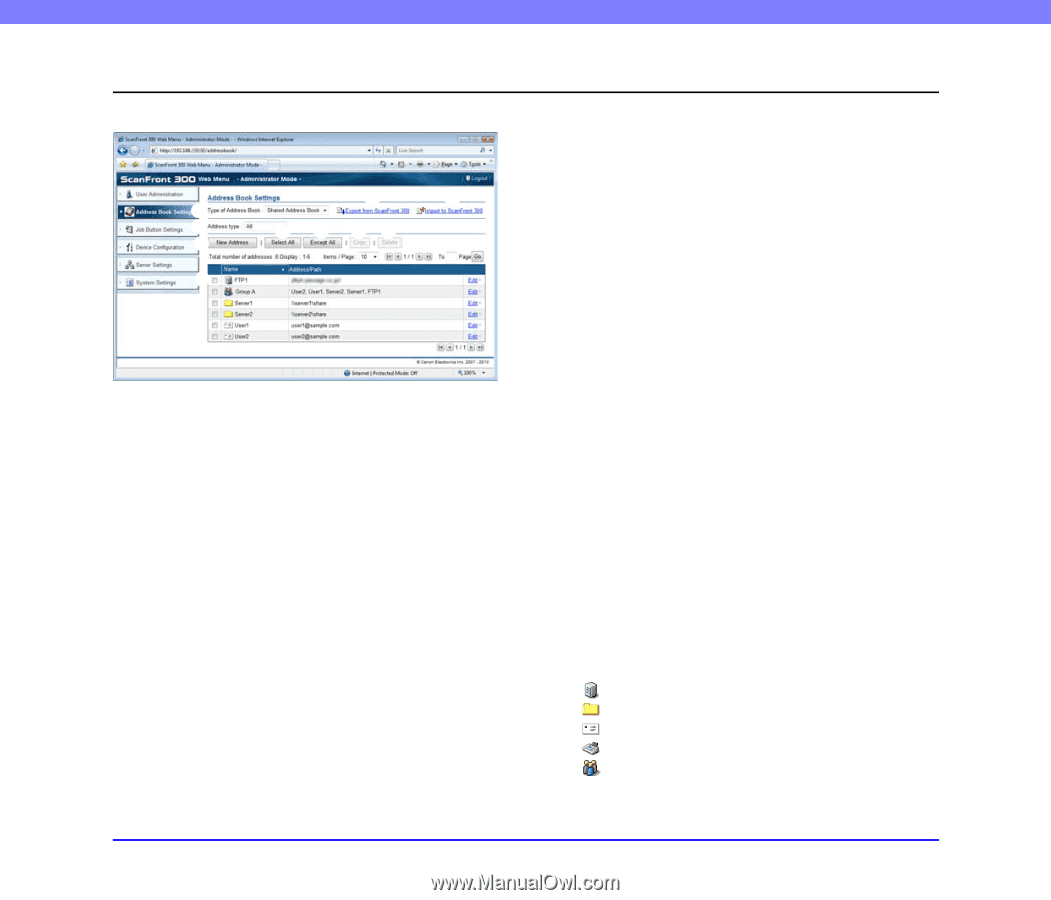
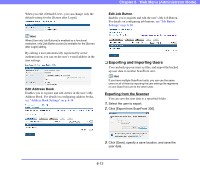
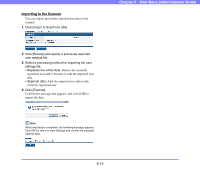
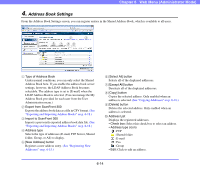
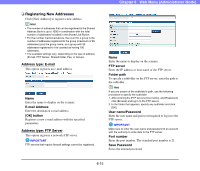
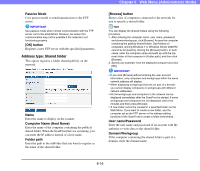
Chapter 6 Web Menu (Administrator Mode) 4. Address Book Settings From the Address Book Settings screen, you can register entries in the Shared Address Book, which is available to all users. b c a d f g hi e j a Type of Address Book Under normal conditions, you can only select the Shared Address Book here. If you enable the address book server settings, however, the LDAP Address Book becomes selectable. The address type is set to [E-mail] when the LDAP Address Book is selected. (You can manage the My Address Book provided for each user from the User Administration menu.) b Export from ScanFront 300 Exports the address book data as a file in CSV format. (See "Exporting and Importing Address Books" on p. 6-18.) c Import to ScanFront 300 Imports a previously exported address book data file. (See "Exporting and Importing Address Books" on p. 6-18.) d Address type Selects the type of addresses (E-mail, FTP Server, Shared folder, Group, or All) to display. e [New Address] button Registers a new address entry. (See "Registering New Addresses" on p. 6-15.) f [Select All] button Selects all of the displayed addresses. g [Except All] button Deselects all of the displayed addresses. h [Copy] button Copies the selected address. Only enabled when an address is selected. (See "Copying Addresses" on p. 6-18.) i [Delete] button Deletes the selected address. Only enabled when an address is selected. j Address List Displays the registered addresses. • Check box: Select this check box to select an address. • Address type (icon) : FTP : Shared folder : E-mail : Fax : Group • Edit: Click to edit an address. 6-14
-
 1
1 -
2
-
3
-
4
-
5
-
6
-
7
-
8
-
9
-
10
-
11
-
12
-
13
-
14
-
15
-
16
-
17
-
18
-
19
-
20
-
21
-
22
-
23
-
24
-
25
-
26
-
27
-
28
-
29
-
30
-
31
-
32
-
33
-
34
-
35
-
36
-
37
-
38
-
39
-
40
-
41
-
42
-
43
-
44
-
45
-
46
-
47
-
48
-
49
-
50
-
51
-
52
-
53
-
54
-
55
-
56
-
57
-
58
-
59
-
60
-
61
-
62
-
63
-
64
-
65
-
66
-
67
-
68
-
69
-
70
-
71
-
72
-
73
-
74
-
75
-
76
-
77
-
78
-
79
-
80
-
81
-
82
-
83
-
84
-
85
-
86
-
87
-
88
-
89
-
90
-
91
-
92
-
93
-
94
-
95
-
 96
96 -
 97
97 -
 98
98 -
 99
99 -
 100
100 -
 101
101 -
 102
102 -
 103
103 -
 104
104 -
 105
105 -
 106
106 -
107
-
108
-
109
-
110
-
111
-
112
-
113
-
114
-
115
-
116
-
117
-
118
-
119
-
120
-
121
-
122
-
123
-
124
-
125
-
126
-
127
-
128
-
129
-
130
-
131
-
132
-
133
-
134
-
135
-
136
-
137
-
138
-
139
-
140
-
141
-
142
-
143
-
144
-
145
-
146
-
147
-
148
-
149
-
150
-
151
-
152
-
153
-
154
-
155
-
156
-
157
-
158
-
159
-
160
-
161
-
162
-
163
-
164
-
165
-
166
-
167
-
168
-
169
-
170
-
171
-
172
-
173
-
174
-
175
-
176
-
177
-
178
-
179
-
180
-
181
-
182
-
183
-
184
-
185
-
186
-
187
-
188
-
189
-
190
-
191
-
192
-
193
 |
 |