Canon PC300 Instruction Manual - Page 144
OK] button, Select the [Enable] check box to include the file size
 |
View all Canon PC300 manuals
Add to My Manuals
Save this manual to your list of manuals |
Page 144 highlights
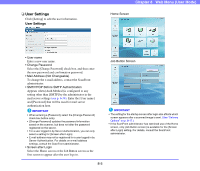
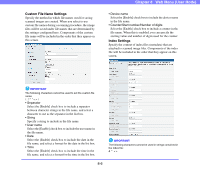
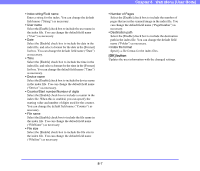
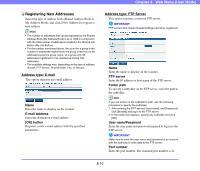
• Index string/Field name Enter a string for the index. You can change the default field name ("String") as necessary. • User name Select the [Enable] check box to include the user name in the index file. You can change the default field name ("User") as necessary. • Date Select the [Enable] check box to include the date in the index file, and select a format for the date in the [Format] list box. You can change the default field name ("Date") as necessary. • Time Select the [Enable] check box to include the time in the index file, and select a format for the time in the [Format] list box. You can change the default field name ("Time") as necessary. • Device name Select the [Enable] check box to include the device name in the index file. You can change the default field name ("Device") as necessary. • Counter/Start number/Number of digits Select the [Enable] check box to include a counter in the index file. When this is enabled, you can specify the starting value and number of digits used for the counter. You can change the default field name ("Counter") as necessary. • File name Select the [Enable] check box to include the file name in the index file. You can change the default field name ("FileName") as necessary. • File size Select the [Enable] check box to include the file size in the index file. You can change the default field name ("FileSize") as necessary. Chapter 8 Web Menu (User Mode) • Number of Pages Select the [Enable] check box to include the number of pages that are in the scanned image in the index file. You can change the default field name ("PageNumber") as necessary. • Destination path Select the [Enable] check box to include the destination path in the index file. You can change the default field name ("Folder") as necessary. • Index file format Specify a file format for the index files. [OK] button Updates the user information with the changed settings. 8-7
-
 1
1 -
2
-
3
-
4
-
5
-
6
-
7
-
8
-
9
-
10
-
11
-
12
-
13
-
14
-
15
-
16
-
17
-
18
-
19
-
20
-
21
-
22
-
23
-
24
-
25
-
26
-
27
-
28
-
29
-
30
-
31
-
32
-
33
-
34
-
35
-
36
-
37
-
38
-
39
-
40
-
41
-
42
-
43
-
44
-
45
-
46
-
47
-
48
-
49
-
50
-
51
-
52
-
53
-
54
-
55
-
56
-
57
-
58
-
59
-
60
-
61
-
62
-
63
-
64
-
65
-
66
-
67
-
68
-
69
-
70
-
71
-
72
-
73
-
74
-
75
-
76
-
77
-
78
-
79
-
80
-
81
-
82
-
83
-
84
-
85
-
86
-
87
-
88
-
89
-
90
-
91
-
92
-
93
-
94
-
95
-
96
-
97
-
98
-
99
-
100
-
101
-
102
-
103
-
104
-
105
-
106
-
107
-
108
-
109
-
110
-
111
-
112
-
113
-
114
-
115
-
116
-
117
-
118
-
119
-
120
-
121
-
122
-
123
-
124
-
125
-
126
-
127
-
128
-
129
-
130
-
131
-
132
-
133
-
134
-
135
-
136
-
137
-
138
-
 139
139 -
 140
140 -
 141
141 -
 142
142 -
 143
143 -
 144
144 -
 145
145 -
 146
146 -
 147
147 -
 148
148 -
 149
149 -
150
-
151
-
152
-
153
-
154
-
155
-
156
-
157
-
158
-
159
-
160
-
161
-
162
-
163
-
164
-
165
-
166
-
167
-
168
-
169
-
170
-
171
-
172
-
173
-
174
-
175
-
176
-
177
-
178
-
179
-
180
-
181
-
182
-
183
-
184
-
185
-
186
-
187
-
188
-
189
-
190
-
191
-
192
-
193
 |
 |