Canon PC300 Instruction Manual - Page 44
Backup/Restore Setting Information, Select Login Type, When adding another ScanFront - repair
 |
View all Canon PC300 manuals
Add to My Manuals
Save this manual to your list of manuals |
Page 44 highlights
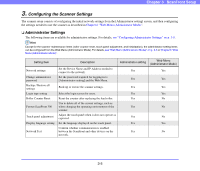
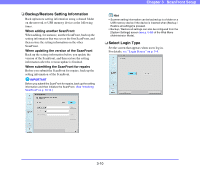
❏ Backup/Restore Setting Information Back up/restore setting information using a shared folder on the network or USB memory device at the following times. When adding another ScanFront When adding, for instance, another ScanFront, back up the setting information that was set on the first ScanFront, and then restore the setting information on the other ScanFront. When updating the version of the ScanFront Back up the setting information before you update the version of the ScanFront, and then restore the setting information after the version update is finished. When submitting the ScanFront for repairs Before you submit the ScanFront for repairs, back up the setting information of the ScanFront. IMPORTANT Before you submit the ScanFront for repairs, back up the setting information and then initialize the ScanFront. (See "Initializing ScanFront" on p. 10-13.) Chapter 3 ScanFront Setup Hint • Scanner setting information can be backed up to a folder on a USB memory device if the device is inserted when [Backup / Restore all settings] is pressed. • Backup / Restore all settings can also be configured from the [System Settings] screen (see p. 6-38) of the Web Menu (Administrator Mode). ❏ Select Login Type Set the screen that appears when users log in. For details, see "Login Screen" on p. 5-4. 3-10
-
 1
1 -
2
-
3
-
4
-
5
-
6
-
7
-
8
-
9
-
10
-
11
-
12
-
13
-
14
-
15
-
16
-
17
-
18
-
19
-
20
-
21
-
22
-
23
-
24
-
25
-
26
-
27
-
28
-
29
-
30
-
31
-
32
-
33
-
34
-
35
-
36
-
37
-
38
-
 39
39 -
 40
40 -
 41
41 -
 42
42 -
 43
43 -
 44
44 -
 45
45 -
 46
46 -
 47
47 -
 48
48 -
 49
49 -
50
-
51
-
52
-
53
-
54
-
55
-
56
-
57
-
58
-
59
-
60
-
61
-
62
-
63
-
64
-
65
-
66
-
67
-
68
-
69
-
70
-
71
-
72
-
73
-
74
-
75
-
76
-
77
-
78
-
79
-
80
-
81
-
82
-
83
-
84
-
85
-
86
-
87
-
88
-
89
-
90
-
91
-
92
-
93
-
94
-
95
-
96
-
97
-
98
-
99
-
100
-
101
-
102
-
103
-
104
-
105
-
106
-
107
-
108
-
109
-
110
-
111
-
112
-
113
-
114
-
115
-
116
-
117
-
118
-
119
-
120
-
121
-
122
-
123
-
124
-
125
-
126
-
127
-
128
-
129
-
130
-
131
-
132
-
133
-
134
-
135
-
136
-
137
-
138
-
139
-
140
-
141
-
142
-
143
-
144
-
145
-
146
-
147
-
148
-
149
-
150
-
151
-
152
-
153
-
154
-
155
-
156
-
157
-
158
-
159
-
160
-
161
-
162
-
163
-
164
-
165
-
166
-
167
-
168
-
169
-
170
-
171
-
172
-
173
-
174
-
175
-
176
-
177
-
178
-
179
-
180
-
181
-
182
-
183
-
184
-
185
-
186
-
187
-
188
-
189
-
190
-
191
-
192
-
193
 |
 |