Canon PC300 Instruction Manual - Page 128
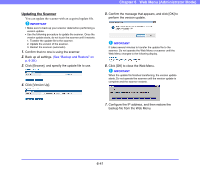
Updating the Scanner, Click [OK] to close the Web Menu.
 |
View all Canon PC300 manuals
Add to My Manuals
Save this manual to your list of manuals |
Page 128 highlights
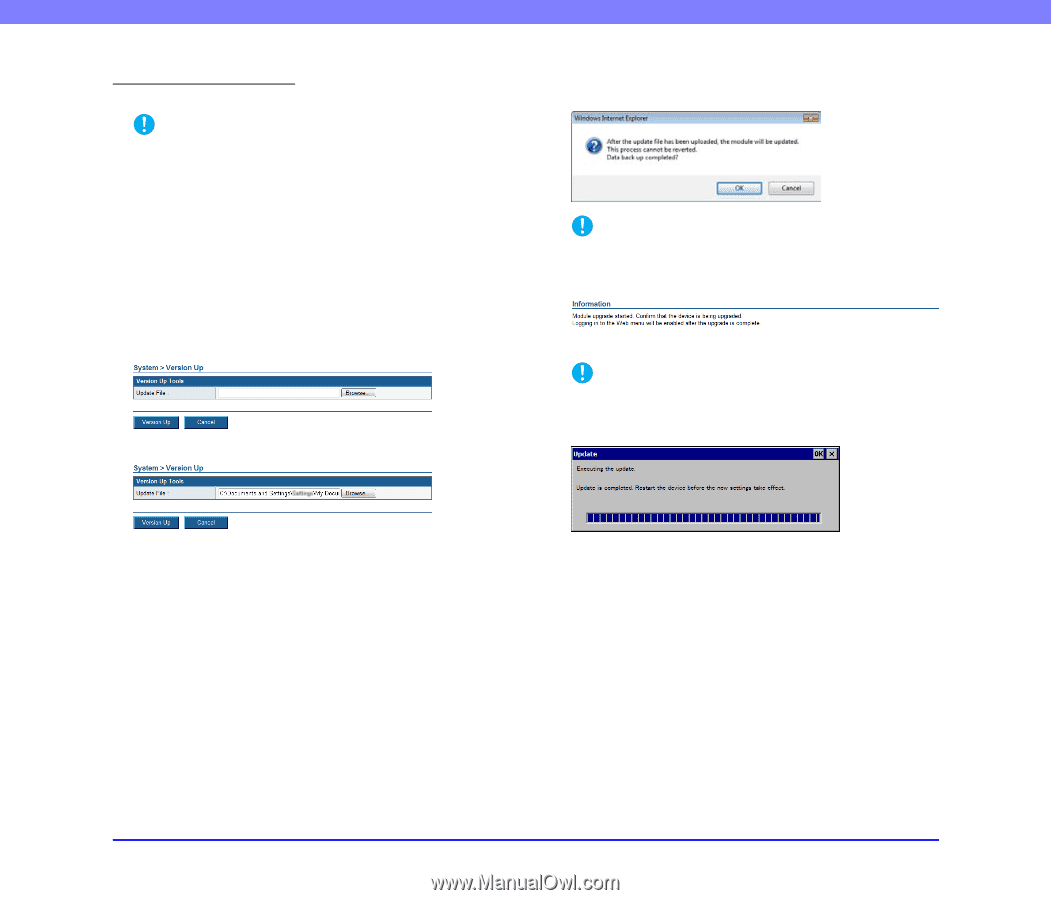
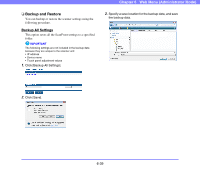
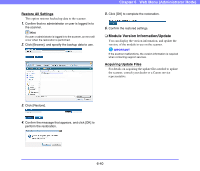
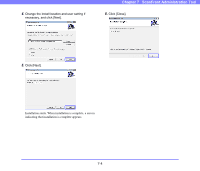
Chapter 6 Web Menu (Administrator Mode) Updating the Scanner You can update the scanner with an acquired update file. IMPORTANT • Make sure to back up your scanner data before performing a version update. • Use the following procedure to update the scanner. Once the version update starts, do not touch the scanner until it restarts. 1. Transfer the update file to the scanner. 2. Update the version of the scanner. 3. Restart the scanner (automatic). 1. Confirm that no one is using the scanner. 2. Back up all settings. (See "Backup and Restore" on p. 6-39.) 3. Click [Browse], and specify the update file to use. 4. Click [Version Up]. 5. Confirm the message that appears, and click [OK] to perform the version update. IMPORTANT It takes several minutes to transfer the update file to the scanner. Do not operate the Web Menu or scanner until the Web Menu changes to the following display. 6. Click [OK] to close the Web Menu. IMPORTANT When the update file finishes transferring, the version update starts. Do not operate the scanner until the version update is complete and the scanner restarts. 7. Configure the IP address, and then restore the backup file from the Web Menu. 6-41
-
 1
1 -
2
-
3
-
4
-
5
-
6
-
7
-
8
-
9
-
10
-
11
-
12
-
13
-
14
-
15
-
16
-
17
-
18
-
19
-
20
-
21
-
22
-
23
-
24
-
25
-
26
-
27
-
28
-
29
-
30
-
31
-
32
-
33
-
34
-
35
-
36
-
37
-
38
-
39
-
40
-
41
-
42
-
43
-
44
-
45
-
46
-
47
-
48
-
49
-
50
-
51
-
52
-
53
-
54
-
55
-
56
-
57
-
58
-
59
-
60
-
61
-
62
-
63
-
64
-
65
-
66
-
67
-
68
-
69
-
70
-
71
-
72
-
73
-
74
-
75
-
76
-
77
-
78
-
79
-
80
-
81
-
82
-
83
-
84
-
85
-
86
-
87
-
88
-
89
-
90
-
91
-
92
-
93
-
94
-
95
-
96
-
97
-
98
-
99
-
100
-
101
-
102
-
103
-
104
-
105
-
106
-
107
-
108
-
109
-
110
-
111
-
112
-
113
-
114
-
115
-
116
-
117
-
118
-
119
-
120
-
121
-
122
-
 123
123 -
 124
124 -
 125
125 -
 126
126 -
 127
127 -
 128
128 -
 129
129 -
 130
130 -
 131
131 -
 132
132 -
 133
133 -
134
-
135
-
136
-
137
-
138
-
139
-
140
-
141
-
142
-
143
-
144
-
145
-
146
-
147
-
148
-
149
-
150
-
151
-
152
-
153
-
154
-
155
-
156
-
157
-
158
-
159
-
160
-
161
-
162
-
163
-
164
-
165
-
166
-
167
-
168
-
169
-
170
-
171
-
172
-
173
-
174
-
175
-
176
-
177
-
178
-
179
-
180
-
181
-
182
-
183
-
184
-
185
-
186
-
187
-
188
-
189
-
190
-
191
-
192
-
193
 |
 |