Canon PC300 Instruction Manual - Page 43
Network Settings, Administrator Password, setting] and the Web Menu Administrator Mode.
 |
View all Canon PC300 manuals
Add to My Manuals
Save this manual to your list of manuals |
Page 43 highlights
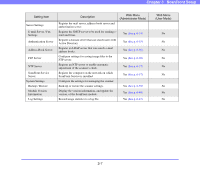
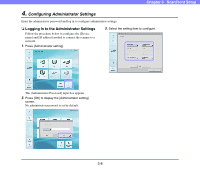
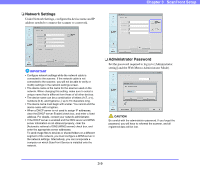
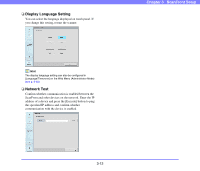
❏ Network Settings Under Network Settings, configure the device name and IP address needed to connect the scanner to a network. Chapter 3 ScanFront Setup IMPORTANT • Configure network settings while the network cable is connected to the scanner. If the network cable is not connected to the scanner, you will not be able to verify or modify settings in the network settings screen. • The device name is the name for the scanner used on the network. When changing this setting, make sure to select a unique name that is different from those of all other devices. • The device name can be a combination of letters (A-Z, a-z), numbers (0-9), and hyphens (-) up to 15 characters long. • The device name must begin with a letter. You cannot end the device name with a hyphen. • When a DHCP server is not used to assign IP addresses, clear the [DHCP server Enable] check box, and enter a fixed address. For details, contact your network administrator. • If the DHCP server is enabled and the DNS server and WINS server information is not obtained properly, clear the [Automatic retrieval of DNS (WINS) server] check box, and enter the appropriate server addresses. To send image files to devices or shared folders on a different segment of the network, you must configure a WINS server in the network settings. Alternatively, you can incorporate a computer on which ScanFront Service is installed onto the network. ❏ Administrator Password Set the password required to log in to [Administrator setting] and the Web Menu (Administrator Mode). CAUTION Be careful with the administrator password. If you forget the password, you will have to reformat the scanner, and all registered data will be lost. 3-9
-
 1
1 -
2
-
3
-
4
-
5
-
6
-
7
-
8
-
9
-
10
-
11
-
12
-
13
-
14
-
15
-
16
-
17
-
18
-
19
-
20
-
21
-
22
-
23
-
24
-
25
-
26
-
27
-
28
-
29
-
30
-
31
-
32
-
33
-
34
-
35
-
36
-
37
-
 38
38 -
 39
39 -
 40
40 -
 41
41 -
 42
42 -
 43
43 -
 44
44 -
 45
45 -
 46
46 -
 47
47 -
 48
48 -
49
-
50
-
51
-
52
-
53
-
54
-
55
-
56
-
57
-
58
-
59
-
60
-
61
-
62
-
63
-
64
-
65
-
66
-
67
-
68
-
69
-
70
-
71
-
72
-
73
-
74
-
75
-
76
-
77
-
78
-
79
-
80
-
81
-
82
-
83
-
84
-
85
-
86
-
87
-
88
-
89
-
90
-
91
-
92
-
93
-
94
-
95
-
96
-
97
-
98
-
99
-
100
-
101
-
102
-
103
-
104
-
105
-
106
-
107
-
108
-
109
-
110
-
111
-
112
-
113
-
114
-
115
-
116
-
117
-
118
-
119
-
120
-
121
-
122
-
123
-
124
-
125
-
126
-
127
-
128
-
129
-
130
-
131
-
132
-
133
-
134
-
135
-
136
-
137
-
138
-
139
-
140
-
141
-
142
-
143
-
144
-
145
-
146
-
147
-
148
-
149
-
150
-
151
-
152
-
153
-
154
-
155
-
156
-
157
-
158
-
159
-
160
-
161
-
162
-
163
-
164
-
165
-
166
-
167
-
168
-
169
-
170
-
171
-
172
-
173
-
174
-
175
-
176
-
177
-
178
-
179
-
180
-
181
-
182
-
183
-
184
-
185
-
186
-
187
-
188
-
189
-
190
-
191
-
192
-
193
 |
 |