Canon PowerShot SD700 IS ImageBrowser 5.6 Software User Guide - Page 101
Layout and Print 1/7
 |
View all Canon PowerShot SD700 IS manuals
Add to My Manuals
Save this manual to your list of manuals |
Page 101 highlights
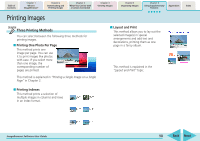
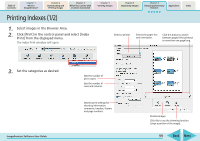
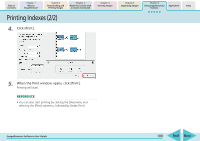
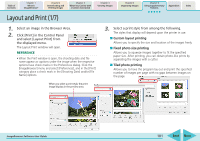
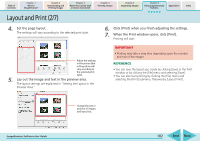
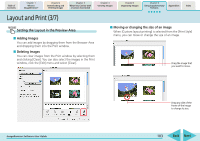
Table of Contents Chapter 1 What is ImageBrowser? Chapter 2 Downloading and Printing Images Chapter 3 What You Can Do with a Camera Connected Chapter 4 Viewing Images Chapter 5 Organizing Images Chapter 6 Using Supplementary Features Appendices Index Layout and Print (1/7) 1. Select an image in the Browser Area. 2. Click [Print] in the Control Panel and select [Layout Print] from the displayed menu. The Layout Print window will open. REFERENCE • When the Print window is open, the shooting date and file name appear as captions under the image when the respective options have check marks in the Preferences dialog. Click the [ImageBrowser] menu and select [Preferences], and in the [Print] category place a check mark in the [Shooting Date] and/or [File Name] options. When you select a print style, the print image displays in the preview area. 3. Select a print style from among the following. The styles that display will depend upon the printer in use. ■ Custom layout printing Allows you to specify the size and location of the images freely. ■ Fixed photo size printing Allows you to squeeze images together to fit the specified paper size. After printing, you can obtain photo-like prints by separating the images with a cutter. ■ Tiled photo printing Allows you to have the program lay out and print the specified number of images per page with no gaps between images on the page. ImageBrowser Software User Guide 101 Back Next
-
 1
1 -
2
-
3
-
4
-
5
-
6
-
7
-
8
-
9
-
10
-
11
-
12
-
13
-
14
-
15
-
16
-
17
-
18
-
19
-
20
-
21
-
22
-
23
-
24
-
25
-
26
-
27
-
28
-
29
-
30
-
31
-
32
-
33
-
34
-
35
-
36
-
37
-
38
-
39
-
40
-
41
-
42
-
43
-
44
-
45
-
46
-
47
-
48
-
49
-
50
-
51
-
52
-
53
-
54
-
55
-
56
-
57
-
58
-
59
-
60
-
61
-
62
-
63
-
64
-
65
-
66
-
67
-
68
-
69
-
70
-
71
-
72
-
73
-
74
-
75
-
76
-
77
-
78
-
79
-
80
-
81
-
82
-
83
-
84
-
85
-
86
-
87
-
88
-
89
-
90
-
91
-
92
-
93
-
94
-
95
-
 96
96 -
 97
97 -
 98
98 -
 99
99 -
 100
100 -
 101
101 -
 102
102 -
 103
103 -
 104
104 -
 105
105 -
 106
106 -
107
-
108
-
109
-
110
-
111
-
112
-
113
-
114
-
115
-
116
-
117
-
118
-
119
-
120
-
121
-
122
-
123
-
124
-
125
-
126
-
127
-
128
-
129
-
130
-
131
-
132
 |
 |
