Canon PowerShot SD700 IS ImageBrowser 5.6 Software User Guide - Page 102
Layout and Print 2/7
 |
View all Canon PowerShot SD700 IS manuals
Add to My Manuals
Save this manual to your list of manuals |
Page 102 highlights
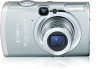
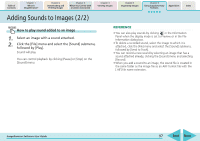
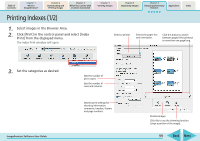
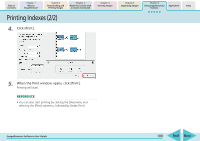
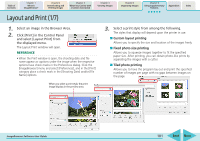
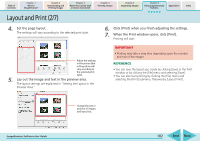
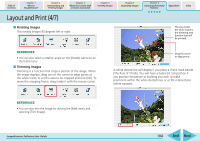
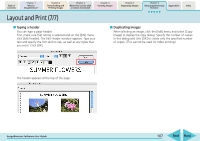
Table of Contents Chapter 1 What is ImageBrowser? Chapter 2 Downloading and Printing Images Chapter 3 What You Can Do with a Camera Connected Chapter 4 Viewing Images Chapter 5 Organizing Images Chapter 6 Using Supplementary Features Appendices Index Layout and Print (2/7) 4. Set the page layout. The settings will vary according to the selected print style. 6. Click [Print] when you finish adjusting the settings. 7. When the Print window opens, click [Print]. Printing will start. Adjust the settings in this section (the setting values will vary according to the selected print style). 5. Lay out the image and text in the preview area. The layout settings are explained in "Setting the Layout in the Preview Area." IMPORTANT • Printing may take a long time depending upon the number and size of the images. REFERENCE • You can save the layout you create by clicking [Save] in the Print window or by clicking the [File] menu and selecting [Save]. • You can also start printing by clicking the [File] menu and selecting the [Print] submenu, followed by [Layout Print]. Change the size or position of images and input text. ImageBrowser Software User Guide 102 Back Next
-
 1
1 -
2
-
3
-
4
-
5
-
6
-
7
-
8
-
9
-
10
-
11
-
12
-
13
-
14
-
15
-
16
-
17
-
18
-
19
-
20
-
21
-
22
-
23
-
24
-
25
-
26
-
27
-
28
-
29
-
30
-
31
-
32
-
33
-
34
-
35
-
36
-
37
-
38
-
39
-
40
-
41
-
42
-
43
-
44
-
45
-
46
-
47
-
48
-
49
-
50
-
51
-
52
-
53
-
54
-
55
-
56
-
57
-
58
-
59
-
60
-
61
-
62
-
63
-
64
-
65
-
66
-
67
-
68
-
69
-
70
-
71
-
72
-
73
-
74
-
75
-
76
-
77
-
78
-
79
-
80
-
81
-
82
-
83
-
84
-
85
-
86
-
87
-
88
-
89
-
90
-
91
-
92
-
93
-
94
-
95
-
96
-
 97
97 -
 98
98 -
 99
99 -
 100
100 -
 101
101 -
 102
102 -
 103
103 -
 104
104 -
 105
105 -
 106
106 -
 107
107 -
108
-
109
-
110
-
111
-
112
-
113
-
114
-
115
-
116
-
117
-
118
-
119
-
120
-
121
-
122
-
123
-
124
-
125
-
126
-
127
-
128
-
129
-
130
-
131
-
132
 |
 |