Canon PowerShot SD700 IS ImageBrowser 5.6 Software User Guide - Page 122
Converting RAW Images 5/5
 |
View all Canon PowerShot SD700 IS manuals
Add to My Manuals
Save this manual to your list of manuals |
Page 122 highlights
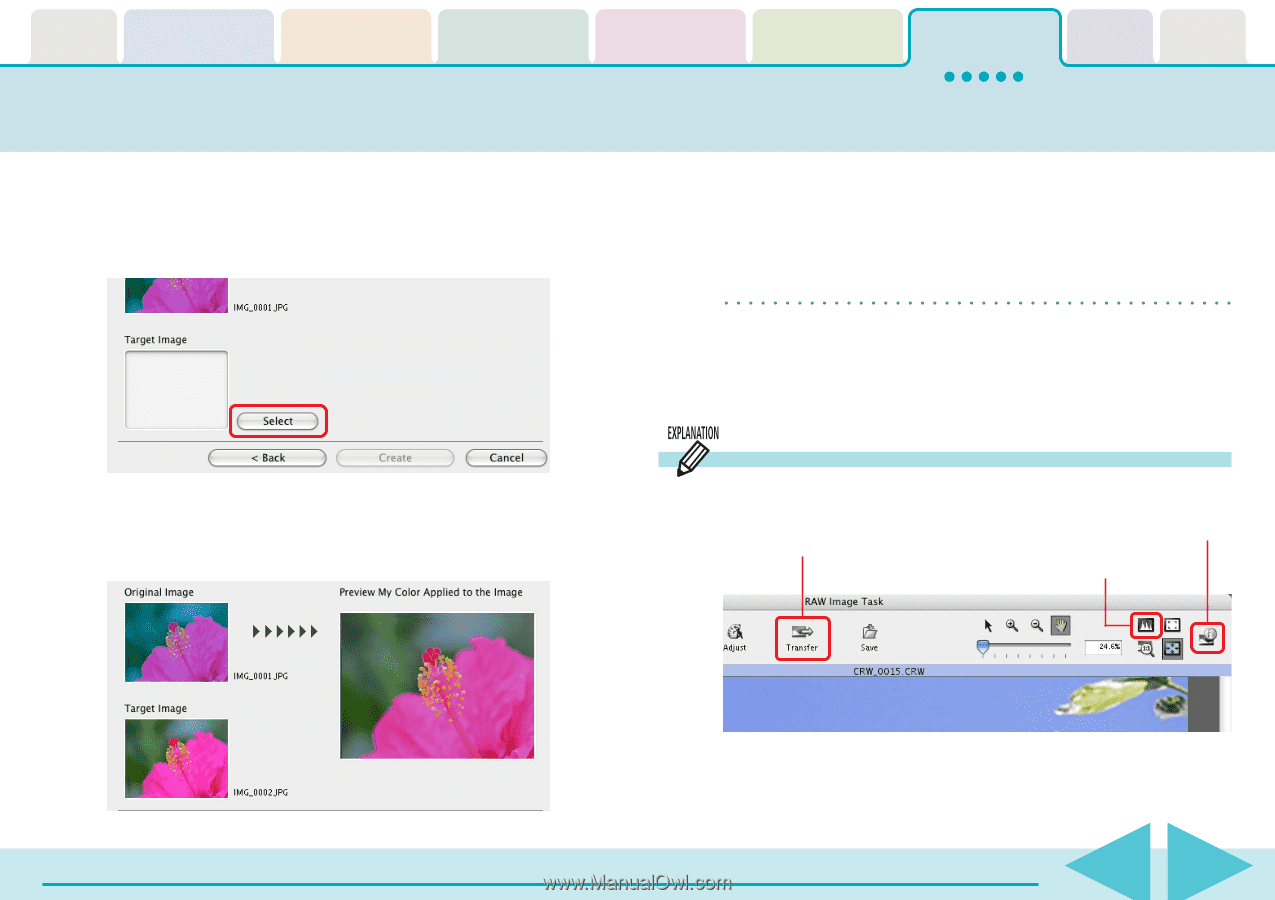
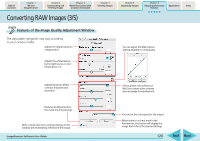
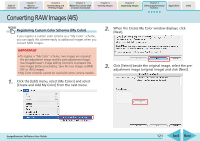
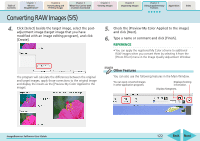
Table of Contents Chapter 1 What is ImageBrowser? Chapter 2 Downloading and Printing Images Chapter 3 What You Can Do with a Camera Connected Chapter 4 Viewing Images Chapter 5 Organizing Images Chapter 6 Using Supplementary Features Appendices Index Converting RAW Images (5/5) 4. Click [Select] beside the target image, select the postadjustment image (target image that you have modified with an image editing program), and click [Create]. 5. Check the [Preview My Color Applied to the image] and click [Next]. 6. Type a name or comment and click [Finish]. REFERENCE • You can apply the registered My Color scheme to additional RAW images when you convert them by selecting it from the [Photo Effect] menu in the Image Quality Adjustment Window. The program will calculate the differences between the original and target images, apply those corrections to the original image and display the results as the [Preview My Color Applied to the image]. Other Features You can also use the following features in the Main Window. You can open converted images in other application programs. Displays shooting information. Displays histograms. ImageBrowser Software User Guide 122 Back Next
-
 1
1 -
2
-
3
-
4
-
5
-
6
-
7
-
8
-
9
-
10
-
11
-
12
-
13
-
14
-
15
-
16
-
17
-
18
-
19
-
20
-
21
-
22
-
23
-
24
-
25
-
26
-
27
-
28
-
29
-
30
-
31
-
32
-
33
-
34
-
35
-
36
-
37
-
38
-
39
-
40
-
41
-
42
-
43
-
44
-
45
-
46
-
47
-
48
-
49
-
50
-
51
-
52
-
53
-
54
-
55
-
56
-
57
-
58
-
59
-
60
-
61
-
62
-
63
-
64
-
65
-
66
-
67
-
68
-
69
-
70
-
71
-
72
-
73
-
74
-
75
-
76
-
77
-
78
-
79
-
80
-
81
-
82
-
83
-
84
-
85
-
86
-
87
-
88
-
89
-
90
-
91
-
92
-
93
-
94
-
95
-
96
-
97
-
98
-
99
-
100
-
101
-
102
-
103
-
104
-
105
-
106
-
107
-
108
-
109
-
110
-
111
-
112
-
113
-
114
-
115
-
116
-
 117
117 -
 118
118 -
 119
119 -
 120
120 -
 121
121 -
 122
122 -
 123
123 -
 124
124 -
 125
125 -
 126
126 -
 127
127 -
128
-
129
-
130
-
131
-
132
 |
 |